How I beat max dread Clava Cairn and advice on how you can do it too.
Introduction

Dread Harvest is the achievement you get for clearing Clava Cairn on max dread. This guide lays out one way to do it.
For those new to the game, or partway through unlocking things, I do not recommend attempting this until you have unlocked most cantrips and hit level thirty. As you’ll see in the cantrips section, i have unlocked all but two of the cantrips.
For advice on how to get to level thirty and unlock most of the cantrips – experiment! Test to see what works and what doesn’t for your playstyle. However, as I’ll get into later, the cantrip Seals Are Exits is probably one of the most helpful cantrips there is, and I highly recommend using it in higher dread runs, even at the cost of some score.
Also, I recommend setting a chunk of time aside for each attempt of this achievement – as of writing this, I have found that sometimes suspending and resuming a run will set your score multiplier to 1. No idea why this happens, haven’t been able to replicate it reliably, hopefully something that gets patched.
Also — this is my first time writing a guide. If you have suggestions for how to improve this guide, or things that I may have neglected to mention, please do say something! I just hope this helps Someone.
Now, let’s get into it!
Cantrips
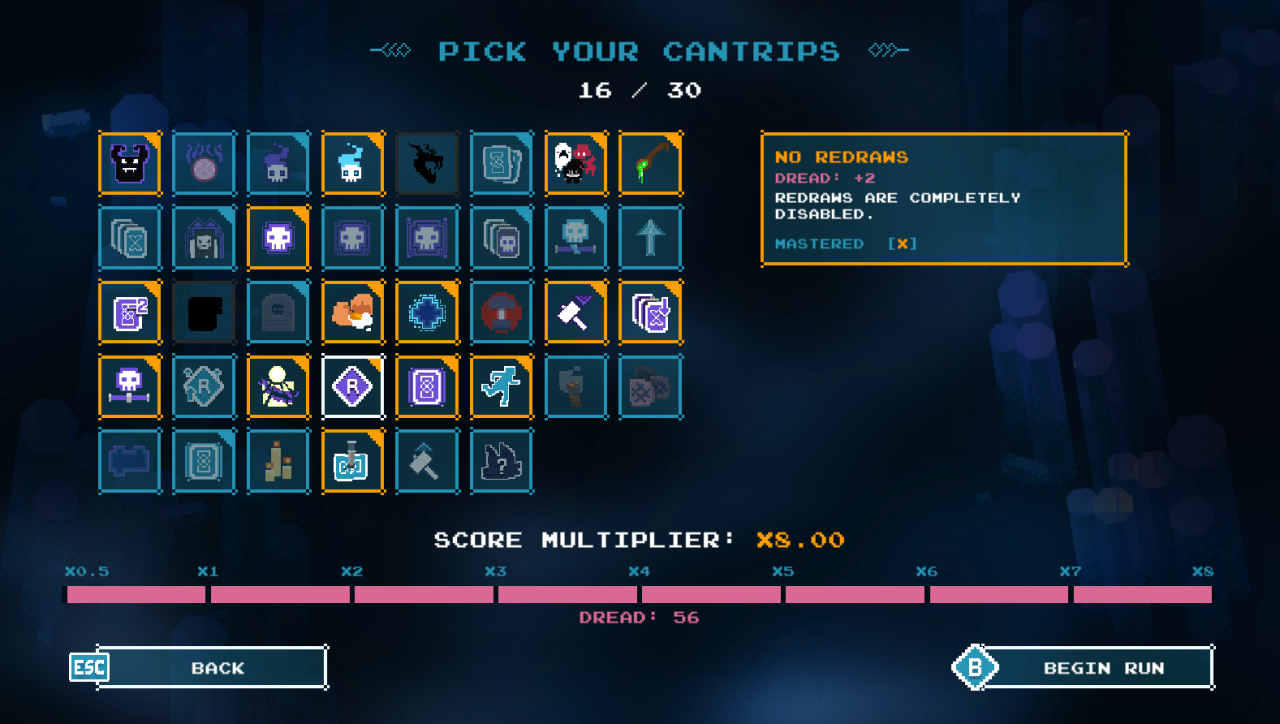
+6 Boss Torch — Torch keeps burning on boss fight.
This is a risky one, but for +6 Dread, and something that you don’t have to deal with until the end of the run, it is largely worth it. To mitigate this, take Campfires and Tallow Storage when possible.
-2 Corruption Bar Size Up — Corruption bar size +25%.
This brings you up to a max corruption of 40, up from 32. This essentially means that you can die two more times before losing the run, because each death ends the night (+1 corruption) and gives you +3 corruption for the death. This is not wholly necessary, and if you don’t take this then you can drop More Curses or No Redraws, but I’ve found that this little extra bit of buffer makes up for having to take one of those two.
+6 Double Enemies — Twice as many enemies can spawn at once.
This is an easier one to deal with if you keep your damage and attack speed up. Avoid getting caught in corners. Can also be helpful, because more enemies means more Glimour, which you will need with some of the other Cantrips.
+4 Double Upgrade Cost — Doubles Hen Wife relic cost.
This is essentially a freebie, since we are also taking Hen Wife Holiday.
+2 Enemy Level + — Enemy level is increased by 2.
If you’ve played later caverns than Clava Cairn, you’ve already dealt with enemies this strong. Honestly, Enemy Level ++ may also be doable here, but in my testing I found that that makes Double Enemies much harder to deal with. Enemies Move Faster is also difficult to deal with when taking Double Enemies, so the compromise is to increase just enemy level by 2.
+4 Hand Size Down — Decrease hand size by 2.
While playing, I assumed this meant that maximum hand size was decreased by 2. I’m pretty sure that’s not the case. I did not end up mitigating this much, but ways to get around it would be various card draw ups, such as Fishing Pool and Thief’s Dexterity. Again, I got through my attempt at this without using those things, for reasons that will become clear shortly.
+6 Hen Wife Holiday — The Hen Wife will not appear.
This poses Some difficulty, but it does make Double Upgrade Cost essentially a free +4 Dread. Superior Tools is a great pickup from Wulver if you can grab it — honestly, grabbing two is not a bad idea. I don’t recommend getting more than two, for reasons I’ll get into in a moment.
+4 Invisible Fog Rooms — Fog rooms are completely invisible until you build within two spaces of them.
This one can be tricky if you have not practiced it. As with most of these cantrips, I do suggest doing a run or two with fewer than All These to get used to them. Knowing how to build your dungeon is key for this one. Assume there is a fog room in any space that is out of your line of sight, and build accordingly. As such, larger rooms are risky to take — I especially suggest avoiding the Sewers and Crossroads unless you know exactly where you’re going to place them, as they have very few doors for the amount of space they take up.
+4 Max BP — Hard cap of 2 build points per night.
Honestly, I think this one should give more Dread than this, because it is easily one of the trickiest ones to work around. Hard cap of 2 means Iron Forge is useless, and Library is unplayable. Avoid those two cards when playing with this. Some charms, like Scotch Egg, help a lot with this.
+5 Max Deck Size — Your deck cannot be more than 10 cards. When one is added past that, another is randomly purged.
This is essentially another freebie due to Purge Plague, which we will also be taking. This is only ever really a concern very close to the start of the run, or if you take too many Seal Bound cards.
+ 2 More Curses — One more curse is on the Corruption bar.
Not too big a deal if you have decent corruption management and don’t get too unlucky with the curses. Cleanse and Sanctuary are your friends here.
+6 No Boons — Claiming a seal will not give you a boon card.
Another one that is less of a big deal than it seems. Many of Wulver’s cards can stand in for boons. The only one that I missed was Smite (big damage buff) but given that getting it is random, it’s not too huge a loss.
+2 No Redraws — Redraws are completely disabled.
Given that most of the game you are going to have maybe 5-7 cards in your deck and you draw 3 of them, this is not too big a deal.
+8 Purge Plauge — All cards have purge.
This is a tricky one, but there are a couple of tricks for dealing with it, and a couple reasons why I took it. For starters, it makes Max Deck Size functionally free, which means taking this gives you a total of +13 Dread, which is a pretty decent chunk. It also makes some cards functionally free to remove from your deck — most notably Blood Ritual, a zero cost injury that you get from placing an Altar, and Healing Ivy. Unfortunately, as of writing this, Healing Ivy doesn’t seem to work correctly — it duplicates itself into your discard pile, and the one played is purged from your deck, but it doesn’t actually give you any healing. However, playing it still reduces the cost of Sanctuary, so it isn’t completely useless.
In order to deal with this, you are going to want to be picking up cards very frequently, and essentially cycling through your deck quickly. This is another reason why we can take Hen Wife Holiday — because cards aren’t sticking around long, they don’t benefit much from being upgraded.
Ideally you want to be picking up two (sometimes three) cards a night. Glimour Chasm helps a lot with this mid to late run, as it increases Glimour dropped by all enemies once it is on the board.
-5 Seals Are Exits — Claimed seals also work as exit portals.
Yes, it is negative Dread, but this gives you so, so much more survivability that it is absolutely worth it. You can avoid the seal breaking horde. You can mitigate low torch from few campfires. It is essentially a “get out of tight spot free” cantrip. If you don’t take this, you can get rid of some other tricky things, but good gods, at what cost.
+4 Twisted Favour — Take 10% damage when obtaining a favor.
This is, especially early game, somewhat tricky to deal with. Later on, once you’ve established some healing, it’s not too big a deal.
This gives you the exact total you need for x8 mult — 56 Dread. I’ve tried a couple other combinations, but these ended up being the winning Cantrips, so it’s what I’m going with here.
Weapons and Training Room Upgrades
As for what weapons to use, Sword is a decent all rounder, especially if you can get attack size up, but Scythe is my personal favorite. I did win with Sword, but Scythe would have made things much easier.
As for secondary weapon, you need range for the boss fight. I won with Crossbow, which is usually somewhat inaccurate, but the speed of the boss means its scattering effect is more effective than the single shot of the Bow. Avoid the Brooch, as the Brooch requires you to be close to the boss which is difficult and dangerous with low torch. Firebombs are unreliable and weak on a boss that moves so much.
Attack speed is first priority, followed by Knockback and Attack Size. Once those are mostly exhausted, Crit Chance and then Crit Damage can be picked up.
Charms
I’m joking, but honestly, Bloody Fang is probably the best charm in the game. Over my 40 odd hours of playing, it has gotten me out of situations that should have killed me more times than i can count.
There are three charms you should seek out from the Toadstool Patch, and they are as follows:
Bloody Fang — Earn 10% of damage dealt back as health.
Perhaps somewhat self-explanatorily good. The more damage you deal, the more you heal. Synergizes best with slightly higher damage secondary weapons, but even Crossbow can heal you with enough damage buffs, and the scattershot of Crossbow with the healing of Bloody Fang can save you in even incredibly perilous situations.
Scotch Egg — First card played each night costs -1 BP.
A huge help when your max BP is 2. It makes a lot of things much easier to play.
Sundial — Deal 50% more damage when below 25% torch.
Really helpful for the boss fight, when you are likey going to be operating on a dwindling torch.
I don’t recommend taking Lizard’s Tail UNLESS you are playing without seals as exit portals. In which case Lizard’s Tail is pretty vital.
There are many good echo charms, but I won’t get into them here unless someone asks or something, just because they are extremely unreliable compared to the Toadstool Patch charms.
Cards and Placement Strategy
First though, an interesting way that Purge Interacts with Seal Bound — if a card is Seal Bound, it is not purged from your deck on use. Maybe they’ll change this later. For now, it makes Seal Bound cards very powerful, but you only want a couple of each, tops, because otherwise they’ll flood your deck every time you break a seal.
Here are some cards to avoid:
- Bee Skeps — too large and too few doors for too little a bonus.
- Crossroads — only good when upgraded. Too big a risk.
- Faery Spring — You don’t need that many relics without Hen Wife, and don’t need an exit guide when seals are exits.
- Farmland — you will not have enough corridors to make this useful, typically
- Fountain — as far as I can tell, luck doesn’t do ♥♥♥♥, and it is a huge footprint for two doors.
- Iron Forge — as previously mentioned, useless.
- Library — can’t have enough BP to play it. Functionally Useless.
- Obelisk — only situationally useful. A risky card.
- Seer’s Hut — Very useful when you are not playing with invisible fog rooms and very few BP. Not useful during this challenge.
- Sewers — too big for this size map, too likely to block off undiscovered fog rooms.
- Statue — I have never had this do something for me.
The majority of other cards have some sort of utility, except I suppose for Poison Swamp and the bog that reduces your movement speed.
As for strategy in placing the rooms, you want to be creating large and small circles, essentially, while keeping as many doors facing the unknown as possible. Try not to close off any spaces larger than three squares tops. I don’t know how to describe my strategy much better than this.
Good cards:
- Altar — gives you a little bit of health at the end of the night at the cost of an injury that is easily removes with the All Cards Purge cantrip.
- Upgraded Armoury or Arsenal — needed for a secondary weapon, upgraded Armoury also gives a permanent damage bonus that can get BIG.
- Banquet Hall — One or two are very helpful, particularly when placed near exit seals. A full heal right before an escape can turn the tide.
- Blessed Light — Reduces torch burn rate. Helpful when you don’t have Tallow Storage or many Campfires.
- Campfire — Useful to pick up since you only start with a couple. Necessary especially late game.
- Cleanse — Incredibly useful for managing corruption, especially as a Seal Bound card.
- Faded Grove — Similar to Campfire. The game expects you to place a lot of those two cards, so picking them up whenever you can is very useful.
- Glimour Chasm — Necessary to keep up with Glimour demands. Only need a couple, though.
- Observatory — Clears fog from a fog room, including fog rooms that are still hidden. Incredibly useful in that respect. I suggest not using them unless you are currently searching for a seal.
- Sanctuary — The cost decreases, and stays decreased, every time you play another card with it in your hand. -5 corruption is huge, enough to make up for the fact that it isn’t super useful as a room.
- Spider Nest — So many doors! Great for scouting or making loops.
- Tallow Storage — Helpful for the torch running during the boss fight.
- Toadstool Patch — Don’t take too many, because it will return every time you break a seal. Taking one early, and more after you have broken all the seals, in an attempt to get Bloody Fang is good, though.
Again, other cards have situational utility, but this is what I’ve found works for me.