Tells you where you have to look for those elusive research opportunities
Introduction
This guide aims to provide the knowledge of where to look for those.
Beware: There are some slight story spoilers in this guide. I kept them brief, but still.
A similar guide for Starcom: Nexus was nearly the first I ever made, so this is a bit of an anniversary!
Unlike the first guide, the order is now more or less top-to-bottom with some exceptions instead of when you’d likely find it.
The locations given may be off by as much as 1 in either direction due to inherent randomness in the game.
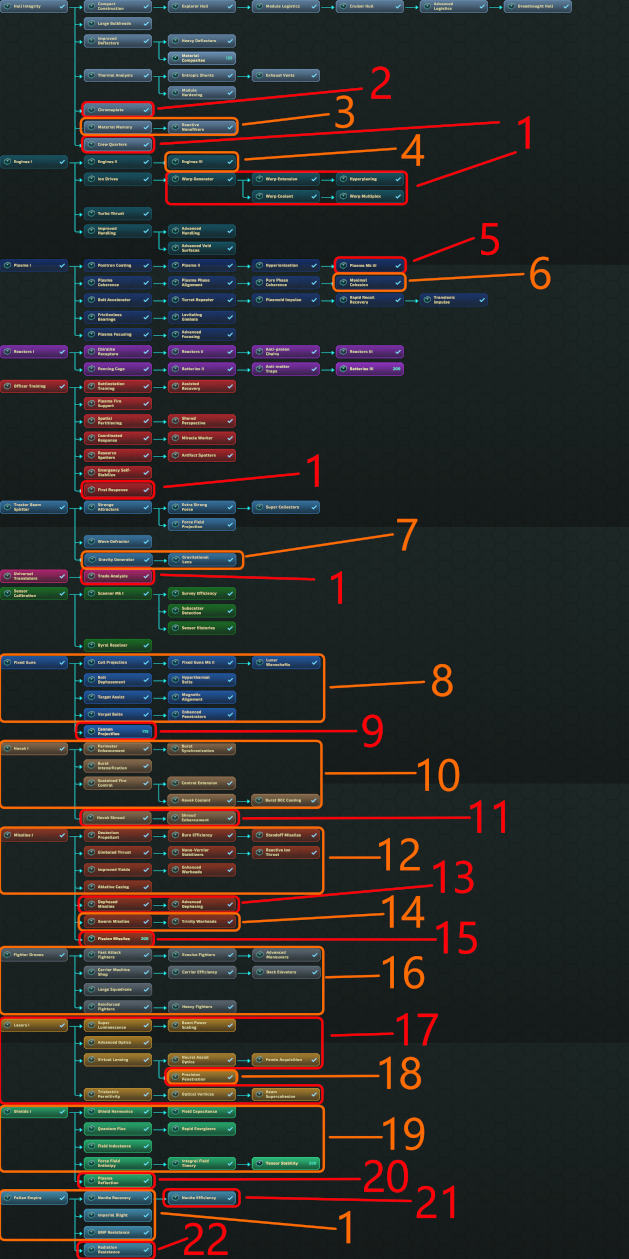
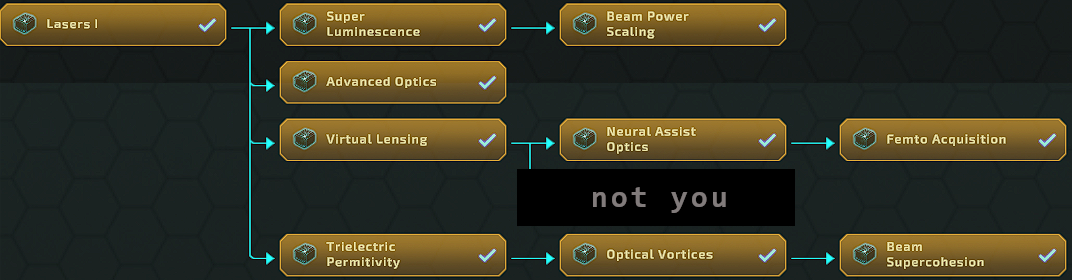
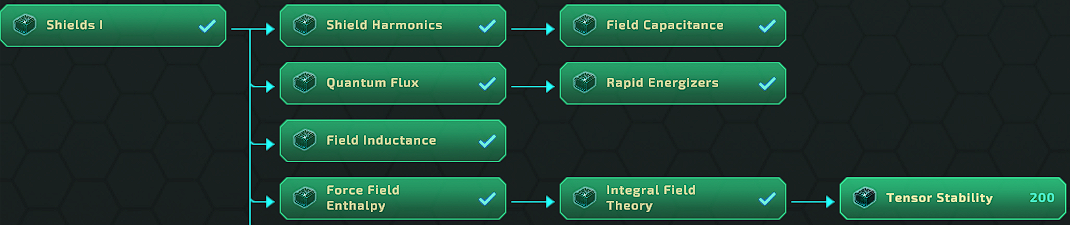
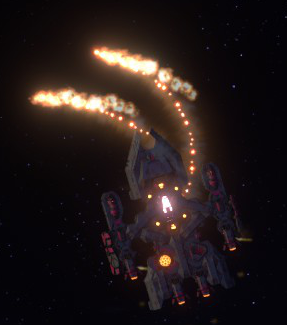
As most people are probably curious about one specific research they’re missing, refer to the following image. The number corresponds to the chapter in this guide.
If you see this guide anywhere else than on steam or doublehelix, it was stolen. Do not use the site you are on, they’re dirty thieves.
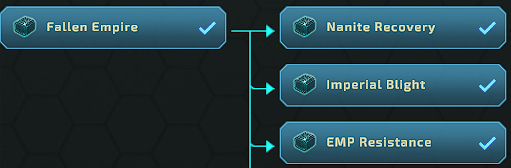
1. Automatic/Story research
Listed from top to bottom, not in order of unlocking.
![]()
What it does:
Lets you carry more support crew that speed up repairs.
How to get it:
Main story, complete mission “The Aletheia”

What it does:
Lets you teleport short distances for enormous energy. Seeing as you only get this very late in the game where you’re almost done exploring, and seeing how it takes up 7 hexes, more than any other part, it’s useless.
How to get it
Late in the game, after the chariot just teleported (in the main mission “Redacted”), return to Celaeno and talk to Milton.

What it does:
Chance of preventing support crew being critically injured
How to get it:
Main story, complete mission “The Aletheia”

What it does:
Shows you how good of a deal trades from traders are.
How to get it:
Automatically unlocked after some time.
What it does:
Nothing, just gives you access to the research beyond it
How to get it:
Main story, complete mission “The Aletheia”
What it does:
Get more nanite drops (a bit of repair) from destroyed ships.
How to get it:
Get 3? samples of nanite superfluid. They don’t land in your cargo bay but are automatically picked up.
Dropped by random enemy ships. First time you get a message from Gliese “This programmable nanite-superfluid..”. After that only a special sound effect.
Under “auto” because you’ll probably collect 100 of those before you know it.
What it does:
Nothing, just lets you complete a side story
How to get it:
At around 31.3 x 10.3 you find the Aquarian colony. They have a plant problem which spawns the mission “Imperial Flora”. There is a planetary anomaly at a random location, “Flora Blight”, which gives you the artifact “Imperial Flora Blight”. It seems to be added to the pool of randomly findable anomalies as soon as this mission is started. Once you have it, go to a Guild Trader and buy information about the imperial flora and you can research the blight.
What it does:
The EMP rockets don’t quite empty all of your energy reserves any more.
How to get it
Last research you can unlock.
Near the end you get a main mission “The lost Goryr”. Finish it and talk to the Goryr at the base again.
The only way you can miss it is if you just let the Goryr hanging as soon as you spotted the collapsar.
2. Chromaplate

What it does:
It lets you change the color of your ship. Purely aesthetic.
How to get it
Get the artifact “Iridescent Globe”, found on a planet (Anomaly: Hidden Launch Pad, around 3.3 x 3.7) near where you find the Aletheia, south west of “Polyhedral Artifact”.
After analyzing it, Talk to Milton on the Celaeno.
3. Material Memory and Reactive Nanofibers

What it does:
Speed up repairs by 7% and then an additional 10%
How to get it
Around the massive derelict at around 25.9 x -1.7 float some black boxes. Shooting them gets Gliese to remark that they’re self-healing. A short time later he calls in again and tells you the research is ready. Note, the “Abstract shapes” artifact in one of the boxes has nothing to do with it.

4. Engines III

What it does:
Bigger and better engines. Humongous.
How to get it
You need the artifact “Advanced Engine Component”. After mission “Devout Message” (the ambush) stronger devout appear. This has a chance to drop from stronger devout with the big engines, like the Devout Warper.
5. Plasma III
What it does:
An even stronger plasma gun.
How to get it
You need the artifact “Burnt Capacitor”. After mission “Devout Message” (the ambush) stronger devout appear. This has a chance to drop from stronger devout with plasma weapons, like the Gerarai.
6. Maximal Cohesion

What it does:
Further increases plasma range.
How to get it
Easy, buy “Plasma Cohesion Adapter” from Wiskamug, who has it in stock at the start of the game, and analyze it.
7. Gravity Generator

What it does:
Lets you push stuff. Pretty useless except for one story related use.
How to get it
After you reach the southern region (mission “devout message” or just braving the void disrupting nebula barrier at a snails pace) survey of the “Gravity Lab” anomaly (around -31 x -39). Gliese will remark something about a physics simulation.
Afterwards, talk to Milton on the Celaeno.
8. Fixed Guns
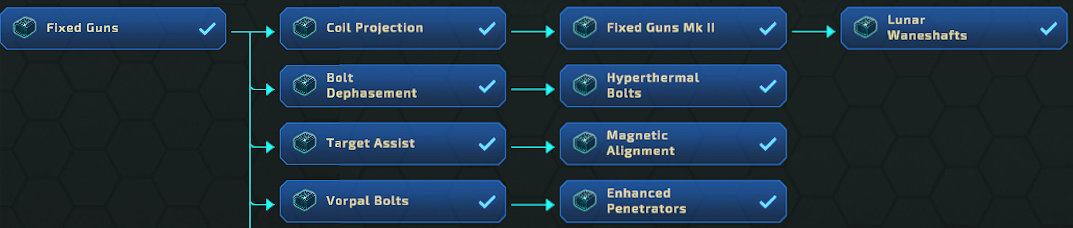
What it does:
Forward-firing energy weapons that have more oomph than plasma but only fire in your ships direction.
How to get it
You need 3 artifacts from enemy ships that have fixed guns – Fixed barrel, Fixed Gun Mount, Fixed Accelerator. First one encountered probably being the Red Raider Light Lancer.
As long as you found one, the rest of those parts can be bought from Wiskamug.

9. Cannon Projectiles

What it does:
Turns the fixed guns into.. burning cannonballs. Slower firing, need more energy, but hurt more.
How to get it
Sooner or later, you will get ambushed by Brogidar Barques. They want some protection money.
Refuse and they attack. They are a tough nut to crack by the time you first meet them, just stay in front or behind them and don’t get too close. They come again, so you can also flee for now.
You need 2 artifacts from them, Plasma Rifle and Plasma Pressurizer.
Those seem to drop very rarely. An alternative way is: Besides dropping those two, they also drop chests. Each chest gives you a location marked on your map.
The location of the third chest gives you another location yet, where you’ll find a Brogidar Galleon, the only one in the game. If you manage to destroy it, you get a new quest marker where you can make friends with the Brogidar. Then you can trade for those parts.
Of course you can go directly to the Galleon (At -17.5 x 11.5 in my game) but then you miss the chests – and it’s unknown if the Galleon even spawns without the chests.
10. Havok
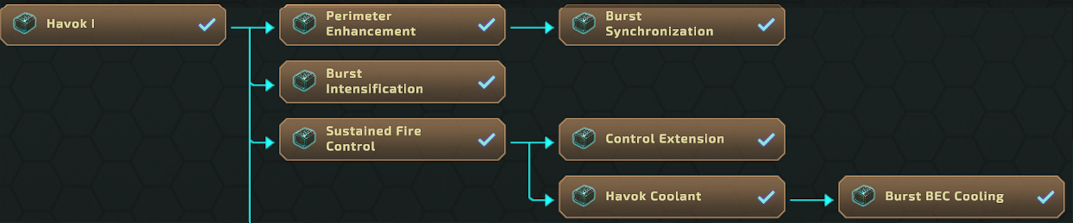
What it does:
A Perimeter defense that aims to destroy rockets that come near you.
So slowly reloading and must be manually selected/fired that I never found much uses for it. I rather keep my fixed guns etc selected as secondary weapons.
How to get it
At around 0 x 11 is a planet with a Devout Parish guarding it (Anomaly: Devout Mission). Landing there gives you an amber skull. Analyze it.
This will give you a new mission pointer for the mission “Devout Expansion” close by. Complete the mission (Help Nil) to get the Havok system as a reward.
11. Havok Shroud

What it does:
Turns the havok into an offensive weapon.
How to get it
The artifact “Shroud Controller” is dropped by some of the bigger and badder ships, for example the Devout Dreadnought in the southern region (past mission “Devout Message”).
12. Missiles

What it does:
Well, missiles. You mark an enemy with right click, then fire with the alternate fire button.
Relatively underwhelming. Until your missile silos are empty, you get relatively good but not amazing DPS, but as soon as they’re empty, which is fast, you produce rockets so slowly every other weapon is way better. The extra upgrade ‘swarm missiles’ (see 14) makes it a tad better, and ‘fission missiles’ (see 15) cost to produce but have more oomph.
IMHO the only reason to use missiles is because they produce no heat and are pretty much the only weapon you can still use if hit badly by an EMP missile.
How to get it
You need 3 artifacts from enemy ships that use missiles – Missile Guidance, Missile Engine, Missile Warhead. The first one encountered probably being the Raider Base.
As long as you found one, the rest of those parts can be bought from Wiskamug
13. Dephased Missiles

What it does:
Turns your missiles unhittable for part of their flight path so they’re harder to shoot down.
How to get it
Collect the artifact “Missile Dephaser” by destroying enemies with dephased missiles. The only enemies with that are stalkers, like the Stalker Frigate.
Stalkers are pretty rare. Easiest is during (maybe before) the mission “CXTA Stalkers”, the third mission you get from the CXTA haulers.
During and maybe before that mission, Stalkers spawn around 38 x 15. Do not analyze the other special drop (Telemetry device) or at least do not give that to the guild trader before you don’t have the missile dephaser, as that will cause stalkers to mainly stop spawning there. Stalkers appear again elsewhere, like near the void disruptors as long as you don’t destroy them, but as said, they’re rare.
14. Swarm Missiles

What it does:
Splits your missile up in two. Double the missiles, half the damage, but they’re harder to shoot down. The trinity warheads upgrade gives you a third missile with no damage reduction, so an effective 50% damage increase.
How to get it
Collect the artifact “Swarm Warhead” by destroying enemies with swarm missiles. Some enemies look like they had it but don’t drop the warhead. One enemy with it is the Elite Battlecruiser, an enemy first appearing around the time where you helped Kyrnan or Nimion.
15. Fission Missiles

What it does:
Bigger, badder rockets – but they are slower to produce and have a running cost of uranium.
How to get it
When you reach the Kyrnan/Nimion space, you get the mission “The Missing Diplomat”.
Complete it and return to Kyrnan space and they’ll call you and let you trade. Buy the artifact “Remnant Device” they have and exhaust their dialogue about it to get the Kyrnan Treaty mission. Complete it and all hell breaks loose. Hail one side to ally with them.
It doesn’t matter who you side with, you can get the artifact, “Fission Warhead”, either way. If you side with Nimion, it is a reward for the mission to regain their trust (complete “Kyrnan Assistance”). If you side with Kyrnan it’s dropped by the Nimion Base at the start of the Nimion space.
See also “18. Precision Penetration” for the other upgrade to get in this conflict.
16. Fighter Drones
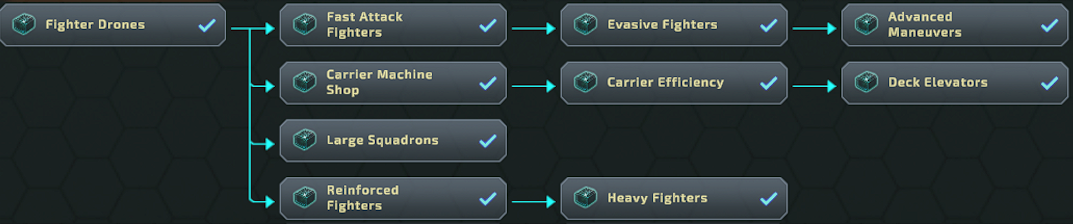
What it does:
Gives you fighter drones, small, autonomous, very weak fighters that cost aluminium to produce (1 alu for 5)
How to get it
You need 3 artifacts from enemy ships or bases that have fighters – Fighter Stabilizer, Fighter Power Cell, Fighter Weapon. First one encountered probably being Devout Cathedral
As long as you found one, the rest of those parts can be bought from Wiskamug

17. Lasers
What it does:
Gives you a constant beam weapon. Can be set to automatically target the nearest enemy. Not quite as powerful as in Starcom Nexus, they’re prone to overheating and do around the same damage as a Plasma II. The enemy laser tho, that shreds right through you. Too bad you only get a nerfed version with maybe a quarter of the power.
How to get it
You need 3 artifacts from enemy ships or bases that have laser – Beam Coolant, Beam Reflector, Focusing Lens. First one encountered probably being a Devout Defender.
As long as you found one, the rest of those parts can be bought from Wiskamug.
18. Precision Penetration

What it does:
Allows the laser to penetrate already damaged modules to get at the stuff behind them.
How to get it
When you reach the Kyrnan/Nimion space, you get the mission “The Missing Diplomat”.
Complete it and return to Kyrnan space and they’ll call you and let you trade. Buy the artifact “Remnant Device” they have and exhaust their dialogue about it to get the Kyrnan Treaty mission. Complete it and all hell breaks loose. Complete it and all hell breaks loose. Hail one side to ally with them.
It doesn’t matter who you side with, you can get the artifact, “Aperture Penetrator”, either way. If you side with Nimion, it’s dropped by the Kyrnan Carrier at the start of the Nimion space. If you side with Kyrnan, it can be traded with the Kyrnan after you complete “Kyrnan Alliance”.
See also “15. Fission Missiles” for the other upgrade to get in this conflict.
19. Shields
What it does:
Gives you a shield as extra armor. Pretty much a necessity for later in the game if you don’t want half your ship being bulkheads.
How to get it
You need 3 artifacts from enemy ships with shields – Shield Controller, Shield Matrix, Shield Projector. First one encountered probably being the Elite Frigate.
Wiskamug sells you the Shield Matrix if you found another part (I found the controller first, possible he sells you another part if you found a different one first)
There is a planetary anomaly “Shield Inducers” (around 3 x 13 – 4 x 14) with a shielded space station next to it. With a high skill check, you can disable the shield of the space station and land on it to gain a Shield Controller (if you don’t have it yet) or a Shield Projector (if you don’t have it yet), but not the matrix. Instead of passing the skill check on the planet, you can also just gently push the shield station away from it with your ship, even gives you the rare achievement “Shield Shove”.
Important: The planet only spawns once you got the mission “Cepheid Variable”. If you visited that area beforehand, it was a lot of empty space, and the location given might not fit totally, but it’ll be somewhere around there – but it’s always one flinger away from where the mission pointer sends you to (or from a particular yellow arrow on the star map if you finished that mission a while ago).
Note: My game behaved a bit quirky and unlocked “Field Capacitance” seemingly when I found the controller on the shield satellite, which was my first. It is possible I had it unlocked by something else beforehands, if so, please write in comments. My best guess is that this is given independently to the item by landing on the Shield Station. So if you have shields but miss “Field Capacitance” and have not yet found that anomaly, that’s your best bet.
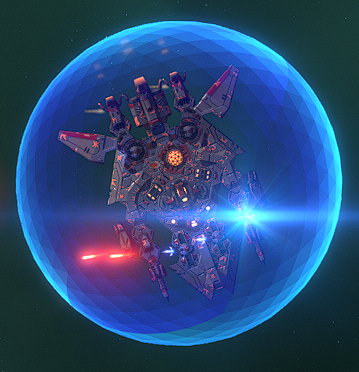
20. Plasma Reflection
What it does:
Upgrades your shield so it does not just absorb, but reflect enemy blaster fire.
How to get it
After you gained access to the southern region (mission “Devout Message”, the ambush), reach the wreck of the generation ship at about -39 -27. You get led there by the quest “Archive Crystal”. The wreck is surrounded by crates, some of them shielded. It may seem at first the shielded crates are indestructible, but you can actually destroy them. May take a long while depending on your weapons (rockets, lasers and plasma II took about 20-30 secs of concentrated fire, 4 plasma III took just 1-3 seconds)
One of those crates will drop the “Field Reflector” artifact, which unlocks the research.
21. Nanite Efficiency
What it does:
The random nanite drops from destroyed ships heal you a bit more.
How to get it
After finishing the quest “Imperial Flora” (see Story researches -> Imperial Blight) the Aquarian Colony sells an “Imperial container”.
Analyze it and wait for a while (~20 minutes) until Gliese tells you the research is ready.
22. Radiation Resistance

What it does:
A bit protection against radiation missiles. The ones that look like vomit.
How to get it
If you didn’t yet encounter them, you can’t get the protection, obviously.
Find, destroy and analyze 4 of the randomly spawning Devout Jetsam/Flotsam. They only spawn later on in the game.
You have to find each planetary anomaly that they connect to. Those are “Blue Crystals” for 9778 (around -5 x 2, Planet seems only to spawn after the mission “Jetsam and Flotsam” is started), “Ochre Fog” for 9440 (around 20 x 8) and “Dead Glade” for 9011 (around 43 x 16). The last Flotsam, 9903, will give you a new waypoint around 15-20 mins after you analyzed it, a nebula at about -6 x 2. Go there and find the “Isolated Lab” in it. Also in the Nebula there should be some Elite Frigates that shoot radiation missiles, getting hit by one may be a prerequisite.
If you go to the Lab before finding the rest of the planet, you can land but not do much more (planet will stay at “Investigation incomplete”).
After visiting the last location, you should get updates about connections between the flotsam and the locations every few minutes until Rhea says that you now have several connections.
This gives you a wayoint to the lab again, visit it again, then wait some more to gain this research.