A simple strategy and tips to help you learn the game. Should get you through easy without failing any arena.
Other guides are good but out of date.
Campaign start and basics
Archer, Rhino, Shaman. Restart until Pyro is in the the initial buildings offered.
Comp: Archer for dps (Agi), Rhino for tank/taunt (Health). Pyro for aoe dmg (Int/Str), shaman for healing and dmg (Int)
At the start, buy at least 1 archer and 1 rhino with the max stat above. (e.g. archer with max agi). if you can find one with great trait, that’s even better.
- Pyro building – need aoe dps.
- Altar of Respec building – a lot of stats are wasted, respec is cheap-ish.
- Expand Gladiator House (slots) once
- Upgrade buildings of archer/pyro/rhino/shaman for more exp.
- Trait crucible building – some traits are op. blueprints are the main bottleneck in the game, so this defines most of the strategy. get it once your core team has traits and you have 2 blueprints leftover to upgrade your best dps.
- Get a disabler unit/building when you start facing units that 1-shot your team. Banshee is great if available, otherwise Marauder (available for limited time 3.5 months in, doesn’t need new building). Cryomancer also good to round out the team.
- Tank lv6/12/18 Perks – big powerspikes: Revitalizing Echo solves stamina needs, Hold my Beer taunts everyone, Absolute Guardian’s Veil makes sure no one dies in first 5/7/10s.
- Lv6 Perk Instructor – on a supportive unit, to help tanks and carries level up and access the overpowered perks.
Team comp
- Resources are the early bottleneck, so use a small variety of gladiator types and upgrade their buildings. Stick to the 4 above until mid game.
- Trait blueprints are the mid-late bottleneck, so invest in 1 strong gladiator of each type, and max 1 backup per role.
- Avoid wasting blueprints on “finite scaling” champs. With few exceptions, only level up perks for each of the infinite scaling “core 3” hyper-scaling-carries – 1 archer, 1 pyro, 1 shaman.
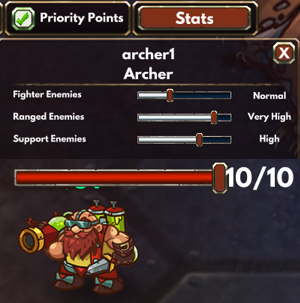
Set general priority high (not max) for all your shaman/archers on enemy ranged and enemy support. not for the pyro/tank. banshees usually auto target well. For big threats, set banshee and archer priority 10/9 etc. Make sure archers have line of sight if it’s a really big threat.
- SSS – Game changer
- S – Important – save resources to level these up
- A – Good but not important, don’t level unless it’s your “core 3”, consider skipping for the backups
- B – OK if you can get them in the shop, but don’t waste resources on them.
- C – Meh
- F – Avoid
Tank – Rhino
Rhino – is great as he can taunt.
- Stamina – to cast taunt 2-3 times.
- Str – If he never dies, or people are passing through him, start putting points in Strength to increase taunt radius. (maxes at 200 so it’s more important that he has health and doesn’t die).
- Health – everything else. 90% of the job is not die.
- Movement speed – a few points could be useful mid-late game.
You’ll very quickly need a backup one, as many times enemies have 2 clumps. The backup should be full HP (so, no Str investment) in case tank 1 dies in big fights.
- 1 – Swift (A). Practical Learner (B), Fast Wits (C); Battle Scarred (F – avoid to not distract healers from saving those who actually need healing)
- 2 – Revitalizing Echo (A), Vitality Echo (B) Emberheart (B), Colossal (C, lategame A)
- 3 – nothing is worth the cost, grab a level 2. Max Hold my Beer (B) if you’re not happy with the taunt, or are scaling pure health.
- 4 – Absolute Guardians Veil (SSS). Unyielding (B), Healthy and Powerful (B)
When shop starts offering level 18s, it’s worth buying a new tank just to get AGV. ideally someone with Colossal already on the skill bar. max only health stat&items. It should become part of the permanent lineup, in addition to the main tank (does not replace it). Game is a cakewalk from then on (on easy).
Just hp, some stamina/str. Not worth investing in making slight upgrades unless he’s dying.
- Drummer (A) – similar to rhino, lower range taunt, higher duration
- Knight (C) – no taunt. better at tanking/damage.
- Cleric (C) – no taunt. heals as well.
- Fence wielder (people) (C?) – no taunt.
No taunt = fails at the main part of the job 30% of the time. If no taunt, get one of the taunt perks. but why waste resources if you could just get a tank with taunt.
DPS – Archer
Archer – best single target DPS at doing the above, with great sustain DPS
You can buy a second archer early, but don’t over-invest: either (a) keep him at 2x lv1 perks, or (b) don’t get perks. bench/replace the backup when the shop gives you decent leveled perks or you get rewarded a powerful secondary Str dps.
- Life – enough to survive – 500-1000 early, 1500-2000 late
- Stamina – enough to shoot 5-10 times.
- Agility everything else – infinity scaling.
- Int – 6 to minimize cd
- 1 – Serial Killer (S), Practical Learner (A), Feeling at Home (B), Adaptive marksman (B), Extrovert (S/C – usually great, useless 10% of the time. see perk section for detail)
- 2 – Critically Lucky (S)
- 3 – Greed is Good (S), Glass Cannon (B)
- 4 – Unyielding (A), Frenzied (C)
- Agi% items – Swiftfoot Shackle&Hare’s Gambit Greaves (S); Necklace of reklessness(A)
- Agi items. Don’t underestimate stat items, you’re multiplying everything by 100-300+%, so more Agi is much better on hypercarries than freezing enemies or whatever bs some items do.
- Ring of Fire/Frost are very powerful, but too slow for me. Primary/Unique Goal of the archer is alpha strike the big threats, so a strong Agi item ends up being better at that, even if it costs long term dps. if your tank has maxed Hold my Beer AND Orb of FireAoE/FrostAoE, triggering it very quick, then it’s definitely worth it.
For this playstyle, you don’t need any other DPS.
- Hunter (B) – archer with a few other abilities, better agi scaling, but higher cd. some prefer it, i’m not a fan of him moving forward to scatter shot.
- Crossbowman (Baroness) (A) – archer with free 70% agi and better dps. First shot, which I value, is much slower. Shot pushes away, can make other projectiles miss.
- Machine Gunner (Baroness(i think) reward) (A) – Str ranged dps. Overpowered secondary dps if you have multiple unused Str% items and/or get lucky with the traits. accept the 70% accuracy and go full str.
- Brigand (bandits) (B) – Str ranged dps. projectile keeps going if it kills. as above, can be very strong if you have unused str% items, but only available for a limited time, at a time when resources are very limited. and buying stuff “just in case” isn’t great in this game.
- Granny (people) (C) – Str ranged-ish dps.
- Summoner (necro) (A secondary dps) – can create big monsters, but too slow if enemy has big nukers.
- Necromancer (A secondary dps) – can also create big monsters, but even slower.
- Warlock (B?) – summons a huge monster, people like it, but slow for my playstyle.
- Mana Assassin (B secondary dps) – great at alpha-striking, but bad with sustaining dps if enemies are spread, and awkward scaling (main stat int, scales off multiple stuff)
- Spearman (Baroness) (B secondary dps) – free 70% agi, but melee-ish so not reliable at dealing with multiple threats
- Executioner (necro) (F) – bad.
- Storm Dwarf (F) – inconsistent. runs into enemies.
- Worg / Beserker / Mace wielder / Metal Brute / Pitchforkman (C/F) – melee str dps positives – good scaling; unused str items; good in 1-2vX. negatives – i’d rather give the 1-2vX xp to someone more useful; too slow; not 100% reliable to reach multiple enemy threats; dies a lot; requires micro-managing re-positioning. If someone can recommend a good Str dps, let me know.
AOE dps – Pyromancer / Dark mage
Pyromancer
- Life – enough to survive – 500-1000 early, 1500-2000 late
- Stamina – enough to cast 2-3 times
- Str – 50 for max aoe and upfront damage – mandatory
- Int – everything else – infinity scaling damage over time
- Agi – Reduces execution time&cd (max 114&150). once you have 187 int (after int items but excluding int% items and perks), you can re-spec into 114 Agi, then go back to full int. if you do, monitor if you’re running out of stamina (you should be ok)
- 1 – Serial Killer (S), Practical Learner (A), Feeling at Home (B), Extrovert (S/C – usually great, useless 10% of the time. see perk section for detail)
- 2 – Take a level 1 perk. don’t take Critically Lucky (F – only works for the initial impact dmg, not burn)
- 3 – Greed is Good (S), Glass Cannon (B)
- 4 – Unyielding (A), Frenzied (C).
As you’re infinity scaling, leave utility/etc for others
- Int% Sages sacrificial diadem (S); Orb of frost AoE until you have Cryomancer or Hold my Beer tank (you are sacrificing a lot of damage for it)
- Int/Str items.
- Competes with shaman for int% items. Give them to whoever is dps-ing more for you in difficult fights.
- Increases to dmg/attacks seem to only affect the initial hit, not the DoT, so avoid them.
___________________________________________________
The best substitute for Pyro is Dark Mage, which has the following differences, from worst to best:
- – 7 v 9 range. this may seem small, but it’s the difference from being exposed and walking around vs staying with the backline. So you need to micromanage or move the entire “deathball” closer to enemies, which is dangerous.
- – smaller aoe. I don’t put points in str until very late
- + AoE attack gives small CC. this also makes it more useful to field backups.
- + all dmg upfront and all scaling on int (8int vs 6str2int+8intDoT), more suitable for hyperscaling, and leads to:
- + can/should take overpowered items and perks that affect attack dmg% e.g. Critically Lucky, Necklace of Recklessness, Ring of Fire/Frost.
Dark Mage
- Life – enough to survive – 500-1000 early, 1500-2000 late
- Stamina – enough to cast 2-3 times
- Int – everything else – infinity scaling damage over time
- Agi – reduces execution time&cd (max 114&150). once you have 214 int (after int items but excluding int% items and perks), you can re-spec into 114 agi, then go back to full int. after this, monitor if you’re running out of stamina (you should be ok)
- Str – 50 for max aoe. i don’t take it until very late (or not at all), but it’s personal preference.
- 1 – Serial Killer (S), Practical Learner (A), Feeling at Home (B), Extrovert (S/C – usually great, useless 10% of the time. see perk section for detail)
- 2 – Critically Lucky (S)
- 3 – Greed is Good (S), Glass Cannon (B)
- 4 – Unyielding (A), Frenzied (C).
As you’re infinity scaling, leave utility/etc for others. If you field more than 1 (e.g. you find a good one in the shop), “nr2” can get some utility.
- Int% Sages sacrificial diadem (S); Necklace of Recklessness (S), Ring of Fire/Frost (A)
- Orb of frostAoE until you have Cryomancer or Hold my Beer tank. Orb of fire AoE if not main carry.
- Int items. Don’t underestimate stat items, you’re multiplying everything by 100-300+%, so more Int is much better on hypercarries than even powerful effects.
- Competes with shaman for int% items. Unlike Pyro, Dark Mage actually 100% benefits from it.
- Storm bringer (C) – stealth & very strong scaling dmg in a small aoe, but incredibly awkward if there’s more than 1 clump of enemies.
Heal/Support – Shaman
Note that Perks like “Poisons an enemy on attack” do not work for the totems.
- Life – enough to survive – 500-1000 early, 1500-2000 late
- Stamina – enough to cast both pillars 1-2 times.
- Int – everything else – infinity scaling damage and healing
- Agi – 38 for max execution, 50 for max both. I didn’t find it as helpful as just having more int until later in the game. Recommend sometime between 60-90 Int before % bonuses.
- 1 – Extrovert (S) (Totems count as gladiators), Serial Killer (S), Practical Learner (A), Feeling at Home (B)
- 2 – Another lv1 above or Ascending Summoner (A – good on prolonged fights, debatable if it’s worth the cost. not worth upgrading unless you’re turbo-charging 1 of them)
- 3 – Greed is Good (S), Glass Cannon (B)
- 4 – Unyielding (B). Raincaller/windbringer on someone else comboes well with 1/multiple Shamans, but by that time you don’t need more help winning.
As you’re infinity scaling, leave utility/etc for others
- Int% Sages sacrificial diadem (S); shadow cloak in some scenarios; Undergrowth Pet if skilling Extrovert/Ascending Summoner
- int items.
- Competes with pyro for int% items.
- Priestess (B) – heals, shields, buffs, but can’t target self. and having 2 on the field isn’t practical. can work as secondary support.
- Druid (B) – “heal” over 5s, more useful in keeping squishies alive. roots enemies
- Invigorator (C) – gives main stat to someone else, which seems to be boosted by modifiers (great!), but doesn’t stay back, and doesn’t do much else (gives stamina, but the tank perk makes this redundant)
I didn’t need other supports and didn’t think it was worth it over any of the main roster, but happy to include suggestions if your experience is different.
Disabler/Debuff – Banshee / Marauder / Cryomancer
When you start facing very high level enemies, get a banshee.
Get 1-3 backups as the game goes on, to field if there are multiple enemy high level threats (or enemy banshees)
If it’s not available at ~3.5 months, when you get temporarily offered marauders, get 2 until you unlock banshees. (build below this)
- Stamina – enough to cast stun 2-3 times early. 5-10 times late.
- Life – enough to survive – 500-1000 early, 1500-2000 late. split with int after that.
- Int – 360 maxes the duration (6-12s), but it’s not urgent, as 6s should be enough.
- Agi – I didn’t skill it up. fyi 116 to max execution time on stun (to not get out-bansheed)
- 1 – nothing is worth the investment. anything from the shop that increases int is ok
- 2 – Instructor (S) – someone on your team should have it and max it, and this is the best candidate.
- 3 – nothing is worth the investment.
- 4 – nothing is worth the investment. maybe Unyielding (B) after everyone else on the main team has it.
- Book of Invincible shield (if you have a spare one, otherwise it should go on the tank)
- can pretty much get anything from the stats above, doesn’t impact much
___________________________________________________
Marauder – Stun/Permastun(late)
3.5 months in you get offered marauders for a limited time. If you don’t have access to Banshee grab 2 while they’re available. For big threats, or double big-threats, it’s useful to run 2 marauders. If 3 big threats, have the archer dps down the 3rd.
Since v1.0, it’s no longer possible to permastun with just 1 stat, so early the best bet is max duration on first stun, and leave him as stun-bot with little/no damage.
- Life – enough to survive – 500-1000 early, 1500-2000 late. all leftover after movespeed.
- Agi – 75 to max knockdown duration.
- Stamina – enough to cast stun 2-3 times early. 5-10 times late.
- Movespeed – invest some points until you’re happy, but hard to spare early game. max late-game.
- Int – 50 to max knockdown cd. only lategame.
- Str – by the time you can spare Str, his damage is very low. you can still spec it instead of Int, as he’s generally targeting weak enemies, and most of the time, 1 knockdown is enough. but i don’t recommend it.
- 1 – Swift (A) – decent to max if you can spare the resources. not worth to waste on backup, as he’s just a stun-bot.
- 2 – Instructor (S) – someone on your team should have it, he’s a good candidate.
- 3 – nothing is worth the investment. maybe Firm As A Rock (C).
- 4 – nothing is worth the investment. maybe Unyielding (B) after everyone else on the main team has it.
- Book of Invincible shield (if you have a spare one, otherwise it should go on the tank)
- early – agi (urgent to max), ms. late – he’s capped out in utility and scaling, so he can pretty much get anything, doesn’t impact much
note: Marauders were nerfed in v1.0. There are better alternatives, but you can’t reliably get them early (besides restarting 500x times), so i’ll keep Marauders as option here.
___________________________________________________
Cryomancer – Freezes the entire field and pushes back if someone gets through. Weak scaling.
If you find orb of frost AoE (i got it ~1/4 of the time) and put it in your taunting tank with max Hold my Beer, Cryomancer is not worth the slot.
- Stamina – enough to cast frost bolt 2-3 times
- Life – minimum enough to survive – 500-1000 early, 1500-2000 late – split life/str/int after that
- Str – 200 to max circle area (radius 2-4.5). a bit overkill to max. once you have Hold my Beer maxed on your tank, you should catch everyone by targeting someone in the middle
- Int – 174 to max freeze, but duration only goes 3.5-5.5, so it’s not too urgent.
- Rest doesn’t matter
– nothing is worth the investment, just grab whatever you find useful in the shop, but doesn’t make a big difference.
- 1 – Int boosters are ok but really not that impactful.
- 2 – Toxic personality (C) is ok but expensive and doesn’t really help you vs big threats
- 3 – nothing is worth the investment. maybe Knockout Artist (C).
- 4 – nothing is worth the investment. maybe Unyielding (B) after everyone else on the main team has it.
- Orb of fire AoE; Herculean Anchor until you get 200 str and don’t have a ranged str dps; Book of Holy Light and other support stuff if no one else has space, since he’s usually in the middle of the team, and doesn’t scale.
- str/int/hp. doesn’t really matter as it doesn’t scale as well as others.
- Hookbot (B for me, A in other strategies) – great way to target big nukers, but doesn’t synergise too well with my comp.
- Purifier (C) – disable is too low range, even if it is AOE. has some DPS.
- Dark mage (C disable, S dmg) – includes a small cc but much smaller area than cryo.
- Storm bringer (C) – stealth & good cc+dmg on clumped enemies, but less reliable (can be interrupted).
- Venomous Mortar (C as secondary) – drain stamina in prolonged fights (bosses etc) is ok but scaling is not good enough to affect high level enemies.
- Afflictor (necro) (F) – bad
Problem fights
In this strategy, you should avoid all of these, but in case you can’t:
- Invisibility Cloak item might buy you precious seconds.
- Use Shaman in most cases.
- Pyro if they’re clumped up.
- Archer if you can dps without dying.
- Melee dps are actually good for this, but then you’re just wasting xp/perks on someone who isn’t good in most situations.
- If it’s just 1, try to line up everyone: [Archer – rest of your team – your tank – invisible enemy – non-invisible enemy] with no one out of the lineup. archer projectile attack should hit invisible guy while attacking the non-invisible; or the tank taunts.
- If many invisibles, try catching them with taunt/multiple taunts, or aoe dps if everyone clumped up and there is someone not invisible in the middle to be targeted priority 10 by the pyro.
- In small battles, consider giving hp potion to your fragile dps’s, or just risking and “accepting” the revival cost.
- In big battles, just “accept” the revival cost, or avoid the battle.
- In arena battles, assuming you can still win, it’s usually still worth accepting the revival cost to guarantee “trait blueprint” rewards.
- Make sure archers 10-priority target the biggest dps. positions the archers so that arrows are not blocked by other enemies, and not so far that the enemy might move and the arrow miss.
- If it’s archer/projectile in a small fight, line up everyone so the enemy archer hits the tank
- If it’s AOE/pyro, make sure to spread out.
- Get a banshee to almost-insta stun. Especially if it’s a “manyv1” arena where enemies are extremely high level. these are a great source of experience (but very dangerous before banshee).
- If there are multiple high level archers/pyros, you’re usually losing at least 1 unit.
Tbh never had problems with bosses.. but here’s some tips
- If you have “pop space”, use 2 disablers from different angles (in case 1 is ko’ed).
- Give stamina potions to shaman & archer, especially if you run low on stamina. alternatively give them health/shield potions/items, as you really cannot afford them dying.
Other Campaign tips
S – ASAP ; A – important, not urgent ; B – good, when you can spare resources ; C – meh ; F – not unless you’re rich.
- Trait Crucible – A – very helpful and big powerspikes.; A upgrade – very strong for infinite scaling, but very expensive (20 blueprints). I start saving for 20 blueprints when I have the core 2-3 gladiators with some level 2 traits, and the next 3-4 with 1-2 level 1 traits.
- Altar of Respec – S early-mid – most peeps have wasted stats, respec is cheap-ish; B upgrade – when you are not very pressured on resources
- Reviving Temple – B upgrade; A upgrade from mid-late game when revive times increase. if you’re not rushing speed achievements, you can usually wait it out or use stones to revive your 3-core.
- Gladiator House – S 1st upgrade; C next upgrades
- Item Storage – F – stop hoarding
- Items Workshop – F early; B late – expensive and each item upgrade is expensive, so only useful mid-late.
- Gladiator-specific buildings – S getting 4th; S upgrading initial 4; A – getting banshee; B – upgrading banshee; B – getting Cryomancer; C/F everything else. Of course get more if it’s more fun for you.
- After 2 battles, you can refresh for free.
- Avoid 1vX battles.
- Avoid “many v1” if you can’t lock down a very strong enemy (usually with banshee). once you can, prioritize them as they are great source of xp.
- Don’t over-stress over each battle, you’ll have another chance every few days.
At the end of the month, you have 5-8 battles with a team of 3/4/5/6/7/8/8/9/9/10/10/12. After you win the 12th, you “win” the game (you can continue playing to complete more quests/achievements).
- Have a few mana crystals to replenish losses.
- Prioritize the hardest fight, then the easiest, as these give trait blueprints, which are the biggest bottleneck.
- You can “accept” a fight to see enemy positioning (especially useful vs invisibles), and “change fight” if you think you can’t handle the expected losses.
- If you see it’s impossible to win (e.g. everyone dead and no mana crystals), don’t worry too much and just try again next month, there’s no big penalty for losing assuming you can pay salaries. Even for speedrun achievements you can fail a couple of months.
- Each finished arena will increase level of enemies, units in shop and items. You can always play previous arenas if you need to level up your gladiators or earn gold to buy them better equipment.
- Wait for discounts before buying.
- You can refresh shops a few times at increasing price. save it for when you have discounts and money to use.
- in Gladiator Market, check for traits that can be useful. late game you can save a lot of blueprints by finding good traits (more in traits section) or a very high level gladiator for non-core roles.
- Note that all gladiators of all classes have same stats, which increase per level, just distributed differently. which is why we rush re-spec, and you can ignore stats beyond the first 2-3 buys
- Trait blueprint – biggest bottleneck all game, don’t waste it.
- Crafting blueprint – only relevant mid game onwards – you should have enough to upgrade some items, but it’s relatively limited and expensive. save it for infinity scaling items (usually INT/AGI/dmg). in the lategame, some items come upgraded.
- Mana Crystals – make sure you have enough when end-month-championship starts. don’t over-hoard as their price stays same while other resources grow in value. I usually sell a few in the first 1-2 months to get upgrades.
- Wood/Stone/Iron – have a sense what upgrades you need and get those. usually you want stone->wood->gold
- W/S/I increase price each month. so, don’t over-float Gold/Mana as these lose value over time vs wood/stone/iron. In other words, spend gold on resources for upgrades before each end-month-championship.
- Gold – you need enough to pay salaries and spend when discounts come around. when your “core 3 carries” are level 12, you need to start floating 6k-12k gold for the “greed is good” trait.
- For favoured faction rewards, resources are more valuable than items, as they get a multiplier. (you can choose 2 resources and ignore items, might be bug).
Perks T1-2
Ratings are how much you should invest in that trait. Ratings are harsh because trait blueprints are a HUGE bottleneck. The opportunity cost is to improve the best-in-slot trait of your core-3-infinite-scaling team members that go in every fight. And they really benefit from those expensive tier3/4 upgrades.
But Perks are more reasonably balanced than the ratings make it seem.
So, if you are shopping for a backup, a B trait might be very good, as it only costs gold.
With a few upgraded tier 3/4 traits, even if their rating is “bad”, a shop gladiator might be 2x more powerful than most of your team, with just a little investment.
- Serial Killer – Gains 2/1.5/1% MainStat for each enemy killed (max 30/45/60) {Best in Slot for DPS/Shaman}
- Practical Learner – MainStat reduced by 20/30/40%. Each battle they participate it increases by 5%. Max bonus 25/37/50%. Resets count when learned {cheap option for regular party members when you don’t want to spend on higher level upgrades}
- Feeling at Home – After 2/4/6 months in the guild, MainStat increases by 25/35/45%. Resets time in guild when learned {similar to above but for party members that don’t play that often. but you shouldn’t be spending on them..}
- Swift – Movespeed increased by 8/12/16. Push/pull forces are 50/75/100% weaker. Lv2 can’t be trapped by a net. Lv3 can’t be frozen. {Good on Tanks}
- Extrovert – Gains 7.5/10/12.5% MainStat for each friendly gladiator within range of 2/2.5/3 {can be very strong and op with shaman spam, but you’re risking team wipe whenever you face high level pyro/dark mage. ‘midwit meme’ analogy:}
- low iq: put extrovert on everyone and make a “deathball”, it’s the best;
- mid iq: no because you’ll get wiped vs powerful enemies, also you should place everyone in a different spot and angle archers this way and x in y position etcetc;
- high iq: put extrovert on everyone and make a “deathball”, it’s the best (and just pay the wipe cost when it happens)
- Fast Wits – Gains xp 12/18/24% faster
- Dragon Blood – Can’t be set on fire; lv2 – frozen, or poisoned ; lv3 bleed or cursed
- Consumer – Gains 20/30/40% MainStat when using a consumable item
- Anti-Capitalist – Gains 25/35/45% MainStat bonus but loses 1/3/6% for every 100 gold. Min (-20/30/40%)
- Young Vampire – Killing an enemy restores 25/37/50% health
- Introvert – Gains 30/45/60% MainStat if no friendly gladiator is withing range of 2
- Mighty Chicken – Gains 40/60/80% MainStat , but if any enemy gladiator comes within range of 3, this gladiator gets terror and runs for 8 seconds.
- Wind Rider – Has 60/90/120 MainStat during Heavy Wind
- Crimson Lungs – has 50/75/100% MainStat and restores stamina 100/150/200% faster during Crimson Mist
- Rain Absorber – Restores 5%/7.5/10 health each 2 seconds during Rain
- Magic Enthusiast – Gains 1/0.75/0.5% for each mana crystal you own (max 20/30/40%)
- Adaptive Marksman – Disables minimum range requirement for abilities and increases Agility by 5% each time this gladiator damages an enemy (max 20/30/40%)
- Fading Ambition – Gains 35/45/55% MainStat but loses 10/12.5/15% each time health is lost
- Fatigue Sensitive – While stamina is above 50%, gains 25/35/45% MainStat, but while stamina is below 50%, loses 25/35/45%
- Battle Scarred – Has 40/60/80% bonus max health but starts with 60/70/80% health missing.
- Critically Lucky – Each time the gladiator deals damage, there’s a 30/35/40% chance to deal 100/125/150% higher damage {Best in Slot for hypercarry DPS}
- Instructor – Other gladiators in battle gain 8/12/18% more experience (bonus only from 1 Instructor) {Best in Slot for 1 of your team members who has spare slots and goes in most battles}
- Revitalizing Echo – 10/15/20% of the damage this gladiator receives will restore stamina to all friendly gladiators {Best in Slot for main tank}
- Toxic Personality – Damaging an enemy poisons them, causing them 10/15/20 stamina per this gladiator’s level during 5 seconds (effective aoe40%, projectile 50%) {OK on 1 secondary with spare slot}
- Ascending Summoner – Each time this gladiator summons or revives a unit, they gain a 20/30/40% MainStat (max 60/100/140) {great on shamans, but a bit expensive. great on other summoners, which i don’t play}
- Vigor Alchemist – Casting a buff on a friendly gladiator restores their stamina by 10/15/20 per this gladiator level {seems good if you play buffers, i don’t}
- Wildheart – Damage of the first attack is increased by 100/140/140% (AoE: 1 target); lv3 – Killing an enemy resets the effect {ok but not great on dps. if you find upgraded on the shop, could be an interesting alpha striker backup}
- Vitality Echoes – 10/15/20% of the damage this gladiator receives will restore health to all friendly gladiators {ok on tanks but tier 2-3-4 tank perks are set in stone.}
- Chillheart – Getting hit by a melee attack freezes the enemy for 2/3/4 (cd:5/3/1s) {ok on tanks but tier 2-3-4 tank perks are set in stone.}
- Colossal – Max health increases by 30/40/50%, but movement speed decreases by 50/60/70% {Good combo with tier 4 godly trait if you’re using a secondary tank for that}
- Fitness Addict – Stamina recovers 40/60/80% faster
- Beastmaster – Gain 10/15/20% MainStat for each friendly beast in the team (.6s after battle start) (max 80/120/170%)
- Fast and Powerful – Gain 1/2/3 MainStat for every 2 MS
- Foul Mouth – Taunts enemies within an area of 2 for 3/4/5s (cd: 12/10/8s)
- Guardians Veil – Absorbs 10/15/20% of damage dealt to all friendly gladiators
- Lifeforce Alchemist – Casting a buff on a friendly gladiator restores their health by 10/15/20 per this gladiator’s level
- Regenerative Summoner – Each time this gladiator summons or revives a unit, they restore 20/30/40% of their health
- Vigor Summoner – Each time this gladiator summons or revives a unit, they restore 20/30/40% of their stamina
- Lifeline Surge – 10/15/20% of damage dealt to any friendly unit is restored to this gladiator as health
- Wound Specialist – Damaging an enemy causes them to bleed, inflicting 4/6/8 damage per this gladiator’s level every 0.5s indefinitely (aoe 40%, projectile 60%)
- Healing Shield bearer* – 10/15/20% of the damage blocked heals allies within an area of 1.5/2/2.5 around the gladiator
- Emberheart* – 10/15/20% of the damage blocked releases a heat blaze, damaging enemies within a 1.5/2/2.5 area around the gladiator
- Agile empowerment* – Dodging an attack increases the MainStat by 10/20/30% (max 60/100/140)
- Agile Vitality* – Dodging an attack restores 5/7.5/10% health and 5/7.5/10% stamina
*not every gladiator has these, probably only those who can block/dodge/etc
Perks T3-4
- Hold My Beer – Jumps into the middle of the enemy team and taunts enemies within an area of 2.5/3.25/4 for 6/8/10 seconds {great taunt when maxed}
- Greed is Good – For each 100 gold you have, the gladiator MainStat increases by 1% (Max 60/90/120%) {Best in slot in easy mode, might be harder to get 6/12k in harder difficulties}
- Better Together – Gives 20/30/35% MainStat for each friendly gladiator of the same type in battle (Max 60/90/125%) {if you run several Shamans. gets unlocked 2 months earlier than Greed is Good}
- Glass Canon – has 40/60/80 more MainStat but 40/50/60% less max health {risky, use at own discretion}
- Minimalist – Gains 25/37/50% bonus MainStat for each empty unlocked item slot {alternative build to stack very high MainStat late game}
- Long Arms – Increase ability range by 1/1.25/1.5 {could be interesting, but too weak&expensive imho}
- Fit and Powerful – Each 70/55/40 max stamina gives this gladiator 1 MainStat (at battle start)
- Firm as a Rock – Cant be knocked down. Lv2 -or stunned. Lv3-or terrified
- Energy Vampire – Each attack drains 5/7.5/10% stamina from the enemy and restores 5/7.5/10% to this gladiator (cd: 2/1.5/1s)
- Boss Slayer – has 50/75/100% higher damage against bosses
- Grateful – Every time gladiator gets healed, gladiators MainStat is increased by 10/15/20% (max 70/110/150%)
- Last Stand – When this gladiator’s health or stamina is below 45%, they gain 100/150/200% MainStat bonus
- Knockout Artist – Each time deals damage, there is a 25/37/50% chance to knock down the enemy for 1.5/2/2.5 seconds (aoe 15/20/25%. Projectile 15/25/35%)
- Master of Poison – When hit by a melee attack, the enemy is poisoned, losing 20/30/40 stamina per this gladiator’s level over 5 seconds.
- Arsonist – When hit by a melee attack, the enemy will be set on fire, burning a total of 50/75/100 dmg per this gladiator’s level over 5s
- Shadow Skin – When hit by a melee attack, the enemy is cursed, reducing their primary stat by 0.5/0.75/1 points (stacks 3 times)
- Absolute Guardians Veil – Absorbs 100% of damage dealt to all friendly gladiators in their team during first 5/7/10s {game-changer. after this you can steamroll everything brainlessly}
- Unyielding – After a killing blow, the gladiator survives at 1 health, gains 100/150/200 MainStat, and blocks all dmg for 4/6/8s {Good fail-safe for hyper-carries, but probably overkill by the time you have Absolute Guardians Veil on your tank}
- Old Vampire – Damaging enemy restores 5% of maximum health. Cd: 2s
- Healthy and powerful – Each 180/135/90 Max health gives this gladiator 1 MainStat
- Feared – Attacking an enemy makes them flee in terror for 8/12/16s (aoe – 1 target) cd 12/9/6s
- Lone Wolf – Gain 200/250/300% MainStat if no friendly gladiator is within range of 5
- Frenzied – Gain 30/45/60% MainStat for each enemy they kill
- Reversal Rift – Getting hit by a melee attack teleports the enemy to their starting position and deals 50/75/100% of their own attack dmg (cd 6/3/0s)
- Collector – Gains 25/37/50% bonus MainStat for each epic item equipped
- Raincaller Martyr – Changes the weather to Rain, then gets stunned for 30/15/3s
- Windbringer Martyr – Changes the weather to Heavy Wind, then gets stunned for 30/15/3s
- Mistweaver Martyr – Changes the weather to Crimson Mist, then gets stunned for 30/15/3s
Item strategy and tips
- Common (Stat) items have no variability in power scaling, they are as strong as their level. So, they are as good as what % of the attributes you use. So:
- Health is almost always good, even if slightly contaminated with Str/MS (ok for tank).
- Stamina is almost always good when mixed with health. by itself it might be overkill, and other mixes are less good.
- Pure Int is awesome as half your roster can use it. mix with Str works early for Pyro.
- Pure Agi is great for archers. mixed Agi with worse stats is almost always wasted except early marauders who benefit from a bit of everything.
- Str is basically wasted for this roster (no main STR user), except very early until your Pyro has 50 Str. Tanks can use it, but their power caps relatively early.
- Movement speed is almost always wasted, as almost no one benefits from it.
- The reason that Int/Agi mixes are bad is that, for the Core 3 hyper-scalers (archer/pyro/shaman), you want to max Agi/Int as appropriate, and have as little as possible of everything else. Each 1 unit wasted would be worth 2-10 units of Agi/Int after all the multipliers. Of course having a margin of safety in health (no dmg if dead) and stamina (no dmg if no stamina) is less “wasteful” than Str/MS.
- For non-scaling (everyone else), past mid-game they don’t get much more powerful, so it’s not worth over-optimizing beyond giving them health and a bit of stamina.
- Very early items (level 1-3) are mostly a waste of gold, as they are quickly replaced and are not that cheap.
- Mid game items are not that much more expensive, but they are much better.
- Late game items are also not much more expensive, but don’t scale infinitely like most other games, so it’s not worth to over-optimize. just make sure your core 3 hyper-scalers aren’t carrying a very old (10 levels from max) equipment.
- If you get a universal item early and have no use for it (e.g. melee/str items), just sell it (good price) and improve your team in other ways. don’t “wait for later”, unless you’re sure you’ll use it or it’s one of the good ones below.
- Beyond this tip, if you’re new, skip the rest of the item section and go play, as you can’t plan and you’ll know more by the time mid game rolls around:
- There are great universal items, but they might just not come out. If your plan A is having a pyro that ALSO freezes, or finding multiple int% items, have a plan B.
- Item upgrades are expensive and only relevant lategame. By then, a very good stat item might be almost as good anyway.
- I haven’t found any game-changing borderline-broken item to look out for. The best ones are int/agi/dmg% for hyper-carries, but they’re “just” 50% more power, nothing outrageous.
Universal Item list
- Book of Invincible shield – Gains a magical shield that lasts for 4/6/8s and absorbs all dmg during its duration {godly on taunter. use temporarily on your glass canons when facing high level direct attack enemies (Purifier)}
- Necklace of Recklessness – Deals 50/60/70% higher dmg, but also receives 50% higher dmg (any attack type)
- Sages sacrificial diadem – Gladiator gains 50/125/200% intelligence but loses 10/12.5/15% of the health every 3/2/1 seconds
- Swiftfoot shackle – Gladiator gains 45/60/75% agility but loses 15/10/2.5% of the health every 3 seconds
- Hare’s Gambit Greaves – Gladiator gains 40/60/80% agility but starts battle with 50% less stamina
- Orb of Frost AoE – AoE attacks freeze enemies, preventing them from moving for the next 1.5/2.2/3s {apparently works with taunts as well}
- Mantle of invisibility – Makes a gladiator invisible during the first 5/10/25 seconds of the battle, or until they finish executing their first ability
- Ring of Fire – Damage against Burning targets is increased by 70/110/150% (AoE 40% weaker)
- Ring of Frost – Damage against Frozen targets is increased by 70/110/150% (AoE 40% weaker)
- Book of magic shield – Gains magical shield that absorbs 100/150/200 dmg per level of the gladiator holding this item
- Book of fire – 2s after battle starts, sets enemies in area of 3.75/2.25/2.75 On fire, burning a total of 15/22/30% Of their max health over 5 seconds
- Orb of fire AoE – Area of effect attacks set enemies on fire, burning 15/22/30 Dps per level of the wearer. Duration 5s
- Book of Holy Light – Heals allies in an area of 2/2.5/3 for 10/15/20% of their max health every 5s
- Knockout Gloves – Melee attack knocks out the enemy for 3/3.5/4 Seconds (cd 12/9/6s)
- Best Friend – Summons a fighting dog that gains 1 level for every 4/3/2 levels of this gladiator
- Undergrowth Pet – Summons a battle-earthworm that gains 1 For every 5/4/3 levels of this gladiator, tripling its levels during rain
- Malfunctioning Mech Suit – Every 7/6/5 hits, dmg all enemies in area of 1/75/2/2.25, dealing 5/7/5/10% of their max health, knocking them and this gladiator down for 0.5s
- Titans Blood Pact Gauntlet – Gain 50/125/200% Str but starts battle with 30%/60%/90% less health {amazing after you have absolute guardians veil on tank, and if you have ranged str dps, which is situational}
- Herculean Anchor – Gain 40/60/80% Str but lose 50/60/70% ms{great if you have ranged Str dps}
- Book of force – 0.5s after battle starts, pushes back and knocks down enemies in area of 2/3/4 For 1.5/2/2.5s. Damages the gladiator wearing the item for 20/30/40% of their max health. {pushing back enemies makes a lot of your own projectiles& AoE miss}
- Whetstone – Deal 30/45/60% more damage for any melee ability {great if you have any melee dps, which you probably shouldn’t}
- Ring of Malevolent Whispers – Damage against Cursed targets is increased by 70/110/150% (AoE 40% weaker) {too situational, ok on secondary dps if there’s nothing better}
- Spiked Chestplate – Reflects 15/22.5/30% of the melee damage dealt to this Gladiator {reasonable dmg but vs enemies that are not really threats. usually rather have more hp}
- Orb of Frost – Direct type attacks freeze enemies, preventing them from moving for the next 3/4/5s
- Orb of Fire – Direct attacks set enemies on fire, burning 35/52/70 dps per level. Duration 5s
- Arrowhead of Frost – Projectile attacks freeze enemies, preventing them from moving for the next 3/4/5s
- Arrowhead of Fire – Projectile attacks sets enemies on fire, burning 35/52/70 dps per level of the wearer. Duration 5s
- Blades of Terror – First melee attack makes enemy lose control and run in terror for 8/12/16 seconds or until somebody hits them
- Emanating Ball of havoc – Makes all enemies in the area of 1.5/1.75/2 around this gladiator lose 2.5/3.7/5% of their max health every 5/4/3s. Double during Crimson Mist weather
- Energy absorbing helm – Each time this gladiator gets damaged, the item gives 2/2.5/3% of dmg to Str (max 50/75/100%)
- Amulet of Crimson Endurance – Restores 5/8/10% of the gladiators maximum stamina every 4s (double during Crimson Mist)
- Amulet of Crimson Vitality – Restores 4/6/8% of the gladiators maximum health every 4s (double during Crimson Mist)
- Damage storage Crystal – Stores all dmg received until 100 per this gladiator level, then explodes for 10/15/20% of stored dmg, hitting all enemies withing area of 2/2.5/3
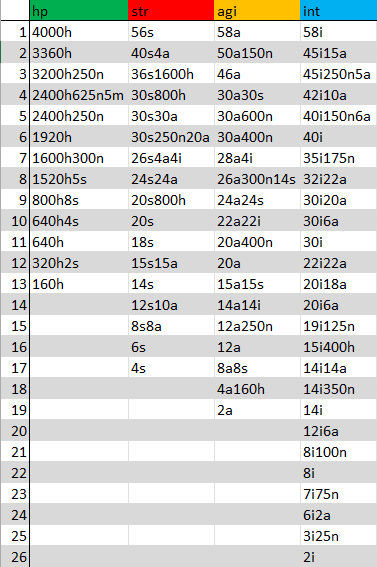 h – hp, n – stamina,
s – str, a – agi, i – int, m – move
To help plan item upgrades for units focused on 1 stat. Some takeaways:
- top 6 items (these will never be useless), for hp appear very early, int appear relatively late.
- very few “pure” items
- for this guide, you’ll be buying and handing down a lot of Int items, get a sense of the path.
Hell Speedrun Achievement cheese
- Start with Shaman/Rhino/Banshee.
- To make it future-proof, you can restart until you have 1 of archer/hunter and 1 of pyro/dark mage. (not mandatory)
- Get a rhino (swift) to tank&taunt, 2x shaman (extrovert). if you don’t have 1-2 of these, restart (not mandatory).
- Rush respec building and respec (you can sell iron/mana crystals to do it before first fight). Shaman – stamina for 2 pillars, a bit of hp, rest in Int. Rhino, just hp and stamina for 2-3 taunts. in the first month, agility might be needed for rhino to do dmg in the first 3-4 small fights, but very quickly shamans take over.
- The main build for these 2 “carry” shamans is extrovert – ascending summoner – better together (or greed is good but that unlocks later)
- You can make 1 of them Practical Learner – Serial Killer to help with early small (1 or 2 units on your side) fights.
- Eventually get a 3rd shaman (lv1 extrovert, and instructor on him – it’s a bit of a “waste” since soon it would be on the banshee, but i think it’s worth it to powerlevel the tank to 12 and 18). give him extra hp so he can stand in front of the others to “tank” shots. you can also get a 4th (lv1 extrovert) but dont spend more blueprints.
- Rhino traits are super important (give him xp potions in big fights) – Swift to prevent enemies from pushing him into your shamans, especially early when fights drag on. Revitalising Echo for free stamina. max Hold my beer to taunt everyone. max Absolute Guardians Veil to make sure no one else dies.
- When you start facing very high level enemies, get a banshee.
- As with most runs, your biggest threats are high level aoe dps (pyros etc), compounded that you’re abusing extrovert, so everyone is in the same place. Banshees work for a while, but at some point you should just start stocking mana crystals to revive after wipes.
- Technically you can stay with shamans indefinitely, but you should transition into having 1-2 hypercarries, which scale way harder. I recommend pyromancer and/or archer depending on what items (%int vs %agi) you got, and what appears in gladiator market/quest rewards.
- Once shop gives lv6 chars, start looking out for banshees with instructor, and pyro/dark mage/archer with upgraded main stat traits (extrovert/serial killer/etc). Once shop gives lv12/18 chars, look again.
- Your main ally will offer you fully maxed units as you advance quests, these might also be helpful.
- In my hell speedrun I got (1) a dark mage with critically lucky; baroness offered a (2) fully maxed extrovert machine gunner which in many fights was top dps with 2 str% items; lategame found a (3) storm bringer that 1-shot backlines (already had absolute guardian veil on tank)
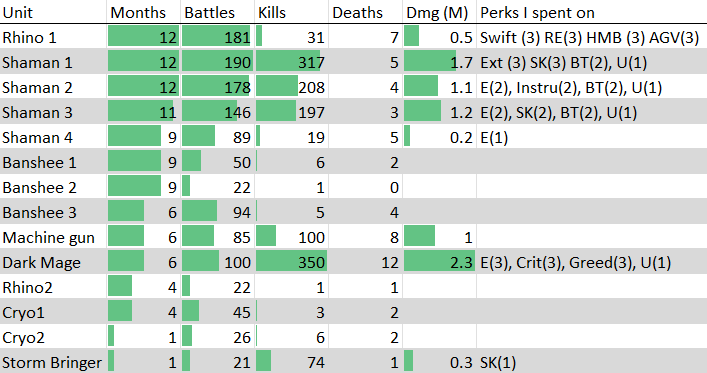 Teamcomp for my achievement run.
Outro
- This guide was made for 1.0, devs have already re-balanced aggressively (multiple 50% nerfs), and i’m not going to update everything just to be out of date right after. If someone wants to update stuff, feel free to steal anything.
- There are a lot of achievements and you need at least 3 runs, and the game is relatively long. Finding a playstyle that is fun for you is better than being very efficient.