Tips on how to collect all of the Achievements in Steamworld Heist 2 as well on various gameplay mechanics.
Story and General Tips
1) Adjust the difficulty at any time if the game is too easy or hard. There will be difficulty spikes when new mechanics are added or certain missions simply may be unexpectedly harder. No Achievements are linked to the difficulty settings, but your enjoyment of the game is.
2) Feel free to experiment with different classes, items, and abilities to figure out how they work and discover the synergies yourself. The only penalty for dying is having to redo things and missing out on certain achievements in a playthrough.
3) Missable Achievements:


The achievements will pop after beating the final boss in the game if you achieved them in the playthrough, though you can continue playing to get additional achievements after the credits roll. While there is no undo button if you make a mistake that would prevent you from getting one of these achievements you can force quit the game (Alt-F4) and when you relaunch it will resume from the last autosave point, which typically is the beginning of each turn or the last location you entered.
4) Take your time and clear out each zone before moving on to the next zone since there is a difficulty spike each time typically and the loot will be less meaningful too. Clearing all the reputation stars (missions, artifacts/warships) in a zone grants a unique “gear” that essentially grants a permanent buff to all your characters that is well worth it. Also, I was able to clear all the missions in 30 days on my first Experienced difficulty playthrough (well below the 35 days for the achievement) which included redoing 2 missions because I missed the epic swag star.
5) Prioritize spending your resources on getting more crew as soon as possible (max of 10 unique characters – entering a new bar location in each zone will trigger additional slots/upgrades), which means it is possible to get additional crew earlier by exploring the map thoroughly. Additional crew means being able to do more missions each day, which means more loot and bounties. It is best to use up every crew member, even if that means replaying a mission. It takes forever to max out characters exp, so it is worthwhile to replay prior missions if you don’t have enough to take on a new mission (like prior solo or duo missions).
6) Each day resets all missions, artifacts (treasure chests in map), and warships (strong ships with a star that drop a chest), and other map enemies. This allows you to farm an unlimited amount of additional galleons (water drops) and fragments (purple gems) for items and upgrades if you explore all the current map zones available to you. Recollecting all the artifacts and warships in a day will net you 29 bounty alone, allowing you to get anything on the list.
Story Achievements:
Other than the 3 missable achievements listed above, the rest of the story related achievements (11 in total) are generally hidden to avoid spoilers and are completely unmissable. The current story objective is highlighted at the top left of the screen and generally talking to the submarine pilot Stanwick will give additional hints on what to do next.
Submarine Map Exploration
1) Your submarine health resets at the start of a new day in game, but if you take significant damage you will automatically heal up to 25% of your max health after a brief period of no damage (you will blink red). So, if you increase your sub’s max health with upgrades your 25% health you can heal up will increase, allowing for hit and run tactics to eliminate any enemy on the map since enemies do not heal if you disengage.
2) You have three weapon slots: front, side, and top and then the remaining slots are for upgrades to health, mobility, or damage and multiple upgrades of the same type do stack. In general, the weapons auto target enemies when within range if it is not reloading and it is facing the the correct direction.
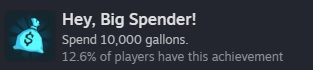
Collecting and spending gallons will happen naturally as you play the game, should get it before the end of the story.
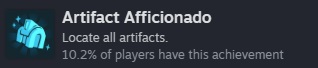
Artifacts appear as treasure chests with a star and are generally guarded by multiple ships and only one exists per zone (6 total). The first time collecting it gives a reputation star and a unique item. Each day after the first collection gives gallons and bounty credits. You need to collect them all, which means having explored the whole map. Once you have explored a zone, you can see the spawn location on the map itself, there are only a few set locations it can spawn.
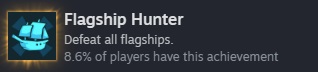
Warships are significantly bigger than other enemies and usually have additional health and attacks. When you defeat one it drops a chest with a unique item and grants a reputation star. Similar to artifacts, each day after the first collection gives gallons and bounty credits. You need to collect them all, which means having explored the whole map. Once you have explored a zone, you can see the spawn location on the map itself, there are only a few set locations it can spawn.
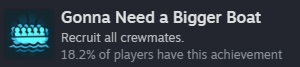
The ability to get all crew is locked by crew slots which come from sub upgrades and reaching the bar in new map zones. So you have to reach all zones to get max crew, but you can get new crew members sooner by reaching new zones before the story takes you there.
Since there are several missions only requiring one or two crew, you can get this with only 6 crew and replaying old missions, but this will be easier with more crew near the end-game when you have many missions to choose from.
The sub upgrades all require the “fragment” resource which looks like purple gems. This also includes the two personal abilities of every crew member and the three upgrades for each job type. The best source for fragments is large enemies on the map and bounties. Cannot complete this until the end of the game because you need all characters and several of the jobs maxed out.

This requires getting fairly far into the story since you need a shield for the sub. The easiest way to get this is on the enemy subs in the north part of the map and let the sub torpedos hit you while on the surface. The torpedo has to bounce back and kill the enemy sub to count. Getting close to the enemy gives the highest chance for it to hit the enemy (need sonar upgrade to see the green pings).
Squad Tactics
1) I highly recommend taking a balanced squad with different weapons/classes to maximize the synergy. There is usually a description at the mission start that gives a hint of what is to come, so you might want to choose the classes to best achieve the victory.
2) Job (aka Classes):
Job / Weapon / Purpose
Brawler / Hammer / Tank – they have armor and can heal from kills but can generally only attack one unit at a time.
Boomer / Rocket Launcher / Explosives – specialize in crowd control and utility items like grenades
Engineer / Pistol / Buffs – specialize is giving healing and various “aura” buffs to teammates
Sniper / Sniper Rifle / Precision – long range attacks with high accuracy, but also the only weapon requiring reloading
Reaper / Assault Rifle / Multi-kill and critical hit damage at the cost of lower health
Flanker / Shotgun / Mobility and loot collector, ideal for speed
3) Every character starts with a single job, but can level any job up simply by changing weapons and then can choose to unlock the abilities of inactive jobs with “cogs”. Since you start with 3 cogs and unlock more as you level up jobs it is highly recommended to switch up jobs to maximize the active abilities on a character. Every job has permanent boosts to “cogs” at level 3 and health at level 5 as well as strong abilities worth using.
4) Every character should do at minimum one mission as a Boomer and a Flanker (Rocket launcher and Shotgun) because a single mission is enough to go from job level 0 to level 1 and Boomer unlocks another utility item slot and Flanker unlocks additional mobility.
5) In my opinion, strong synergies exist between certain jobs:
Brawler + Flanker -> Armor & Mobility for front line characters
Sniper + Reaper – > Aim & Critical Hit for precision high damage headshots
Engineer + Any Job -> Engineer adds more cogs which means more active abilities, though best fit with Sniper and Reaper
Boomer + Any Job – > Boomer increases health and utility item effectiveness, which helps every class I find the Boomer job to be the best synergy for everyone though we get only one story character that starts with it.
Achievements:
Hat Hunter, Hat Trick, and Hat Collector all require shooting off hats from enemies and collecting unique ones, multiple hats of the same type don’t stack. This is easiest with the sniper job or the level 1 sniper ability “Perfect Aim” since the shot needs to not actually hit the enemy, but pass right above them (the ricochet can do damage after the hat is off). Otherwise, hitting an enemy directly and killing them will never drop their hat. This is particularly grindy because bosses have unique hats and there are rare hat spawns for regular enemies that don’t show up often, so it may require replaying old levels multiple times.

This is easiest in missions with rattlers since they spawn in large numbers and many of them allow attacks to pierce them. A Reaper can have as many attacks as enemies as long as a kill is made with each shot if you have the level 4 “Harvest” ability.
The heals across multiple missions add up to the 100, so as long as you have the engineer ability or healing utility items and use them you should get this naturally through normal play.
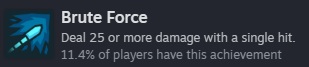
I found this is best with a sniper/reaper combination character with the critical hit buffs, positioned next to an engineer for the damage buff, using the war cry reaper ability, the sniper damage buff and then getting a headshot is the best way to get this. Additionally, avoid enemies with high armor and can soften an enemy with a pistol shot from an engineer to give the “break” debuff to increase damage taken.