I’m not a fan of Wild’s default KB+M layout, so I made an alternative! There are also a lot of default options in Wilds I think a lot of people, controller players included, would hugely benefit from changing or at least knowing about!
Intro
If you’re using a controller, fret not, skip over The Keybinds and you will find a lot of useful option recommendations
My keybind recommendations are very subjective, you should take, leave or adjust each of my suggestions as it best fits how the game feels to you.
I’m also not a ranged weapon user, all these keybinds will be for the Melee Weapon Basics. Many of the keys should still carry over but bowgunners & archers will have to use their own preferences a bit more.
And finally, at the time of writing this, this guide has been hastily reconstructed from a guide I wrote for the beta, so it can be useful for as many people as possible during the game’s launch. I am under no illusion that it’s perfect. If you have any additional information you think should be on here for people, alternate keybind recommendations that work better for you, or just requests for how this guide could’ve been more helpful to you, please comment it to help me improve this guide.
In particular, I believe that Wilds on release has reshuffled a few menus slightly, so my screenshots from the beta aren’t as accurate anymore, I’ll be updating them soon!
Navigating The Options
If you press R to open the submenu, you could alter things like which tabs are displayed, set up a favourites tab to design your own menu, or show/hide the status display screen on the right, it’s worth tweaking!
Everything in this guide will be in either the Options or Keyboard Configuration (keybinds) sections. If you can’t find an option, it is worth checking the Main Menu options or the in-game options, as I believe there are differences between both.
Bear in mind that each tab in the options menu has multiple pages, you can use 1 or 3 to switch page.
Also, in Keyboard Configuration, we now have the handy option to set up specific Profiles, in case you want to use different keybinds for specific weapons.
If you’re unsure about an alternate bind I suggest, you could set up a profile for your main weapon to test it out (use R on either the melee/ranged weapon basics, then select Duplicate, that way any binds you’ve already set up will carry over to the test profile), then you can delete it once you’re done testing.
The Keybinds
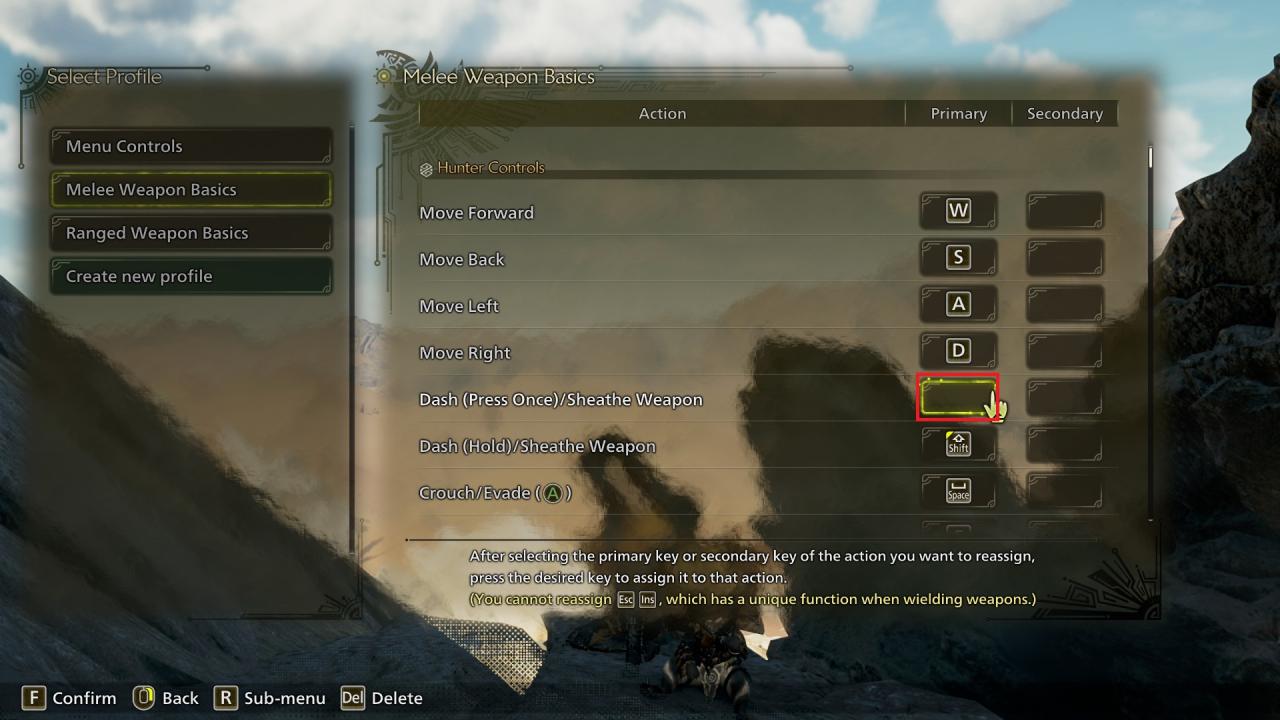
Dash (Press Once)/Sheathe Weapon is how Wilds handles Toggle Sprint as an option. Personally, I have left this as default, I don’t like toggle sprint in Monster Hunter, but some people might feel differently.
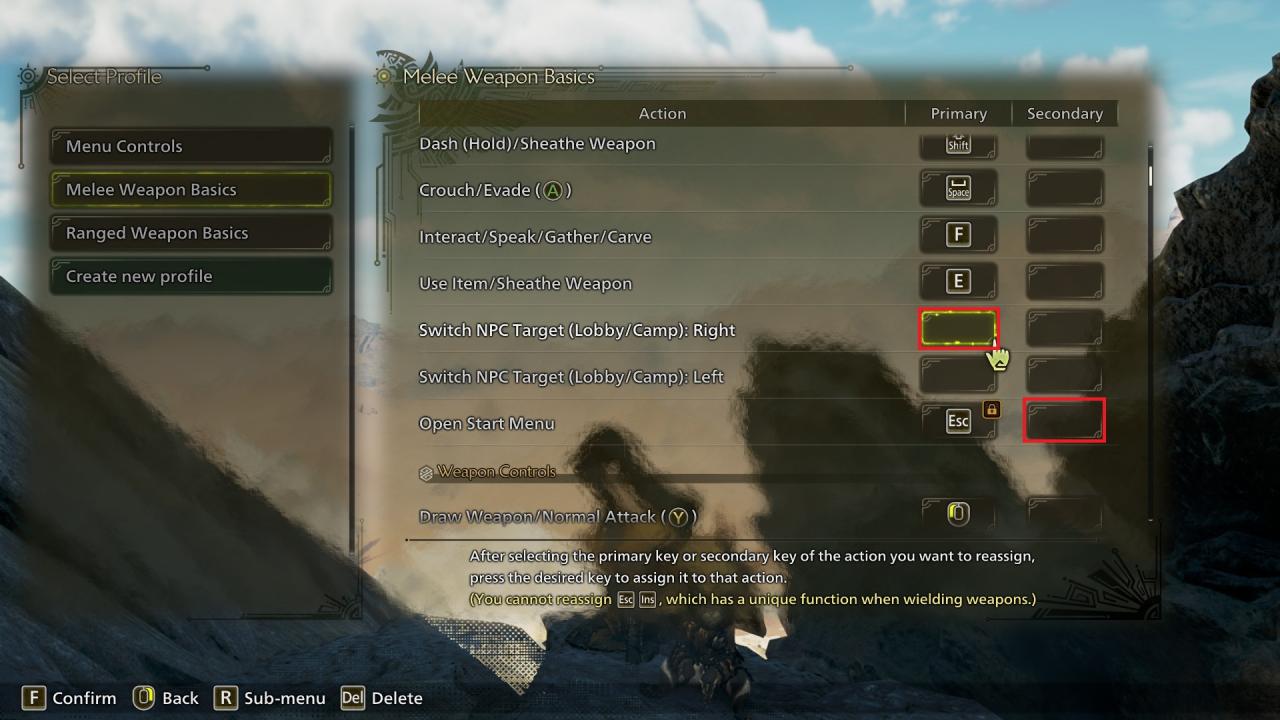
Switch NPC Target (Lobby/Camp): Right I have unbound from R. (Select it, then press Delete to unbind a key) This option is used for if you have multiple interaction targets close together in town, you can switch between them- I haven’t found a situation where this button is really necessary, and leaving this as R causes too many button conflicts.
Open Start Menu unbound from H as a secondary input. I don’t think this secondary input is necessary, and it frees up the key.
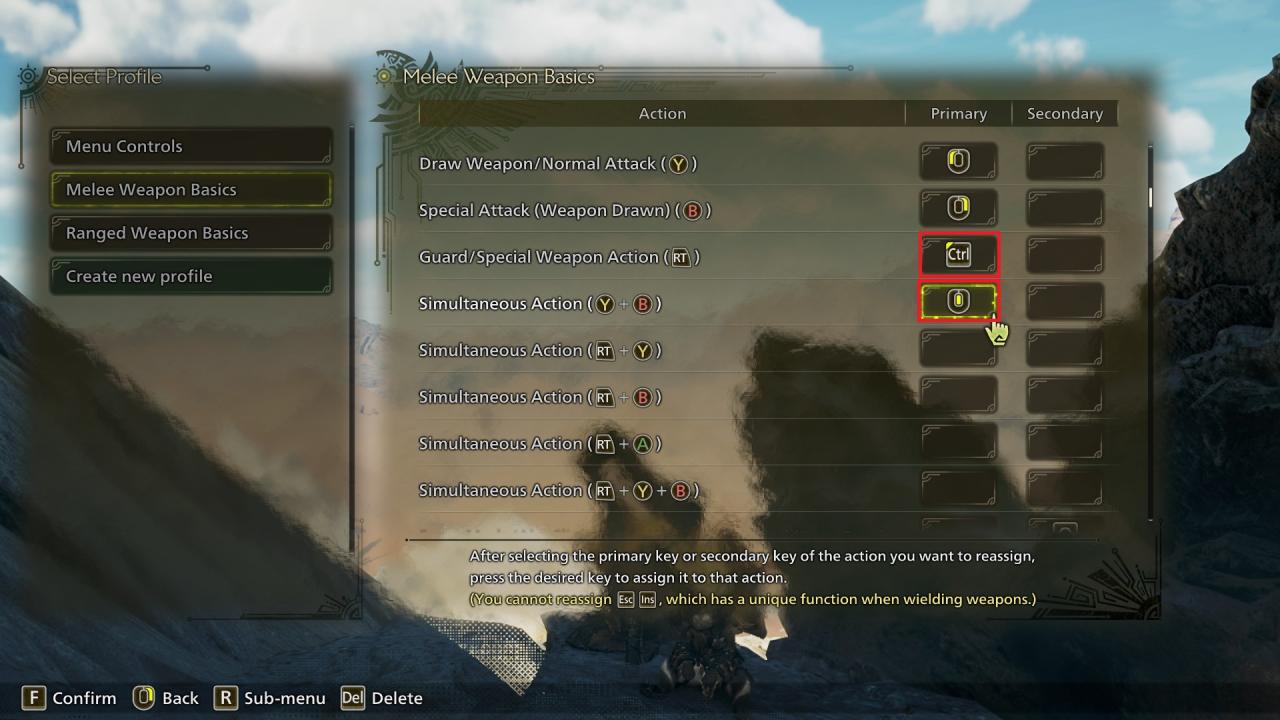
Guard/Special Weapon Action changed from R to Ctrl. My muscle memory from previous PC Monster Hunter games like World is why I’m using Ctrl, so if someone new to Wilds thinks using Ctrl for this feels unnatural, you could use a different button, such as perhaps Q or TAB, which are very easy to free up in this control scheme, or stick with R if that’s what feels best to you.
Simultaneous Action (the first one) changed from whatever Wilds automatically assigned it (likely varies depending on your mouse, for me it was mouse 5) to middle mouse button. You can consider this optional, as this just allows you to press the two mouse buttons simultaneously with a single button. Personally, I’m a Hunting Horn player, the new attacks mean that being able to consistently do several of these inputs quickly with no accidents is important, so this bind is great for that.

Focus Mode/Aim Slinger With Weapon Sheathed (Press Once) I have bound to Q instead of Alt. If you have no intention to remap the Seikret controls, you can avoid doing this if you’d prefer, I find that Q feels like a good button for this. (or maybe I just got too used to using it for Silkbinds in Rise?) Binding this away from Alt also helps if you’re very alt-tab happy, like I am.
You could make this the “hold” button instead, but I personally think toggling Focus mode is going to be far more comfortable for the majority of players. Controller players have to find the ability to do this in the Options, not in button rebinding.
Equip/Unequip Mantle changed from C to V, I don’t think it needs to be this close, and this way (provided you also rebind Display Keyboard Shortcut to free up V) the C key is now free! (Note: I actually haven’t been able to get this keybind to work ingame? I’m still unsure as to why, but so far Mantles have only worked by manually using them like items. If anyone figures this out, please let me know)
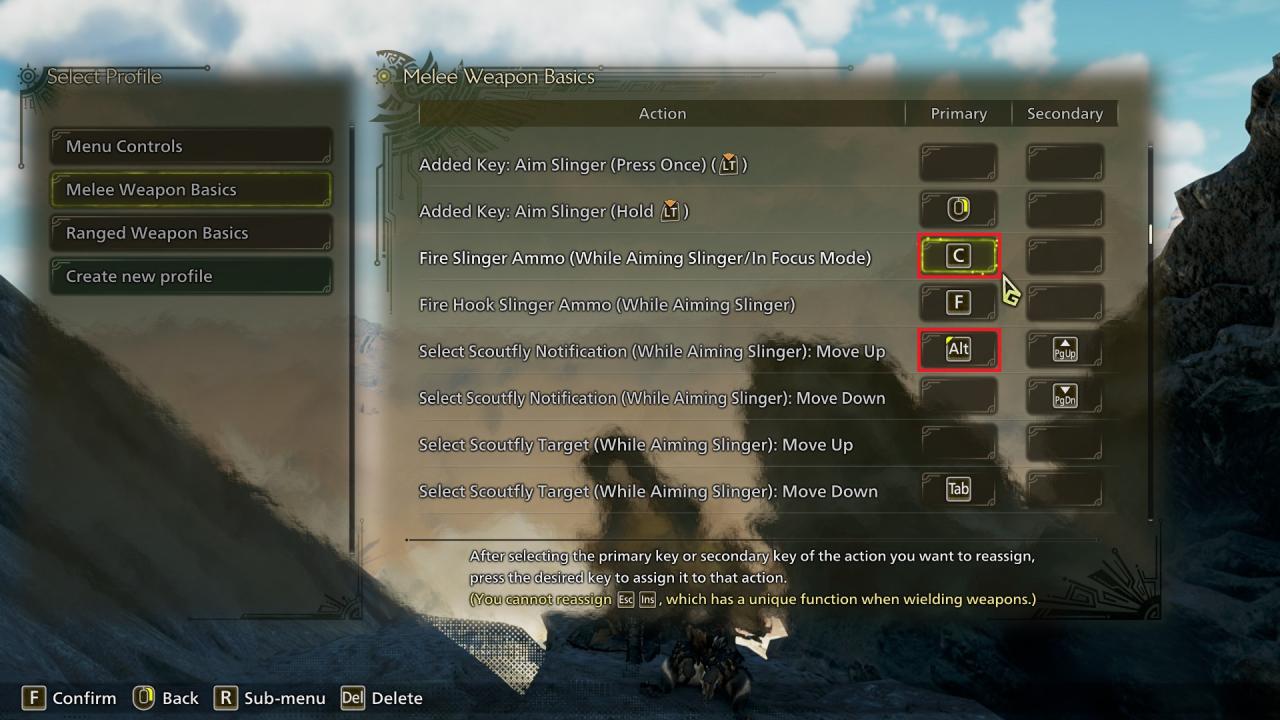
Fire Slinger Ammo (While aiming in Slinger/In Focus Mode) changed from middle mouse button to C, this feels intuitive to me. You might want to swap this around with the Hook Slinger bind (which remains F under this control scheme) depending on your own preference, or use a different button if C feels weird, I think this is the least likely of my keybinds for other people to prefer.
Select Scoutfly Notification (While Aiming Slinger): Move Down rebound from Q to left Alt. What this button does is let you press it to select a scoutfly notification on the left side of your screen, then you can just press the hook button and your hunter will grab the item without you needing to move the camera. This is quite handy, and IMO Alt is a button that makes sense for it.
Note: This section refers to the mounting status effect on monsters, not the Seikret.

Weapon Attack changed from R to Ctrl, or whatever other button you decided to put Guard/Special Weapon action on. If you left it default, you won’t need to touch this. This is only to avoid keybind conflicts.

Call Seikret (Auto/Manual): In Auto mode, your Seikret is always trying to move to the quest target, in Manual mode you always control it.
Personally, I vastly prefer Manual for most situations and only enable Auto sometimes, so I’ve switched Auto to Y to be out of the way, and Manual to TAB to free up Q. Depending on your own tastes, this could differ a lot, though, the use I’ve put for Q isn’t massively important so you could just leave these binds default. On a personal note, I would advise not abusing Auto too much for your own fun, too. Auto mode should be great to use sometimes, but if you’re using it 24/7, especially when exploring new areas, you might lose your sense of direction.
Check Seikret Pouch changed to H, I don’t think this is an important function and freeing up N is nice.

Display Items(Hold)/Reset Camera changed to R. In layman’s terms, this button holds open the item bar, and also allows you to access your radial menus. This is the main reason I prefer to change the special attack button from R, this button is right next to E as use item and feels intuitive to me in managing the item bar.
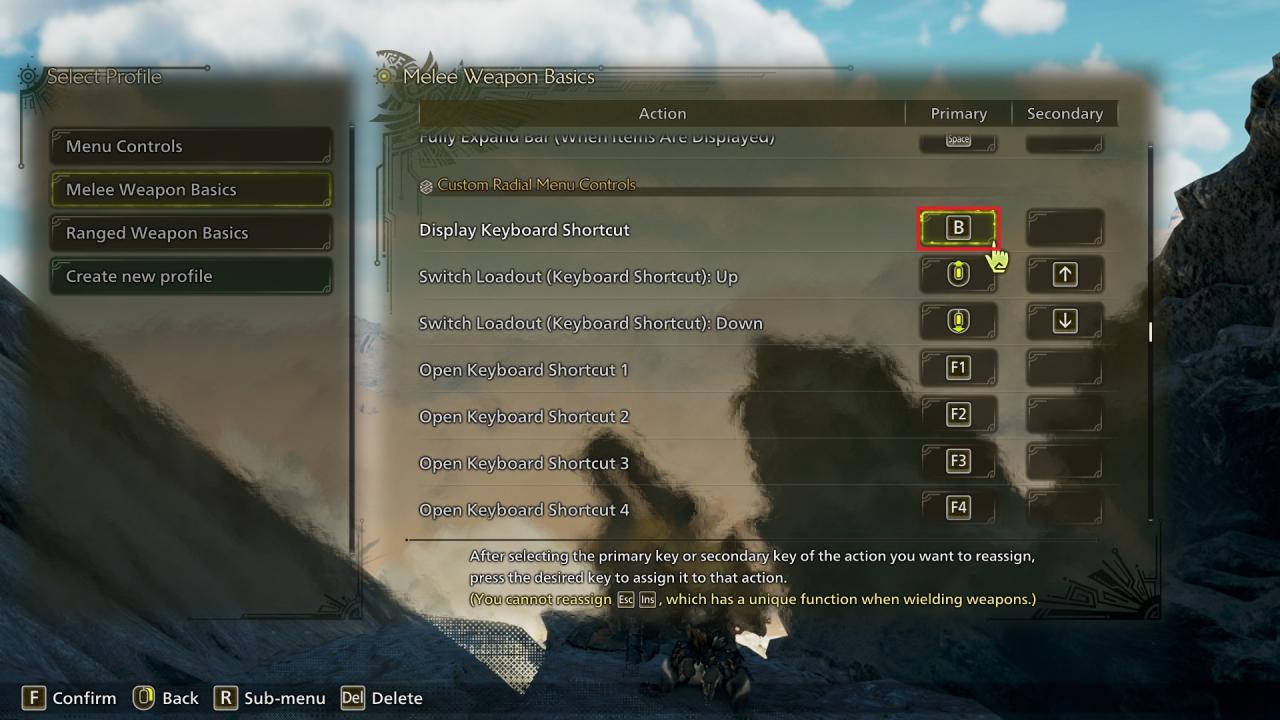
Display Keyboard Shortcut changed to B. This feels like “backpack” so it’s sorta intuitive to me? I want to free up V for other binds and this isn’t a very important button, as you can always just press the actual keyboard shortcut buttons to do the same thing. You could also unbind this entirely, if you’d prefer.
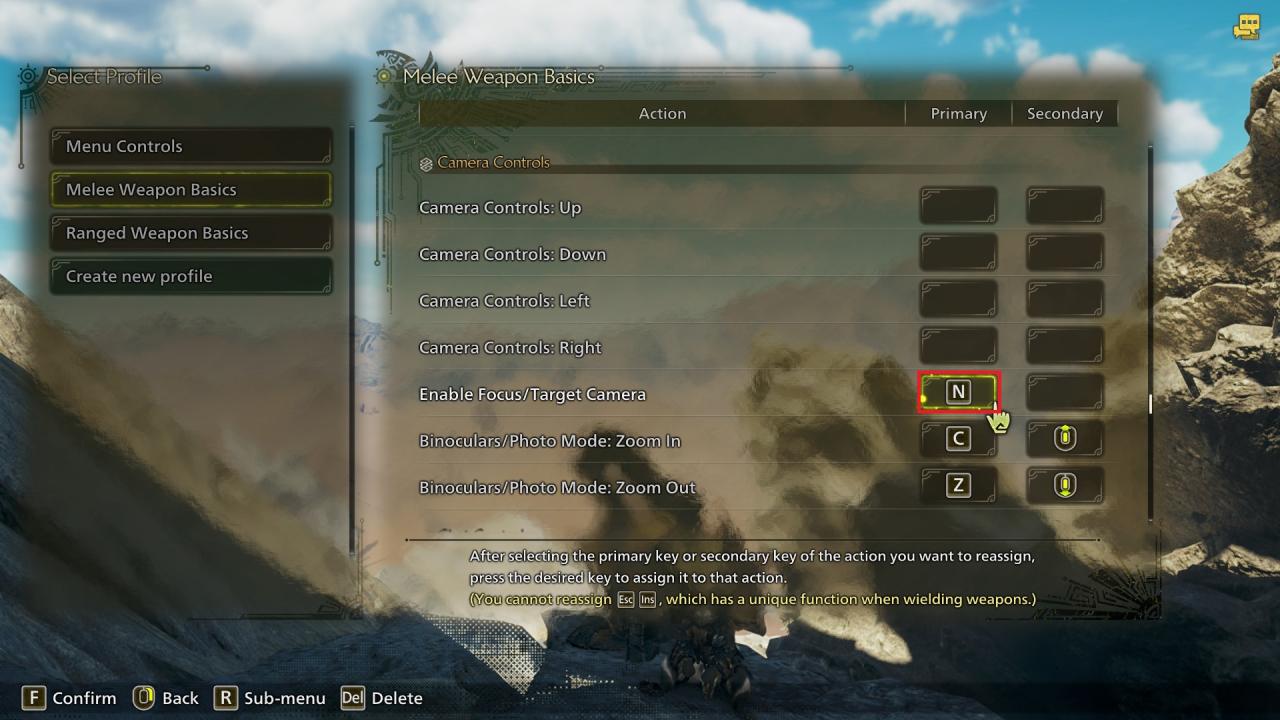
Enable Focus/Target Camera changed to N. Targeting the camera on a monster in Monster Hunter is not my style anyway, so I just put this one out of the way. You could also use T for “target” if you’d prefer, but you would have to figure out how to remap push to talk, that is T by default- If you aren’t intending to use voicechat anyway, you could just dump push to talk somewhere.
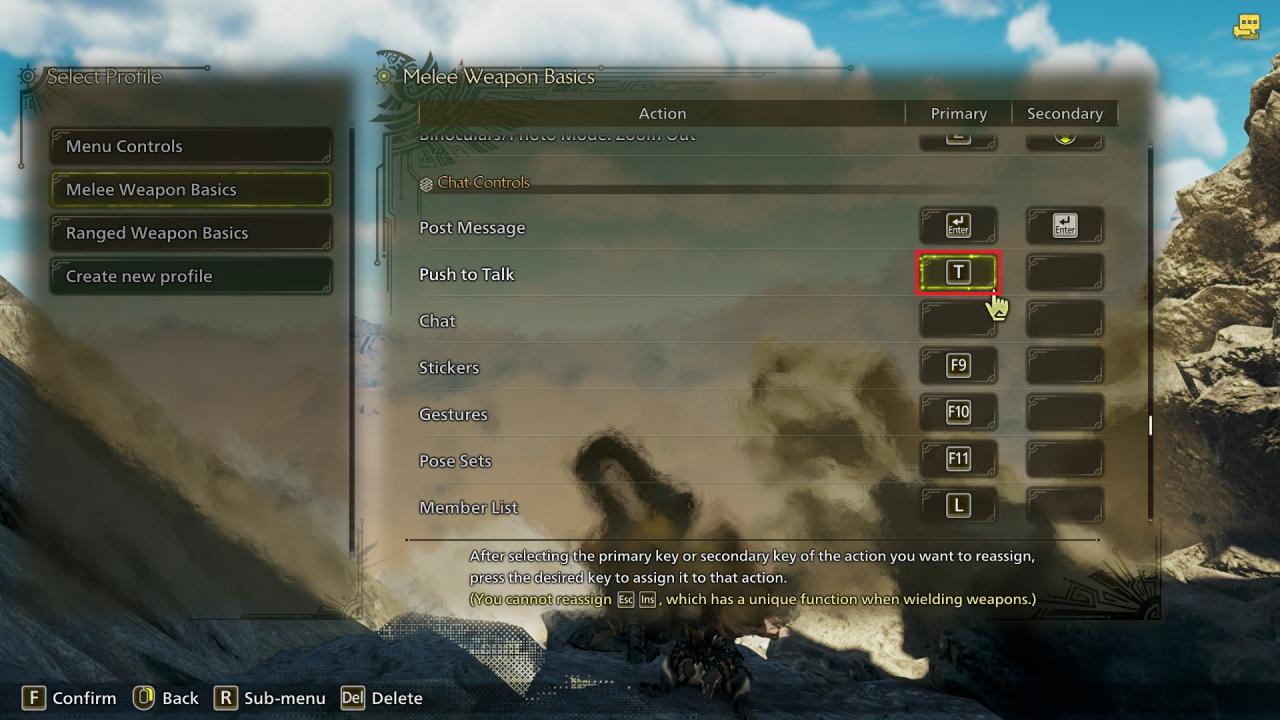
I don’t think there’s anything in here I’m interested in changing personally, but if you never intend to use Push To Talk as mentioned above, it’s here to rebind.
Open Departure Menu/Open Chat Notifications/Skip Quest Results is a curveball the full release has thrown at me lol, but rebinding from Y to U works just as well.
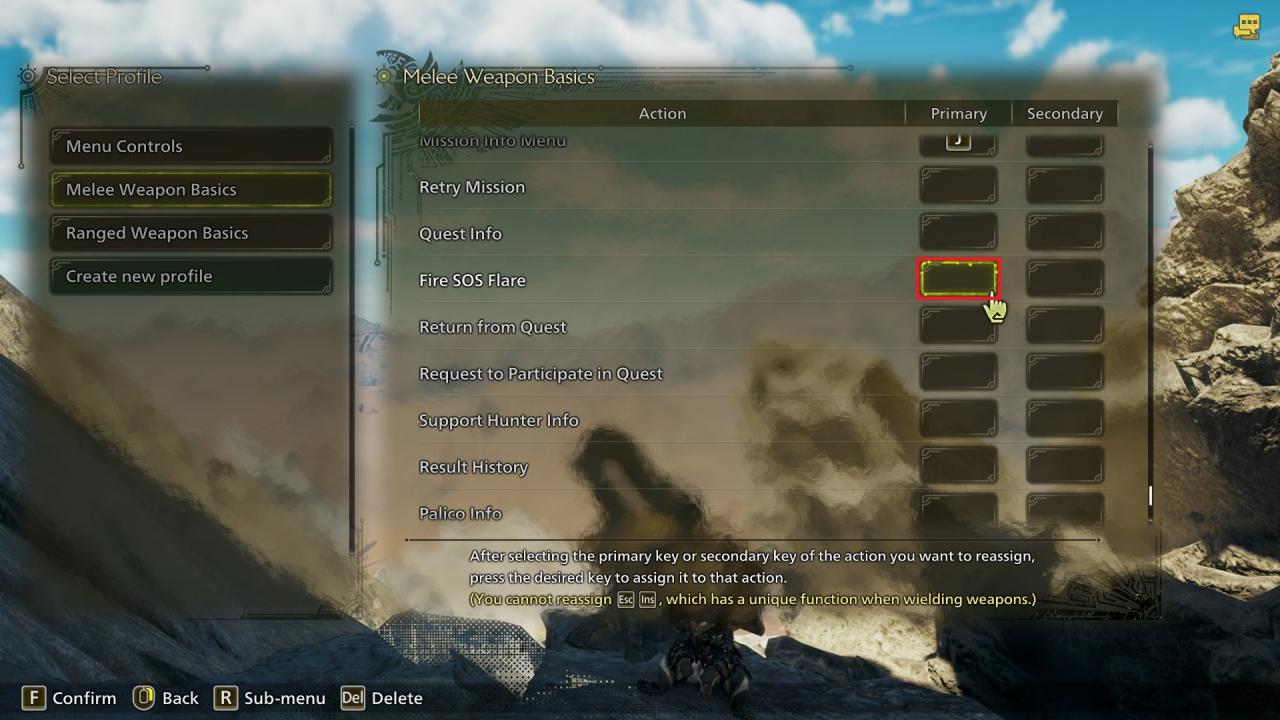
Fire SOS Flare unbound, I’d rather not do this on accident.
The Options (Part 1)
There’s a filter you can activate with X- Setting this to “Shared + Keyboard + Mouse” will hide any options that only work for controllers, if you never intend to use a controller for Wilds (or vice versa for not intending to use a keyboard) this is handy!
Note: All these options are based on the in-game ones. I believe some of these don’t display in the main menu options.
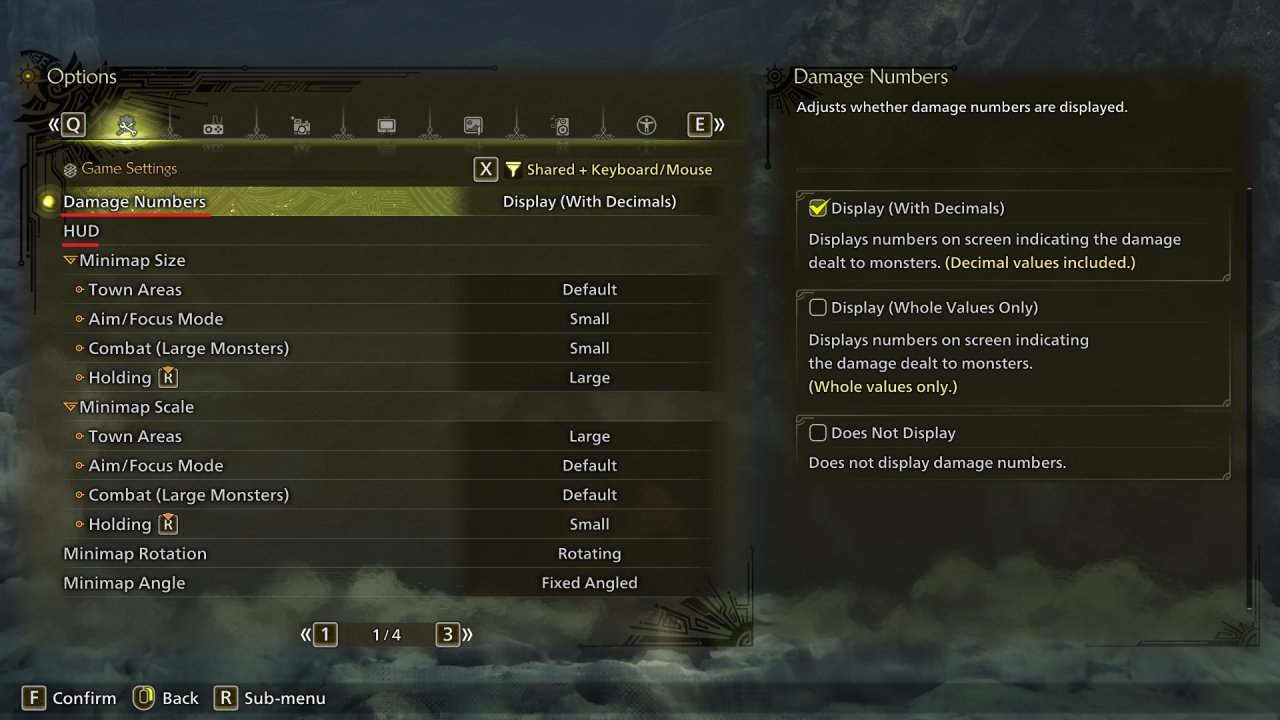
Damage Numbers: You could set these to Display With Decimals (Wilds tracks damage decimal points instead of round numbers now!) if you want precision, or Does Not Display if you don’t like damage numbers.
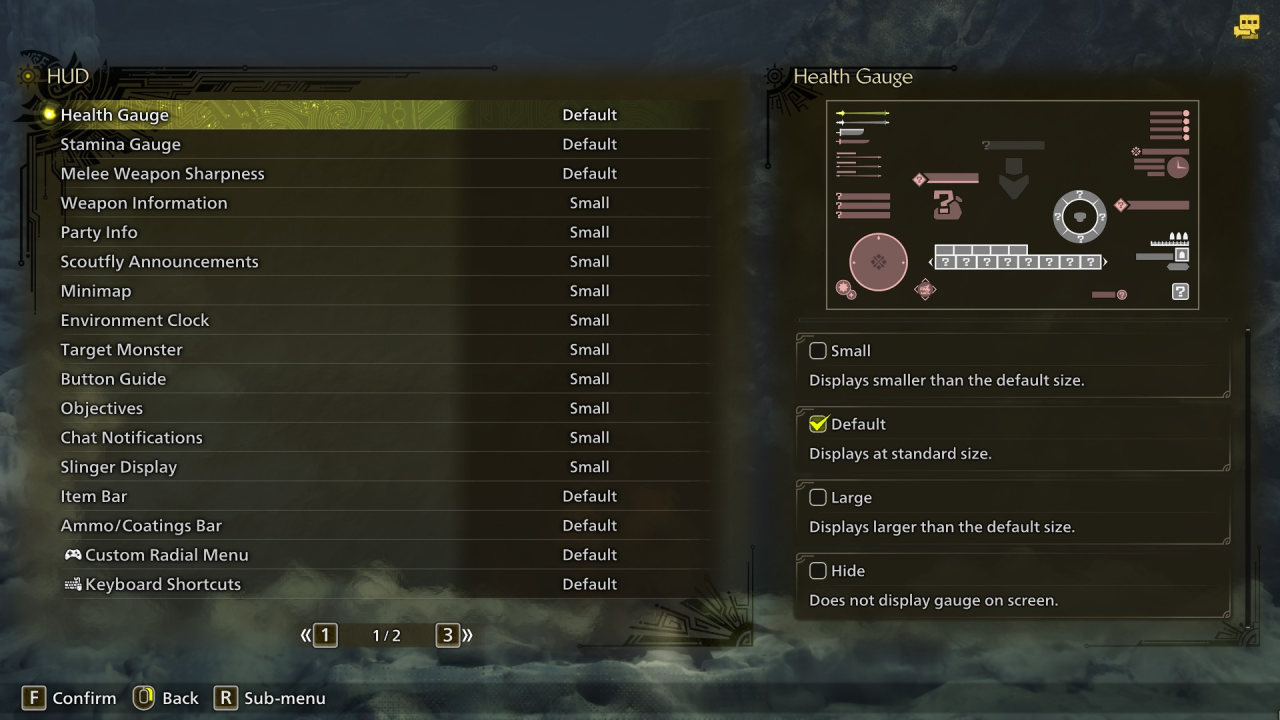
HUD: Press this to enter a full menu where you can review HUD elements and if you’d like to hide, shrink or enlarge them. Personally, I’ve shrunk down a lot of this stuff because I’m playing close to a screen, and hidden Name Display for characters to avoid online clutter. If this menu’s giving you a headache, skip to Accessibility – Automatic Settings, that has 2 quick HUD size options.
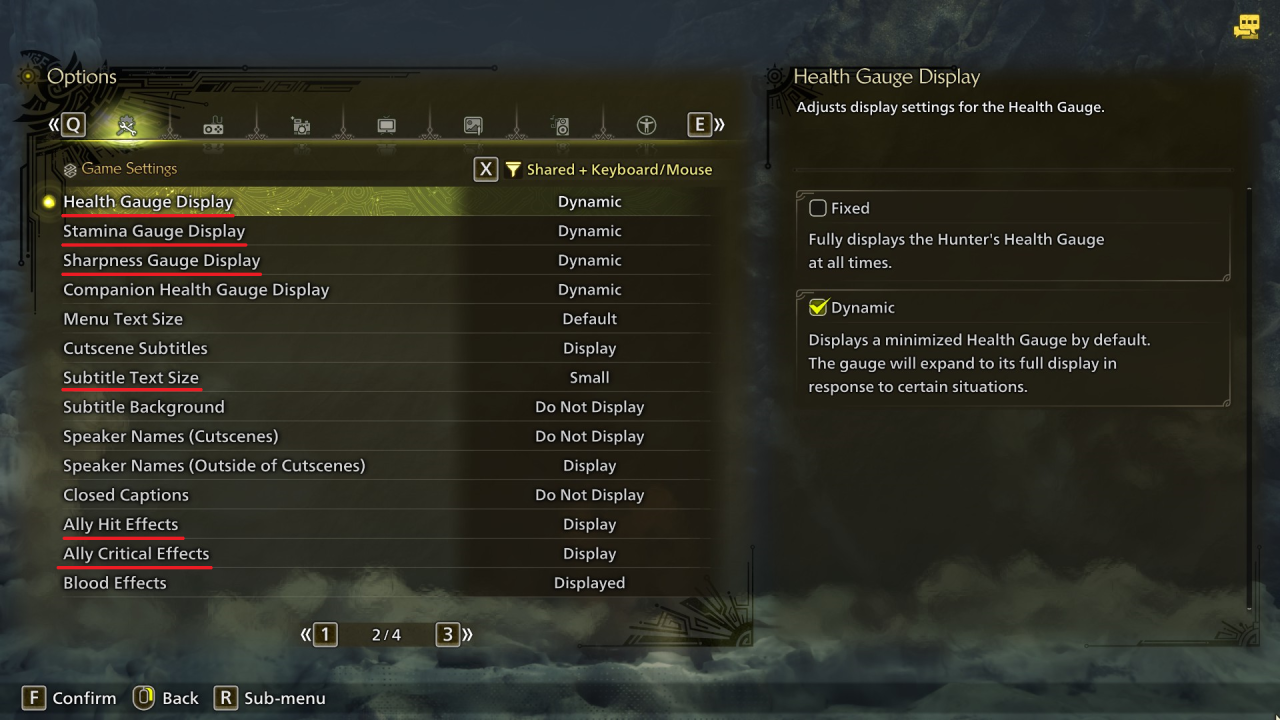
On the second page, you can set the Health/Stamina/Sharpness Gauge displays to if you want them seen at all times, or only in combat.
Subtitle Text Size is IMO a bit too big by default for people who don’t need to rely on the subtitles to understand the game- If you do need the subtitles, you should probably leave it default or larger. There’s a bunch of other subtitle options too like closed captions, speaker names or subtitle backgrounds for your customisation.
Ally Hit Effects/Critical Effects can be disabled, if multiplayer hunting is too visually cluttered for your tastes.

On the third page, you can check out the Weapon/Head Armor Visibility settings to adjust your cosmetic appearance a bit, if you’d rather not have the giant weapons or a helmet.
Obscured Hunter Visibility is partially on by default, to make sure you don’t lose yourself if a monster’s in front of the camera. You can adjust the outline’s colour if you don’t want it pure white, or turn it off. (though I recommend leaving it on)
Hide Other Players’ Seikret is off by default, and I recommend leaving it off to avoid confusion/visual clutter.
Seikret Auto-Explore is on by default and personally, I’d turn it off, I don’t really like the automatic navigation. Even if you intend to use auto-move a lot, this can still be a bit disruptive.
Support Hunter Settings lets you adjust how NPC Hunters behave. (these guys show up in scenarios like using an SOS flare while you’re offline) If you’d prefer, you can stop them doing potentially disruptive behaviours like mounting the monster.
Weapon Attack Power Display is new for the game’s release (so, not in my beta screenshot, sorry! and lets you turn off the “coefficient” that creates bloated damage stats, instead displaying every weapon’s true stats. The mainline team like to lie to you about what damage weapons do to avoid complete newbies assuming Great Sword is useless. Most people will want this turned off.
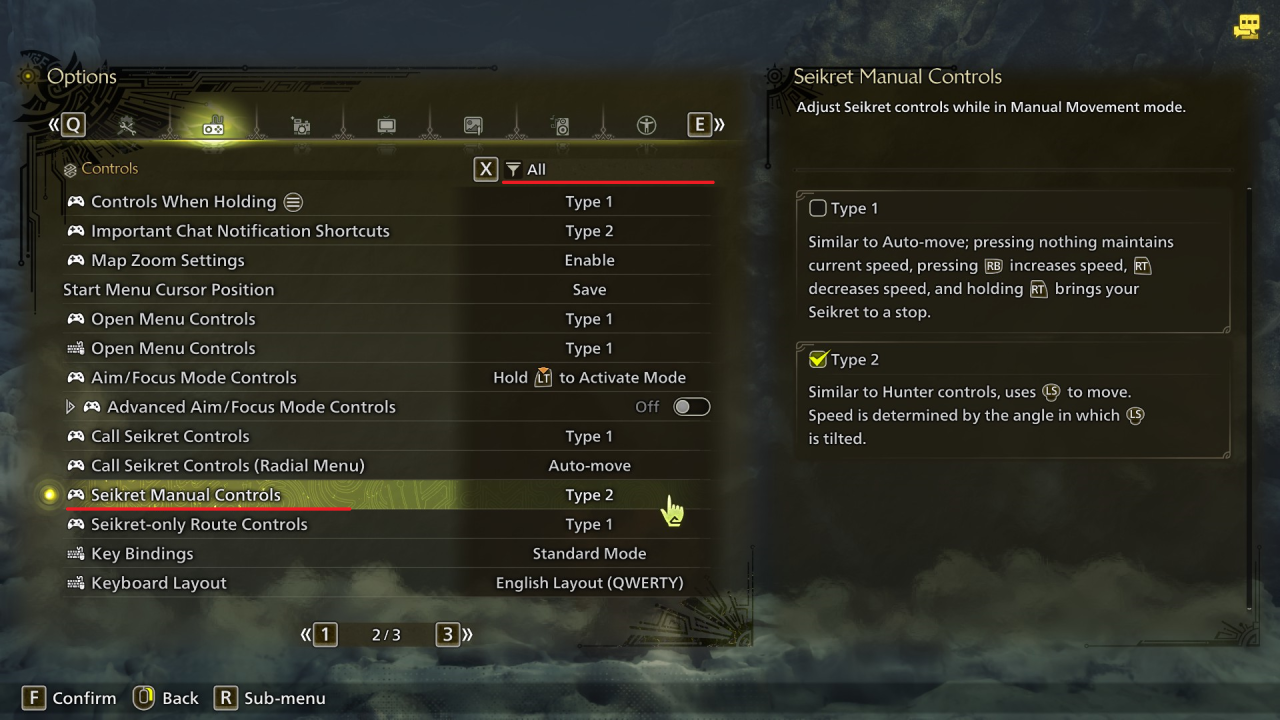
Seikret Manual Controls lets you change the controls from a “driving” style of raising/lowering your speed and steering, (Type 1) to simply holding a direction like normal movement. (Type 2)
I personally highly recommend Type 2 manual controls. It makes it much easier to use the Seikret for combat. The only thing you’re really losing on KB+M is the ability for your Seikret to move slowly, only a controller’s analog joystick input can do that under Type 2.
Capcom’s devs thankfully listened to beta feedback and made this a universal setting instead of designated as for controllers, big thanks to them!
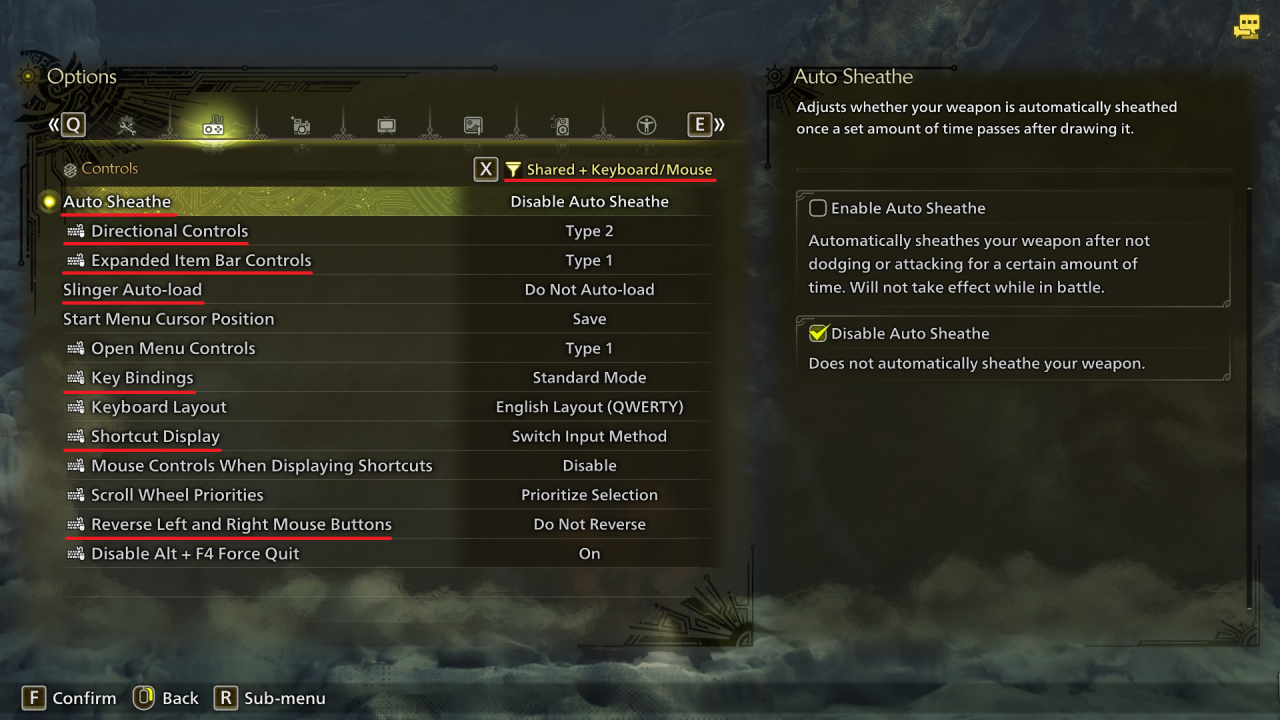
Auto Sheathe: I HIGHLY recommend disabling this, auto sheathing can get you killed.
Directional Controls: I personally left this on Type 2 as that’s what makes sense to my brain (eg. if you are looking to your hunter’s left while attacking, evade while holding W, your hunter evades forward instead of left) but this is personal preference, you could test both settings.
Expanded Item Bar: This is a neat function that lets you display the Item Bar’s full contents at once with an extra button press. You can adjust how it works or disable it.
Slinger Auto Load: With this option, having a slinger ammotype selected in the item bar will have your hunter automatically load it after a moment. Manually loading is faster than auto loading, and I can confirm the slinger loading animation is not freely evade-cancellable, so I personally have turned this off.
Start Menu Cursor Position: Bear in mind that this setting ALSO saves the tab you were on in the Start Menu as well. I personally like leaving this setting enabled.
Key Bindings: No, not that kind of key bindings, this is for people who want to use the keyboard as a secondary control input like for chat or keyboard shortcuts, while using a controller to primarily control the game.
Shortcut Display: The keyboard shortcut button can be used either to display one set of keyboard shortcuts, or to display most of them at once and let you use the scroll wheel to dash through them. This can be really powerful for letting you select items quickly if you master it, but you should set it to Fixed Four-Row Mode if you want to master that forbidden art. If you’d rather not have the giant popup menu, leave it.
Reverse left and right mouse buttons: Left handed players should give this some consideration!
The Options (Part 2)
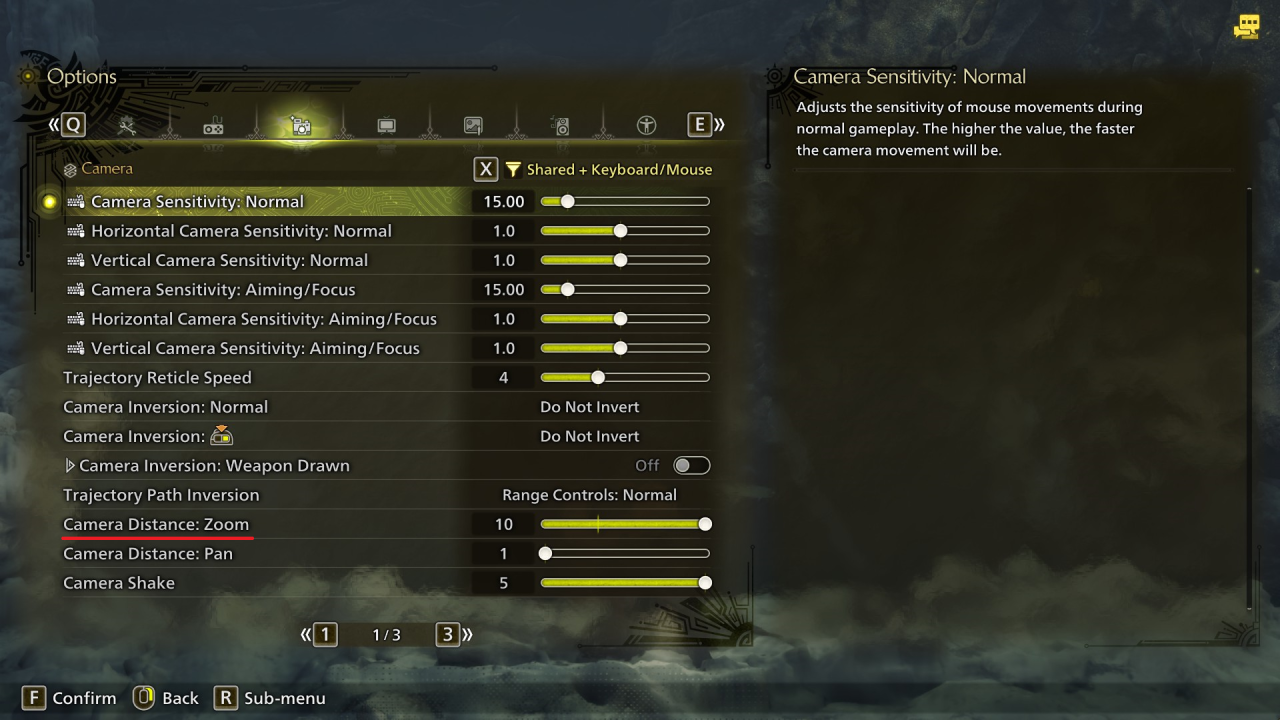
Camera Distance: Zoom on the first page might be worth tweaking, I have personally found especially in villages the default setting of 4 feels way too close-up.
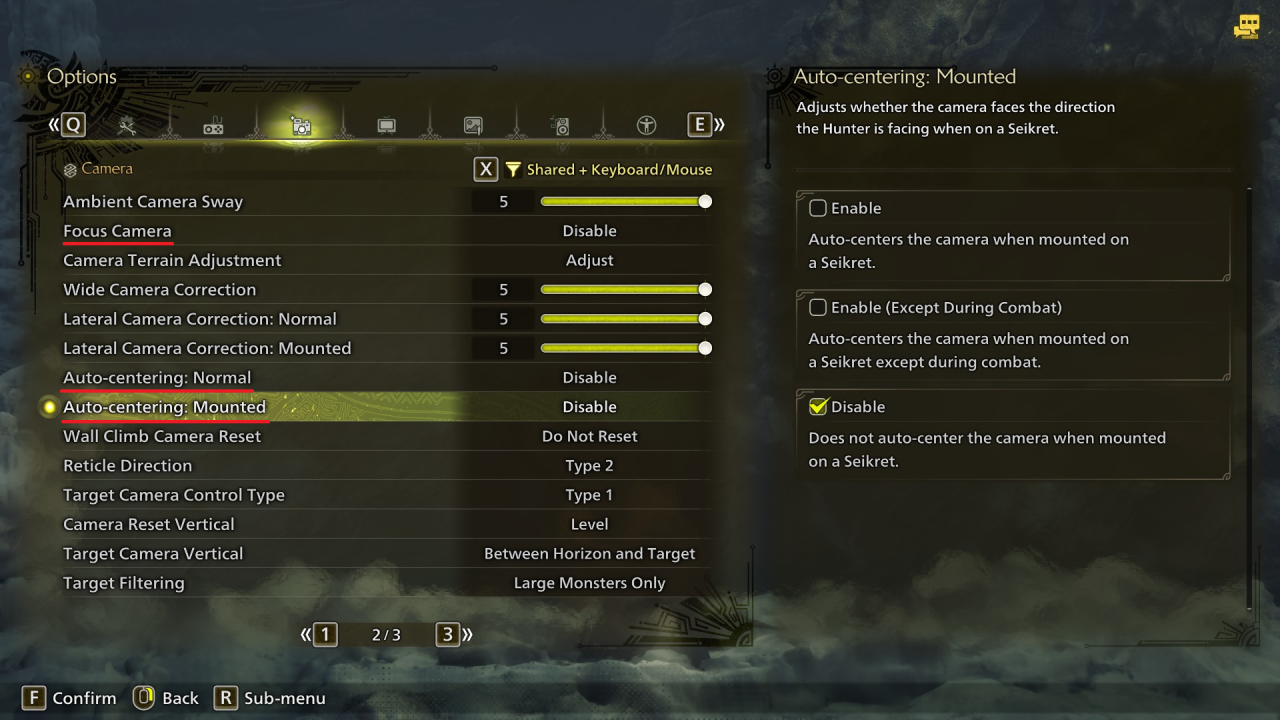
Focus Camera on the second page of this tab might be worth disabling, to stop yourself from engaging in a potentially unwanted lockon.
Auto Centering can also be found on the second tab, and while it’s thankfully disabled by default on foot, it’s not for the Seikret, so you might want to tweak that.
Monster Sighting Camera on the third page causes a zoom-in when you discover a monster for the first time, if you found this annoying in World we can now disable it!
The only section I’ll highlight here is brightness, you set this up when booting up the game of course, but it seems that unlike a lot of games, the default of 5 might be too bright for most monitors if you left it there, and that can make the game’s colours look washed out. Take the text of the Brightness test seriously, and see if that makes the game a bit more vibrant.
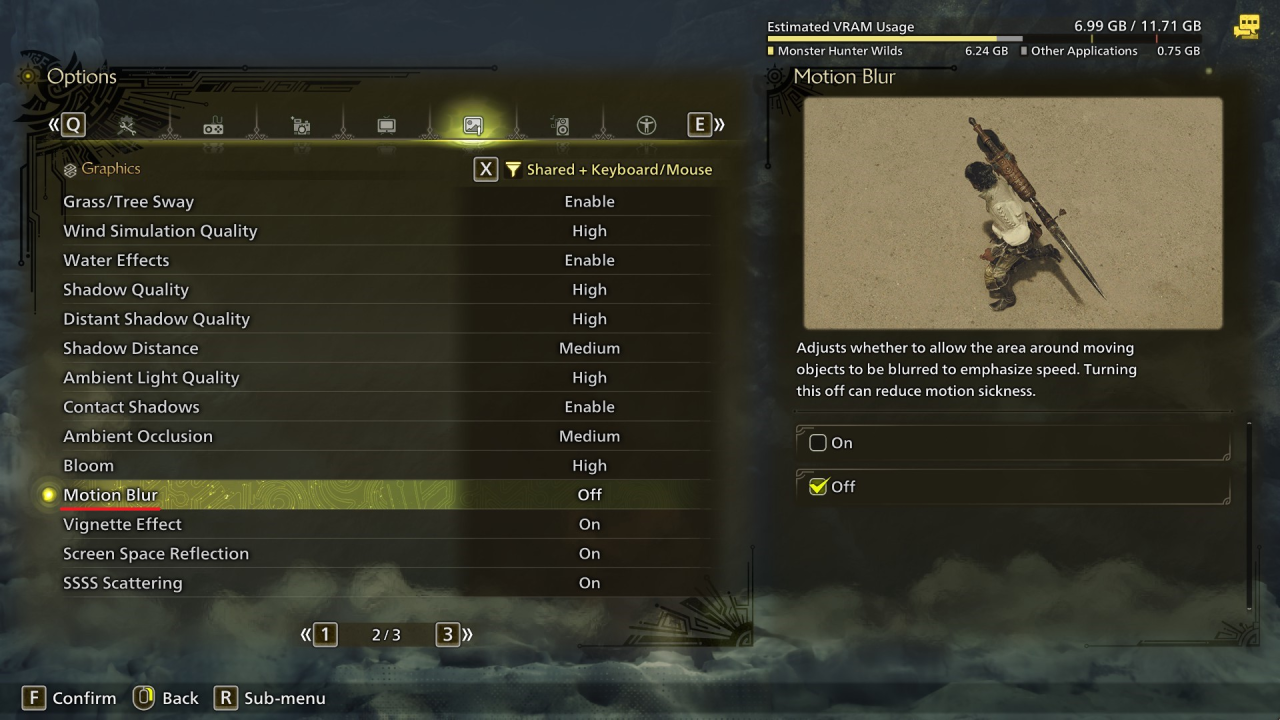
What graphics settings you’re using all depends on your setup of course, I’d just like to highlight that Motion Blur (if you’re already ingame) is on the third page, one option from the top, so strike that OFF button with the righteous fury of a thousand suns
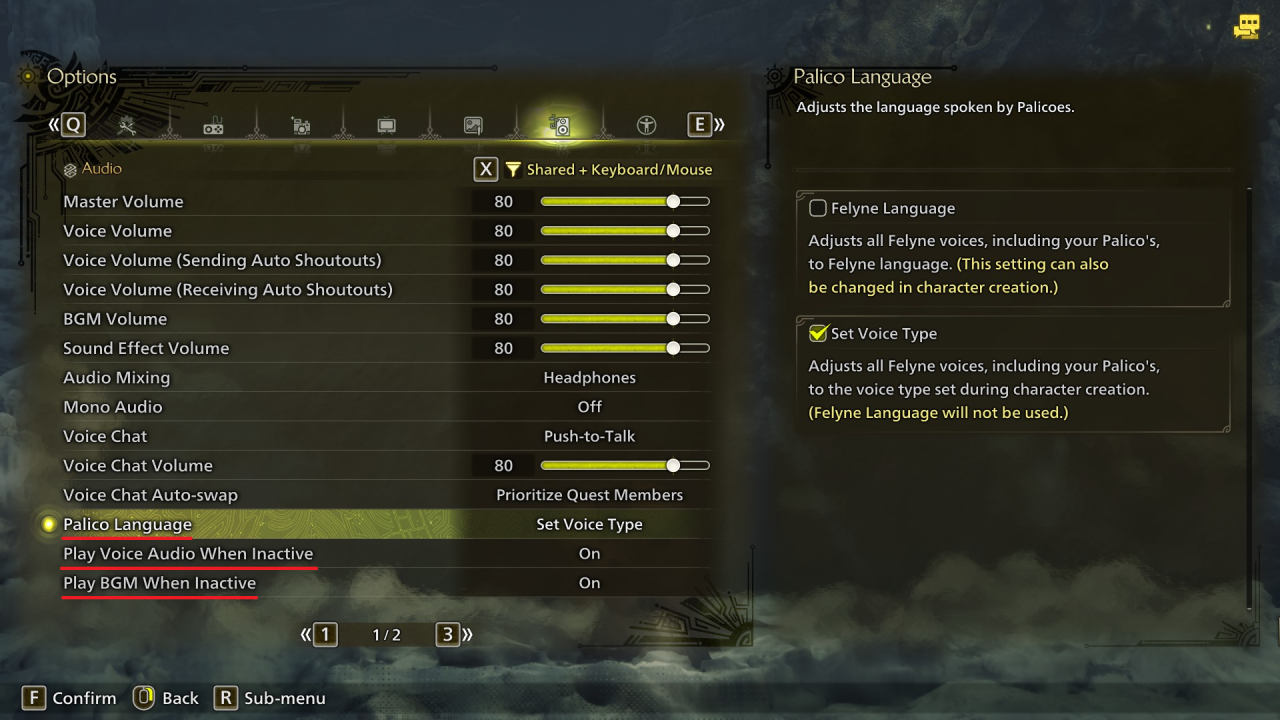
You can change the Palico Language here back to meows in case you’re regretting your choice.
You can also set various sounds to not play while the game window is inactive, in case you’re literally me and alt-tabbing all the time.
Colour Blindness Assistance changes the colour of certain HUD elements, including weapon specific ones like Charge Blade phials. If you have any form of colourblindness, give it a look.
Visual Accessibility, Auditory Accessibility, and Motion Sickness Reduction I believe are just “quick menus” that assemble previously seen options like Motion Blur or HUD size.
Automatic Settings is great if you don’t want to customise your HUD manually. It provides two default sizes for desk/TV players.