This guide provides specific info on those looking to achieve the Day One Trophy by beating the game on Day One of a new profile. It also contains some general information about Blue Prince that would be helpful in that context.
Introduction
I’ll also include some general information that is helpful in the context of achieving the Day One Trophy, but could be useful more broadly.
I think the challenge is still difficult, but hopefully this guide will help people feel that it isn’t as hard nor as luck-dependent as it initially seems.
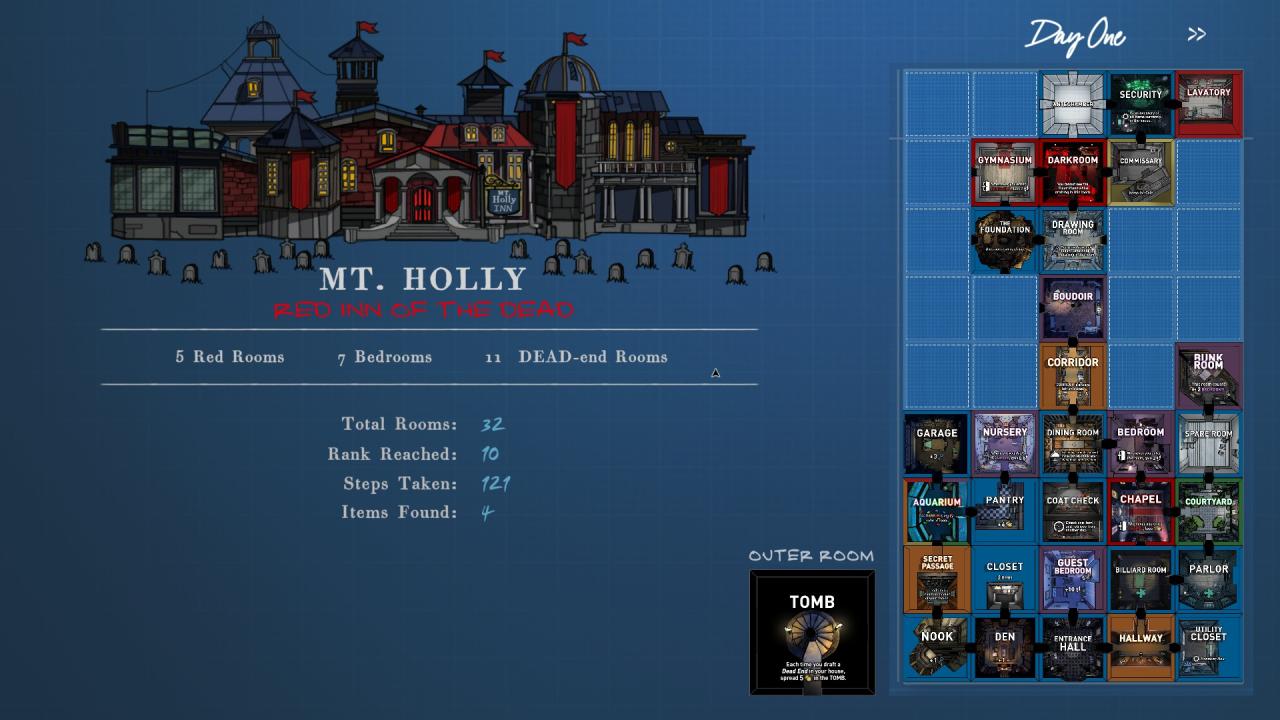
Here is a map from one of my Day One victories (with a minor glitch, there should be the Great Hall south of the Foundation and west of the Boudoir that connects those two rooms):
Primary requirements (Part 1)
- Connect a path to the Antechamber,
- Open an Antechamber door with a lever,
- Access the west side of the Underground, and
- Access the east side of the Underground (to open the north Antechamber door).
This is the first presented challenge in the game. The initial set of non-rare rooms has about 17 dead ends out of 58 rooms, so your run can end in a hurry before even considering other factors. I’ll cover this in more detail in the general information section.
There are three main ways to open one of these doors on Day One.
- Great Hall
- Secret Garden
- Greenhouse
- Weight Room – technically possible, but I’m not really considering this.
The Great Hall opens the eastern door of the Antechamber. The lever is behind one of the 4 locked “corner” doors in the room. It is probably the most commonly-occurring method of opening an Antechamber door. It isn’t a special spawn and doesn’t require a unique item, but it does use a lot of keys. It has 4 exits, however, which is useful from a layout perspective, and sometimes gives useful items (keys, gems) back. The Foyer room (all Hallway doors are unlocked) or Lockpick Kit would be helpful.
The Secret Garden opens the western door of the Antechamber. The lever appears by rotating the weathervane arrows to all point west. The Secret Garden requires a special key to appear, but that does provide you the ability to plan your run ahead if you find the key early. In particular, you can find an early Secret Garden Key in the Billiard room. The Secret Garden is a guaranteed spawn when you use the key to open a locked door into a room on the east or west edge of the house. It has 3 exits, which is useful from a layout perspective, and spreads fruit through the house, which is a helpful boost to steps.
The Greenhouse opens the southern door of the Antechamber. It requires the Broken Lever special item, so this I’d consider this the third-most likely way to open an Antechamber door, because you need both things to align. Obviously if you find one or the other, you can keep an eye out for the other. The Greenhouse always spawns on the east or west edge of the house, and is unfortunately a dead end room.
The Weight Room itself is rare, and it requires you to have a Power Hammer to break a wall to access the lever. It might be more likely in the new patch that corrected an error that made the Battery spawn rate too low, but in my experience, assembling the Power Hammer is effectively not happening.
You need to access the Underground from both the east and west side to access the lever that opens the north door in the Antechamber that leads into Room 46. The east and west side are separated by either a mine cart so they either need to be accessed separately or connected via a boat to cross the reservoir between them.
The east side contains access to the gear and rotating floor puzzle that leads to the lever we need. On the east side there is a wheel that lets us rotate the floor to connect different pathways through a hub. However, the actual pathway we want is on the west side, which is why we need to access both. If we access the west side first, we can pull the mine cart out of the way, so we can access the entire puzzle from the east side. Alternatively we could enter the east side first, set up the gears, and then finish the puzzle by entering from the west side. Remember that we still need to walk back to the Antechamber and Room 46 after pulling the Underground level, though, so pick whichever order uses up fewer steps in your situation.
I’ll talk about these two items first to get them out of the way. In my experience, it’s unlikely to draft the Pump room on Day One, and even less likely to assemble the Power Hammer. So this guide isn’t really focusing on those. The Power Hammer lets you break an outside wall to access the east side of the Underground. The Pump is a room that is only added to your draft pool after you draft the Pool room, so I’ve never had one in my Day One run attempts. But if you get one, the Pump can lower the water level in the Fountain to access the west side of the Underground, or reduce the level of the Reservoir to access the boat so you can connect both the east and west sides – but it can’t do both at the same time, unless you also connect it to the Boiler room for extra power. So I’ll just conclude that if you happen to find the Pool and then the Pump on Day One, you then only need to find another access point to the east or west side of the Underground to complete this step.
The Foundation is the primary way to access the east side of the Underground. Note this requires the Underground Key, which is picked up by entering the Antechamber first. The Foundation is a room that is rare and doesn’t reset each day. The last part is not relevant to our Day One Trophy, but could be relevant for people who intend to continue with the same playthrough after Day One. The first challenge is getting this room to spawn at all.
The Foundation cannot spawn on the east or west edge of the house, and it only seems to spawn after a large number of rooms have already been drafted (30-50). I’m not sure if there are additional explicit restrictions on when or where it can spawn, or it’s just that the rarity means it’s typically seen only after more common rooms have been removed from the pool.
The Foundation is a T-shaped room with an elevator on the side that does not have a door. The elevator leads to the east side of the Underground, but is initially inaccessible until you connect a room on the other side of the wall and pull a lever to lower the elevator. That room needs to have a door/exit that would lead into the Foundation at the side where it does not have a door. So the second challenge is setting up that orientation – often times in runs the Foundation spawns so late, that there are few spaces left and the possibility of already having another room placed in the right position and orientation or of placing a new room are low or impossible.
At the bottom of the elevator (after the door locked by the Underground Key) is a puzzle moving push carts around to access the east side of the underground.
Primary requirements (The Tomb)
The Tomb is probably the primary way to access the west side of the underground (unless, in your experience, you are able to get the Pool and Pump rooms to spawn more frequently). The Tomb is an outside room – it doesn’t go into your house, but is accessed by accessing the west side of the outside of the estate.
To access the west outdoors, you need to find the Garage room and open the garage door that leads outside. The Garage only spawns on the west side of the house, and only at rank 4 or greater (i.e. the 4th row or higher). To open the garage door, the room must be powered, so the Utility Closet room needs to be drafted so you can turn the power on to the Garage. Both of those rooms are dead ends, which can stress your house layout. The Garage does have the benefit, though of containing 3 keys, which is especially helpful if you are accessing the Antechamber via the Great Hall.
After exiting the Garage door you can open the gate that leads back to the front of the house, which will permanently unlock the west outdoors in future days. More importantly, you’ll find a path to a door to the outside room – like the doors inside the house, opening that door will allow you to draft one of three rooms. These rooms will all be from the “Outdoor” room pool, though. On Day One the first three Outdoor rooms are set, and none of them are the Tomb. By all accounts if you reroll the rooms, using dice, exactly twice, one of the options will be the Tomb.
The best way to find dice, in my experience, is by opening chests. One possible chest contents is 2 dice and 4 coins. Other sources of dice tend to come in singles, so it’s hard to get the pair you need through sources like closets or random items in rooms.
The Tomb gathers gold each time you place a dead end room in the house. At the bottom is a puzzle of statues, solving which, opens a door further down into the west side of the Underground.
Assuming you are aiming for the Tomb + Foundation combination, you need the following:
- Great Hall or Secret Garden or Greenhouse + Broken Lever
- Place a high volume of rooms until you can draft the Foundation, then place the Foundation and an adjacent room so that the adjacent room has a doorway into the non-doorway wall of the Foundation.
- Utility Closet to turn on the power in the Garage
- Garage (west side, rank 4+) to gain access to the Outside Room
- Two reroll dice (most likely from a chest) to draft the Tomb as the Outside Room.
- Then just enough resources (steps, keys, gems) and a room layout that allows you to reach the Antechamber, and finish the other steps (e.g. grab the underground key, pull levers, return to the Antechamber and Room 46).
The main game (Room layouts)
The very first challenge before anything else, is simply not running out of openings to new rooms. The Day One pool of rooms looks roughly like this:
I say “roughly” because I’m not totally confident about which rooms are in the draft pool on Day One. This mostly applies to rare rooms. I know, for example, that Room 8 is not in the pool, but I don’t know if the Trophy room will show up before you have any trophies in the game.
In any case, the first thing you’ll notice is a large number of dead-end rooms: 17 out of 58 non-rares. Additionally, there are another 22 rooms that are “corner” or “straight” shaped, so they keep the number of available paths the same, but don’t add any new ones. But that’s only a best case scenario, as there are many times when you can’t control the orientation of the rooms you draft, and the corner rooms will be effectively dead ends as they lead into rooms that are already placed. You also effectively lose a pathway if two rooms open to the same undrafted space. Your Entrance Hall begins with 3 openings – so basically, if you draft 3 real dead ends (literal or effective because of cut-off openings in rooms) before expanding through an T-shaped or 4-way room, your run will end regardless of other factors.
- Rooms will never orient themselves so that doors point toward the outer walls of the house. You can take advantage of this when drafting along the walls, and especially the corners as rooms that are corners and T-shaped will be more likely to have useful exits.
- On Day One the first set of rooms offered will always be Bedroom (corner), Closet (dead end), and Hallway (T-shape). Personally, taking the earlier point into account, I usually draft a Hallway to the east or west. I then typically draft the room in the southern corner, knowing that if it is a corner-shaped room it will be oriented in a useful direction, or that it isn’t a bad place to draft a dead-end room.
- There are two hallways that cost 0 gems and are T-shaped and one each is exclusive to the east and west edges of the house. I usually prioritize these as they can’t be drafted elsewhere and are great value to open up my options and make it less likely my run will end in dead ends.
- A lot of drafting rooms is about managing the pool (which, admittedly, I’m not great at). Generally that means weighing the benefit of the rooms offered (e.g. keys) with how efficient or wasteful the placement is from a pathways perspective. So try to avoid drafting a T-shaped room when one of the doors points into a wall so you can save it for later and prioritize placing dead-end rooms when you happen to be in a place where they minimize how much they impede your progress.
The main game (Resources)
Steps are a bit like life total or health in games, in that they don’t matter between 1 and 99, but then between 0 and 1 the matter more than anything else. Getting a source of steps throughout the game will prevent it from being the limiting factor later, but it’s not something that is especially time-sensitive when you start the game. You almost certainly won’t be able to reach Room 46 with just the 50 steps you start with. You can see in my screenshot, that I took 121 steps in my Day One victory.
Some good sources of steps:
- Early Nursery room: +5 steps when you draft a bedroom.
- Secret Garden: spreads fruit, combos with Conference Room which collects spread items.
- Dining Room: +20 steps after you reach rank 8. I think Day One is always an extra +10 steps if you have an Aquarium room.
- Laboratory: creates an effect for the rest of the run, which is sometimes to reset your steps to 40.
Some of the more rare and/or valuable rooms require spending gems to draft them. It’s important to keep a source of gems as you get past your initial rooms, because rooms that cost gems will start to show up in the drafting screen. If you can’t afford them, it’s not just the downside of not being able to take them, but it also restricts your drafting options and could force you to take a room with no gem cost that ends your run in a dead end. Many of the rooms that contain gems also cost at least one gem, so it’s specifically important to not drop to zero gems, if possible.
Some good sources of gems:
- Greenhouse: in addition to a method of opening an Antechamber door, it will contain some number of gems in the middle of the flowers.
- Patio: spreads gems to all Green rooms in the house (combo with the Conference Room).
- Parlor: opening the correct puzzle box has two gems.
- Laboratory: some effects can give you gems.
- Safes in the Drawing Room, Boudoir, Office, Study, Drafting Studio. I’m assuming if you are aiming for the Day One trophy and reading this guide that you aren’t actually playing for the very first time and are ok with spoilers and/or bringing in your knowledge from other runs in Blue Prince into your Day One run. If so, you can open the safes in each of these rooms to grab a gem, even if the solution normally requires or information that you don’t have within that particular Day One run.
Keys are often one of the most limiting factors for my runs. Some of that is specifically exasperated because I typically need to open chests (for dice) and doors in the Great Hall (for an Antechamber lever). There are also just a decent number of locked doors in the house.
Some good sources of keys:
- Garage: usually needed for the run anyway, to access the tomb, the Garage has three keys.
- Lockpick Kit: effectively several keys, as you can use them instead of keys on doors.
- Metal Detector: causes more keys to spawn in the house.
- Locker Room: probably unlikely, as it requires the Pool room to be placed first, but if you get a Pool, you both could potentially find a Pump to access the Underground and find the Locker Room to spread keys in the house (combo with Conference Room, as with all spread effects).
- Billiard Room: solving the puzzle has either two keys, the Keycard, or one special key.
- Ballroom: Will set your gems to two each time you enter.
- Laboratory: some effects can give you keys.
- Security Room: this is a virtual source of keys. You can set the security level to “high” and it will replace some future locked doors in the house with security doors instead. The security doors require either a keycard or the power to be off (in conjunction with setting them to open when the power is out in Security). And you will probably need the Utility Closet to open the Garage anyway.
Dice let you reroll the room offerings when drafting, which is very useful. Unfortunately, we’ll need 2 to unlock the Tomb on Day One, and might not find any more than that. But we need at least two, and will definitely put more to good use, so here are some sources of dice that I’ve found.
- Chests: One possible content is two dice and four coins.
- Laboratory: One effect will add extra lockboxes to the Entrance Hall, and another will set your dice to two.
Rooms
- Billiard Room: If you get the Secret Garden key, you can plan accordingly, both for the fruit spread effect and opening the west door to the Antechamber.
- Music Room: Another possible source of the Secret Garden key.
- Den: Sometimes has a chest.
- Chamber of Mirrors: DO NOT draft this. It fills your pool with mediocre rooms and probably interferes with you drafting the Foundation.
- The Pool: If you are lucky enough to find one early enough, the Pump Room can get you access to either half of the Underground, and the Locker Room can give you keys.
- Security: Can maximize the security level, saving keys, and set them to unlock when they lose power, which they probably will as we need the Utility Closet anyway.
- Workshop: Required for the rare high-roll where we assemble a Power Hammer – but even aside from that, it always contains an item in my experience, and it’s often a useful one.
- Laboratory: You can set an experiment from among a few options – some of those will give you steps, gems, keys, or dice.
- Aquarium: In my experience, the Dining Room meal is always fish that gives +10 steps if the house has an Aquarium. Also triggers the Nursery (counts as every room type) and many Laboratory experiments.
- Guest Bedroom, Nursery: An early Nursery will almost cover your needed steps for the run. Both typically contain an item, usually a gem.
- West Wing Hall; East Wing Hall: Only appear on the west or east edge of the house, respectively.
- Foyer: Combos with the Great Hall (unlocks all Hallway doors).
- Gymnasium: If you turn off the power in this room in the Utility Closet, you won’t suffer a step penalty when walking through.
- Darkroom: After you walk in the lights will go out. If you backtrack to the Utility Closet, you can turn the lights back on, which removes the penalty (blind drafting). The room also typically has a unique item. I’m not sure, but I think you can only grab the item if you turn the lights on.
- Green rooms: Most of them only appear on the east and west edge of the house. They often have a Shovel, Sledge Hammer, or Metal Detector.
- All Shops: I find these typically bad on Day One because we often just don’t have that much to spend, so they are often just costing me gems in exchange for bad pathways (e.g. the Locksmith is a dead end, the Commissary and Kitchen are corners). However, if we manage to get an early Tomb combined with a Conference Room we can use the shops as a source of items, gems, or keys.