Here’s a quick guide based on my experience with the game and how to succeed as a F2P player — along with some general pulling tips. If you have any questions I’d be happy to help!
0) TLDR
- Get the Lunite Subscription if possible — it takes pressure off and can net you nearly three 5★s over a year.
- Accept that you can’t get every character — be selective and prioritize characters you will have the most fun with (or general support characters, with long-term value).
- Check leaks to stay informed about upcoming banners and events so you can plan ahead.
- Only use Astrite on featured character or weapon banners — never on the standard banners.
- Use standard summons (Lustrous Tide) on the weapon banner, prioritizing the 5★ sword or pistols.
- Spend Oscillated Coral on pull currency only. Save Afterglow Coral for surprise character drops — avoid using it on dupes unless they’re worth it to you.
- Track your pity carefully — soft pity starts around 65 pulls. Since pity carries over between banners, it could be a good strategy to build pity on banners with strong 4★s.
0.5) Light Spending
If you’re okay with spending a little money on the game, get the Lunite Subscription.
It gives you an extra 90 Astrite per day, bringing your minimum daily total (including dailies) to about 150 Astrite. That might seem small, but over time it really adds up — after a year, you’ll have enough for almost three extra 5★ characters (abt 200 pulls).
It’s completely optional, but it takes a lot of pressure off. You’ll have a bit more flexibility, and you can even make the occasional dumb pull with minimal long-term impact on your account. I personally pick it up every month and just treat it like a subscription to the game — as long as I like how Kuro is handling the game.
The second-best paid option is the Pioneer Podcast, but I consider it way less valuable. It’s $10 and only gives about 9 pulls. Buy it if you want the resources, but I wouldn’t recommend getting it every month — especially since the 4★ weapons from it aren’t great.
1) The Mental Battle
Some characters are objectively more valuable than others (like Shorekeeper for example), but at the end of the day, this is a game meant to be enjoyed. If pulling a niche DPS makes you enjoy it more, go for it — even if it’s not the “smart” choice.
That said, I highly recommend trying characters out first before summoning. Every patch includes a trial event where you can test featured Resonators. Also, take a look at your account when making decisions — if you already have three Rectifier users, maybe skip the next Rectifier 5★ to add some variety and give your resources a break. The same goes for elements: I’m currently trying to build a full team for each element, and that goal helps guide my pulls.
Finally, try not to fall into the FOMO trap. It’s hard to skip banners when everyone’s enjoying the newest character, but sometimes skipping is the best call for you. I made that mistake with Zani — pulled her without a built team or any real love for her gameplay. If you know a future character will bring you more enjoyment, it’ll definitely benefit you more to skip the current banners and save.
2) Leaks and Having a Timeline
Keeping an eye on leaks can seriously help your resource management. You’ll know what’s coming and can plan your pulls accordingly, instead of feeling pressured to swipe your card when a surprise banner drops. If a character you want is 3 months out, you can most likely safely summon for the current character or weapon banner– if you want them— while still being able to obtain that future character.
That said, if you prefer to avoid leaks, another strategy is to make educated guesses based on the story. When a new character appears in the main quest, there’s a good chance they’ll become playable at some point. It’s better than going in totally blind, but the downside is the lack of a defined timeline — some characters show up and release in the next patch, while others (like Zani) might take several patches to arrive.
A good general rule of thumb: if you get to play as a character in the story as a trial Resonator, you can usually expect them soon (typically the next patch). But if they just show up as a background or side character, their release may be farther off.
Just keep in mind: leaks aren’t always 100% accurate. Designs might change, characters may get delayed or moved forward, and nothing is ever guaranteed until it’s official. But even with those risks, leaks can give you a rough roadmap and help you make smarter long-term decisions.
3) Resource Management and Banner Guide

Only spend Astrite on Featured Resonator or Featured Weapon banners. Never use it on stamina refreshes or the standard banners.
Featured characters/weapons are usually top-tier and time limited, meaning once their banners are gone, you might not see them again for a long time. Standard banners, by contrast, are permanent, so there’s no rush to acquire these characters or weapons.
When it comes to banners, imo characters should usually be prioritized over weapons since they provide more gameplay variety. Like I previously said, pull for characters that either offer a lot to your account — Shorekeeper — or offer you joy and whimsy. I’d say over the course of a year about 85% of my Astrite has been spent on characters. That said, certain weapons are definitely worth going for when they’re featured. The following weapon types should be specifically analyzed:
- Broadblade
- Gauntlets
- Rectifier
These weapon types don’t have standard 5★ options with Crit Rate or Crit DMG, making the featured versions significantly better. Look for weapons that both:
–Fall into one of the above categories.
–Offer general buffs instead of being hyper-specific ones.
Stringmaster (Yinlin’s weapon) is a great example — it’s versatile and fits one of the weapon types mentioned, making it a super valuable pick up. Keep an eye out for featured weapons that fit this criteria and try to grab them when you’ve got Astrite to spare.

These are banner-specific currencies and can only be used on their respective featured banners.

Lustrous Tide can be used on either of the standard banners. You should only spend them on the standard weapon banner*.
The standard Resonator banner really isn’t worth it — you’ll naturally collect all those units by losing 50/50s on the featured banner (a fate I wouldn’t wish on anyone). Instead, go for the standard weapon banner and prioritize the following:
–Emerald of Genesis (Sword)
–Static Mist (Pistols)
These are the only standard 5★ weapons with Crit main stats, which are nearly always better than ATK% ones. After you get both, you can aim for the remaining three 5★ standard weapons in whatever order you prefer. They’re better than any 4★ weapons and make solid placeholders until you have a strong featured weapon.
Once you own all five, feel free to start getting dupes of the sword or pistols depending on your team comps. There’s an argument for switching to the character banner for Verina dupes, but I think weapon upgrades have broader value since you can use them across multiple characters as your roster grows. Getting dupes also would allow for you to have multiple copies of these weapons to use at the same time.
* This assumes you already got Verina from the beginner banner. She’s the first priority for Lustrous Tide. Once you have her, follow the guide above.

Spend this every patch on the three pull currencies in the shop: Radiant Tide, Forging Tide, and Lustrous Tide.
They’ll cost 1,470 Coral total per patch. You can usually earn this from pulling alone, but if you’re deep in a saving streak, you might come up short. In that case, prioritize them in the order I listed. If needed, you can even do a few pulls to build both pity and top off your Coral for the month. Never spend Coral on anything else in the shop — most of the other items can be farmed.

This is your flex fund. Personally, I treat it as a “rainy day” stash — only spending it if a new character drops unexpectedly and I haven’t had time to save.
I recommend doing the same. Try to forget this currency exists until you really need it. Spending it as you get it can make you subconsciously less careful with your pulls over time. There’s also a case to be made for using it on dupes, but I’d only do that if a character heavily benefits from a dupe level — like Shorekeeper’s S2. Otherwise, just use it for more pulls.
To put it in perspective: 360 Afterglow Coral = 45 pulls OR a character dupe. Those 45 pulls can be the difference between hitting pity and just missing a character or weapon.
4) Pity Strategies
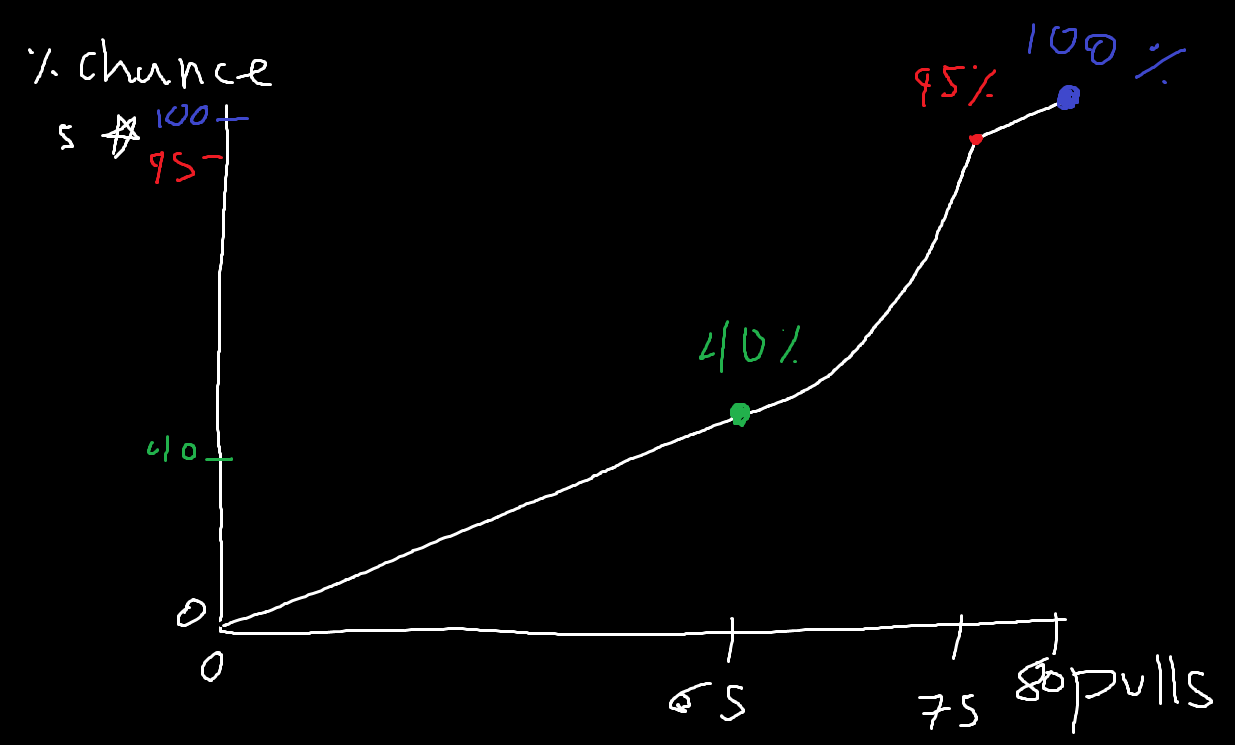
- Every 80 pulls guarantees a 5★ if you have not already pulled one in the past 79 pulls (hard pity)
- After 65 pulls your % chance of getting a 5★ increases exponentially until about 75 pulls to where it slows down (soft pity)
- For character banners, each 5★ has a 50/50 chance to be either the featured character or a standard one (50/50)
- If you lose that 50/50 and get a standard character, your next 5★ is guaranteed to be the featured character
- Weapon banners are different — every 5★ is the featured weapon, no 50/50 system.
Because of how soft pity ramps up, you’ll usually get a 5★ between pulls 65-79. I tend to hit mine in the low 70s. That makes it super important to start being careful once you near that 65-pull mark — you don’t want to accidentally pull something you didn’t plan for.
All your pulls before pulling a 5★ are essentially “building pity.” The game keeps track of this per banner type. While pity does carry over on future banners of the same type, there is no carry over between different banner types.
–Character pity ≠ Weapon pity
–Standard Banner pity ≠ Featured Banner pity
–Featured Weapon pity ≠ Standard Weapon pity
Because of this pity carry over, there’s a useful strategy you can implement: build pity on banners that still have good 4★s.
Example:
Say there’s a weapon banner up with a 5★ you don’t care about — something like a niche character specific pistol — but it has a super valuable 4★ (like Variation) featured. You can do a few pulls — as long as you stay under 65 — to try for the 4★s without risking the 5★. If you do accidentally pull a 5★ early, it sucks — but at least you pulled it early didn’t burn all that much Astrite.
Last Notes
Most importantly — none of this matters if you’re not enjoying the game. WuWa is meant to be fun, so play and pull in whatever way keeps you entertained and happy.