Here is a guide on how to solve the Chapter 1 and 2 puzzles.
Tutorial Puzzle
Step by step guide
1) Talk to Alyssa, ask all questions, search area
2) Go to pub/bar and (try to) talk to Eldoris
3) Search pub/bar to find key
4) Go to the abandoned shed
5) Use the key
6) Check the purse
7) Go to where Johnno is hanging around
8) Talk to Johnno
9) Show him the wallet
10) Go back to the pub/bar
11) Give Eldoris the wallet
Puzzle Complete
There is no keychain to be found in this puzzle.
Escape Room
1) Search the room to find the urn
2) Go to Ember, she will give you the knight statue
3) Go to Kitty, she will give you a key
4) Talk to Kitty, she will give you a clue
5) Go back to Ember
6) Search or talk to bring up the puzzle Kitty’s clue solves, and enter solution
7) Combine statue and shield
8) Go to treasure chest
9) Use key
10) Combine statue and sword
11) Return to Kitty
12) Use statue
13) Search room to find piece of a star
14) Go to fireplace(without Ember)
15) Search to find candle
16) Go to Kitty, she will give you part of a clue
17) Use candle to get the piece of paper with the code for the urn
18) Go to Ember, she will give you the other piece of the star
19) Combine the star pieces
20) Go to the room with the cupboard(nobody is there)
21) Use the combined star to get the other part of the clue
22) Combine the two parts of the clue
23) Return to Ember
24) Talk to bring up puzzle
25) Enter the solution shown in the clue – N, R, F, N, X, R.
26) Use the urn to enter the code previously acquired
27) Use shield
Puzzle complete
To get the keychain here you must complete the puzzle in less than 36 minutes.
Galtis Invasion
We’re past the tutorials now, but this puzzle is still extremely simple. We’re still at the stage where standard adventure game procedures will easily get you through. This puzzle does have a twist – you have a limited number of actions in each area before you get moved to the next. You can also choose to proceed to the next area at will. You do not choose where to go – you will proceed through each area in a specific order, and the areas will loop back around to allow you do things you missed. There is an active timer as well – the longer you take, the fewer actions you will get per screen. Some steps don’t have to be done on the screen I list in this guide, but I list them there just to make sure that step does not interfere with required steps on a given screen.
1) (harbor) Search or talk to find Ember
2) Proceed to next area(highway), talk to find Brie
3) Proceed to next area(jetty), search to find warhead, talk to find Alluna
4) Proceed to next area(hilltop), you will automatically get Ryja in your inventory
5) Proceed to next area(harbor), use Brie to heal Ember
6) Proceed to next area(highway), use warhead on Ryja to split them into Jock and Pherusa/Ryley
7) Proceed to next area(Jetty), use Ember to free Alluna
8) Proceed to next area(hilltop), combien Alluna and Brie to get Brielle
9) Proceed to next area(harbor), use Pherusa/Ryley to block incoming warheads
10) Proceed to next area(highway), use Brielle to acquire ramp
11) Proceed past next area(jetty) to the hilltop, use ramp
Puzzle complete
There is no keychain to be acquired in this puzzle.
Underwater Repairs
This is where things can start to get tricky, but they aren’t too hard yet. In-game hints start to get more subtle here, but the puzzle is still very easy with a methodical approach.
1) Swim to the coral reef(bottom option)
2) Go north twice
3) Search to get glowing coral
4) Return to starting point
5) Swim to dark cave
6) Use glowing coral, Search to find multimeter
7) Swim into the deeper cave, search to find fuses
8) Return to starting point, give fuses to Matt
9) Swim back to coral reef, follow pathing that makes lights on multimeter light up
10) Path is North, East, East, South, East
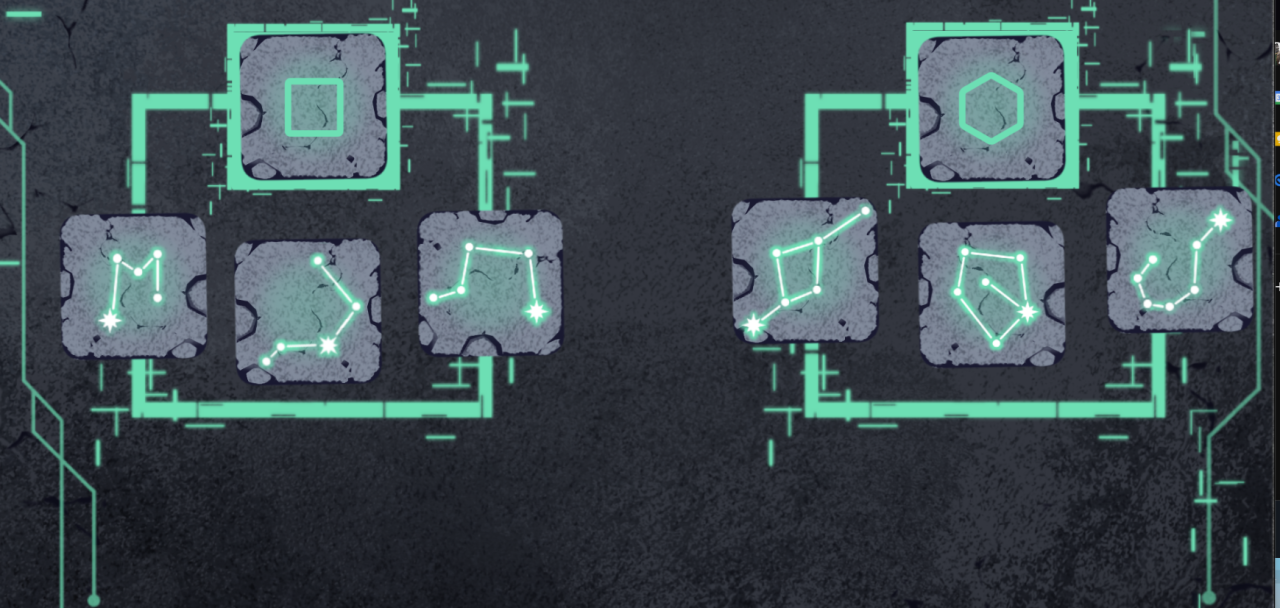
11) The solution to the puzzle is to count the lines on each symbol – the symbols with four lines go under the square(left), the ones with six go under the hexagon(right). The star on each symbol indicates which order they go on each side. A screenshot of the solution is attached to the bottom of this section.
(EDIT: Apparently the star on the symbols mean nothing and any combination where the tiles are group correctly under the square or hex placements is valid, but I apparently encountered a glitch leading me to the above conclusion – I’m leaving the screenshot in since it is still an example of a valid solution)
12) Search to find Scorilite
13) Return to Matt at Central Distribution, talk or use Scorilite
Puzzle complete
To get the keychain in this puzzle, return to where you got the glowing coral to find another piece. Return to the cave where you found the fuses, and use the coral to get the keychain. Make sure you have a fresh set of underwear ready.