
This is my rundown of every piece of upgradeable equipment worth caring about in Land of Glarefall, split by when you’ll actually want it — early, mid, and late game. If you’re juggling limited Upgrade Points and don’t know which items deserve them, this should save you from wasting resets on gear you’ll bench in an hour.
I put this together because the equipment choices here aren’t obvious. A few of these look weak on paper and turn out to be the backbone of a run, and a couple look great until you realize they don’t stack the way you’d expect. Here’s how I’d sort it all out.
Early Game Equipment
These are the pieces I’d reach for first. None of them need a massive investment to feel good, which matters when Upgrade Points are tight.
| Equipment | Effect / Upgrade | My Take |
|---|---|---|
| Regeneration Stone | Upgrade: effect also applies to all units. Upgrade: HP Recovery +100%. | Essential |
| Voltstride Staff | +30 Attack | Essential |
| Flame Orb | No stats, but decent early damage. | Optional |
| Windhunt Warbanner | +100 Attack | Essential |
| Aura Pendant | Restores 20 HP per second. | Optional |
| Warcry Horn | +500 Stamina | Optional |
The Regeneration Stone is the one I’d call a no-brainer if you’re running anything with bodies on the field — once upgraded, that healing hits your Heroes and your Soldiers and Summons too, which is enormous sustain in the opening stretch. The Voltstride Staff is the other early must-have: +30 Attack, very fast hits, and it chips away at resource loot while it fights, which quietly saves you a lot of time. It’s great against single-target Bosses. Use it during the Day.
I’d max out the Windhunt Warbanner as fast as you can. It carries the highest Attack stat in the game at +100, and while its unique passive doesn’t stack, that raw Attack alone is worth slapping on every Hero you have.
The Flame Orb gives no stats, but it does respectable damage early when your melee hero’s attack speed is still low — useful during Night for melee and in Nether Realm 1, though it’s skippable if points are scarce. The Aura Pendant is what lets your Soldiers tank into the mid game without pouring tech into them, and if your strategy leans on soldiers or summons alongside a Warlock, it’s worth upgrading. The Warcry Horn and its +500 Stamina is a solid pick if you’re fielding a lot of Soldiers — especially Archers — or if you got lucky with the Mysterious Egg, which summons a phoenix that hits 3 targets every time you kill 90 enemies.
Mid Game Equipment
This is where the crystal shards come into play, and it’s also where I hit the most confusing decision of my run. Let me walk through both.
The Blue Crystal Shard upgrades let its laser chain to up to 6 enemies and double its attack frequency. It gives no stats, but it’s a decent stand-in for the Voltstride Staff across both Day and Night. The catch is it has none of the special effects you’d get from the Blue Crystal Tower, like defense reduction. If you don’t have a lot of spare equipment to sacrifice, I’d hold off on this one and just wait for the Red Crystal Shard instead.
The Red Crystal Shard is my recommended replacement for the Voltstride Staff. Its upgrades increase explosion radius by 50%, add +1 flame shot per attack, and every 5 attacks it summons a Giant HellMeteor with 250% ATK damage that stuns targets. There are no attack stats on it, but the AoE damage, the stun, and the lingering burning ground from the meteor more than make up for that. It also makes clearing Misty Hills much easier against those exploding giant enemies pushing in from the South.
One thing I noticed while running these: if you equip one red crystal on one hero and another red crystal on a different hero, one of them seems to stop firing. I’m not sure if it’s a bug, but I wouldn’t bother upgrading two red or two blue crystals. Keep it simple — one Red Crystal Shard on one hero and one Blue Crystal Shard on the other.
Late Game Equipment
The Ring of Thunder is, in my opinion, the best equipment in the game. It can drop as soon as you reach Aurora Fang and kill the Boss or Monster King. Its upgrades generate 3 electric arcs from each lightning strike, grant the wearer +3% ATK for 3 seconds per enemy hit by a strike with stacking, and reduce the damage dealt by enemies inside the Magnetic Storm Field by 30%. The area damage is huge, the attack buff is a real damage multiplier, and the damage reduction keeps you alive in packs. With this equipped and enough levels, your Hero can solo Nether Realm 2 and Nether Realm 3.
Farming Tips and Hero Picks
There’s a fast gold loop I’d lean on early. Echoing Plains has a Merchant to the right of your base, with a Monster Den just southwest of him. Since resetting Upgrade Points costs you nothing, take Basic Supply IV and Corpse Salvage II, dump the extra points into your Hero’s stats, kill the nearby monsters for about 3k gold, then buy equipment and fodder from the Merchant. You can loop this in 2–3 minutes, end the mission, and repeat until you’ve pushed your equipment up to 3-star.
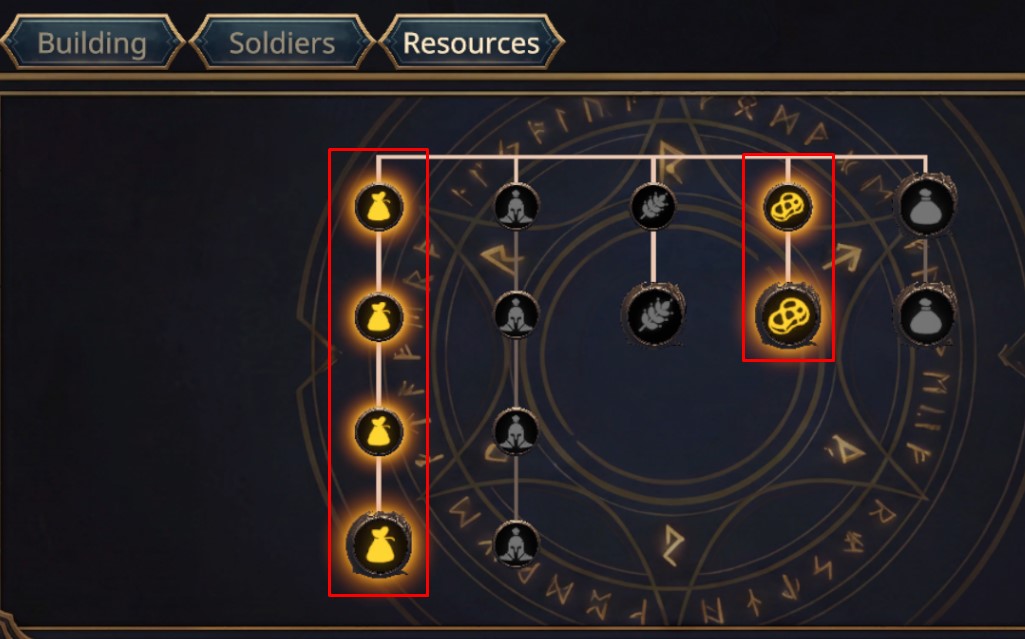
When it comes to backtracking for extra Upgrade Points, a good window is when a stage is 3–4 missions behind your Normal Clear — clearing that stage on Hard is a clean way to grab more points without losing momentum. And once you’ve picked up the Ring of Thunder from Aurora Fang (Mission 16), you can start farming Nether Realm 3 waves 3, 6, or 9 — whichever you can reach — to fully equip your 3 heroes. Samurai is the strongest pick for conquering the Nether Realm in my experience; I managed to solo Wave 12 with a level 40 Samurai, and that was with the wrong skill upgrades.
If you’re just picking your first Hero, here’s how I’d rank them:
- S — Samurai, Monk
- A — Warlock, Knight, Ranger