For Lure Operation, Tunnel Descent in Ch.2
You could skip the puzzle by choosing the first option in [Tremors Beneath].
Not sure if it’s intentional but a Mech can prevent the barrier from being shut, however this guide will be using it.
DISCLAIMER
This guide is not exactly the only way to passed the puzzle, also if any part is wrong or missing feels free to point it out.
Lure Operation
This one is quite simple, connect between each Burrow and the Frequency Generator with only one Burrow and the generator being connected at the same time. You have to close another barrier that the rats are coming from and another burrow for the Longclaw to come out.
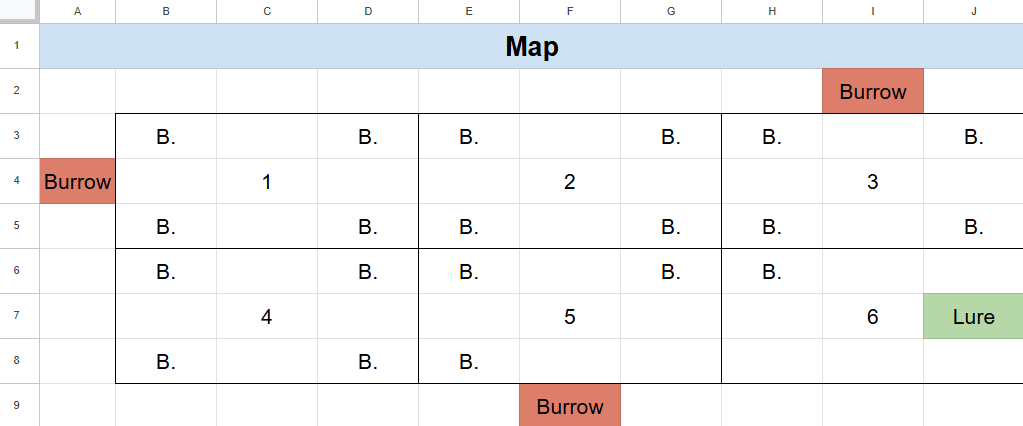
Ideally, you could go through this stage without any damage to your Mech by clearing out the rats and using a barrier to your advantage.
Ideally, you could go through this stage without any damage to your Mech by clearing out the rats and using a barrier to your advantage.
Here the spoiler:
- H6
- G6 from between G6 and H6
- Kill the First Longclaw
- E8
- E5 from between E5 and E6
- B5 and Kill the Second Longclaw
- E3 and G3 in the same turn
- H3 from between G3 and H3
- Deal with the final Longclaw
Tunnels Descent
No damage taken is possible for this one and I suggest you equip Mech with Aoe and either a jump pack or Propulsion device for speed and get to use some barrier to your advantage. Also don’t forget that you can turn the barrier back on if you can’t clear all the enemies in one turn and stay away from the damage zone.

Spoiler:
- D11
- I11 and I10 from between those two buttons
- D10
- C10, beware of enemy from the left
- J8
- C7 and A8
- J5, beware of enemies from the right
- A4
- Clear the enemies, then Purple
- J11
- Gold
- D7
- Clear the enemy then proceed to the extraction point
And here is the buttons that would help prevent more enemy to come if used fast enough, however some will prevent or make you change the route.
- L2: Room 1 Top & Left
- L8: Room 9 Top & Left
- L13: Room 13 Bottom & Left
- A13: Room 16 Bottom & Right