Strategies for beating all 81 quests (eventually) without heavy reliance on RNG
Intro
This guide is a work in progress. I intend to cover all Quests for a given King before moving on to the next, with the order being Nothing→Spells→Greed→Blood→Nature→Nomads→Stone→Progress→Time
All quests are given a difficulty rating 1-3 ★
1★: Easy and simple
2★: More challenging. Some amount of improv required
3★: Hard
While most quests can be beaten 90-100% of the time, not all can. Quests which are heavily dependent on RNG will have ✪ instead of ★
Keep in mind I have 180+ hours in game and most quests are pretty easy for me. The ratings I give them may not match up perfectly with your experiences. I have done my best to take what others in the community have been saying into consideration for the ratings to try and make them more accurate.
If you need help with a quest I haven’t covered yet, feel free to leave a comment below or ask for help either on the Steam Discussions or in DIscord. If you feel I didn’t cover something thoroughly enough, or you think you know a better way to deal with a quest, leave a comment below.
General Advice
Cards
Regression is an amazing card in quest mode. Units gain lots of stats on level up, so being able to level them up infinitely lets us create a single plot with insanely high stats. The only issue is playing Regression can be a bit slow. Regression works best when you have a way to play multiple cards in a single turn.
Swords and Shields are the only flat stat boosts in the game, and are incredibly powerful when used on weak units. Take Orbiters for example. Level 1 Orbiters do 3 damage, so giving them 1 Swords (+5 damage) is a 167% damage boost. The trade off is that if your stats are already high then these cards are pretty weak.
Some times you just want units to stall the enemy and slow them down. Raptors, Trappers, Warpers, Scapegoats, and Thiefs are all good at stalling the enemy due to their unusual movement patterns.
Gigantify and Razing are the best Rainbow cards and should almost always be picked when offered. Gigantify is a massive stat boost, and an extra decree is more than worth losing a plot of land you weren’t even using. Shrine is great if you have a large number of plots you need to level up, and Temple is great if you only have 1-2 Towers/Units for it to concentrate boosts on. The more Towers/Units you have, the less effective Temple is.
I’ll go into more detail on each Kings cards in their respective sections.
Decrees
Generally we want to get a significant stat boost from decrees or additional cards to play. Bunker, Feast, Sharp Blades, Eyeglass all fall into that first category. Supplies, Oddity, Wishing Well are the second category.
Overwork is fantastic if you’re relying on Support buildings, but isn’t always the best to pick for your first decree. Sometimes you need a quick power up, which is not what Overwork does.
Refraction, Gambling, Multiculturalism, and Oddity are all extremely random. Gambling is almost never a good choice, being unable to pick what cards you get is a huge handicap. Refraction is almost a coin toss, you can get some of the best cards in the game or complete trash. Multiulturalism let’s you pick other kings decrees, which can be quite good, but requires some luck. Oddity, unlike the other three, is completely safe and generally a great perk to pick. It has no downsides and just gives us extra cards.
I’ll go into detail on each kings decrees in their respective sections.
Quests
King of Nothing
Nothing has some pretty strong cards. Our Castle is great once you raise it’s damage, Paladins gain HP when they gain damage and gain a massive stat boost on level up, and Soldiers are great for swarm tactics. Unfortunately, Archers and Scout towers are pretty bad, and while Steel Coat is a great enchantment, its not very helpful in the mirror match against enemy archers.
Our best decree is easily Freshmen, providing a massive stat boost to level 1 units. Whenever practical leave units at level 1 until your first decree in case Freshmen shows up. Development and Armory are also decent.
 Paladins are our best unit generally, and conveniently we start with some. Place them so that you can build 2 Blacksmiths that will buff both the Paladins and your Castle, and place one farm next to your Paladins.
Try to avoid leveling up the Paladins until after the first year in case the Freshmen decree shows up. Other good picks for a first decree are Supplies, Development, Sharp Blades, Feast, Overwork, and Wishing Well.
Get a Lvl 2 Farm, then level up your Paladins and Blacksmiths, then Lvl 3 Farm and finally Lvl 3 Castle. When the Tower arrives open up a plot of land next to the Paladins and add another Blacksmith.
 Soldiers are another strong unit and having them in our starting hand makes them our best option. Our goal is to get Soldiers with 2 Farms and a Blacksmith, then later add a 2nd Blacksmith or Beacon.
Our 9 rerolls should be spent trying to get Overhaul from Progress or trying to get good decrees. The starting vaults are useless and perfect targets for Overhaul. Never reroll Greed or the enemy king. Good starting decrees include Overwork, Armory, Freshmen, Development, and Wishing Well.
Try to throw a couple stacks of Steel Coat onto your Soldiers at some point. Avoid declaring war on kings with AoE/Piercing attacks (Spells, Stone, Time).
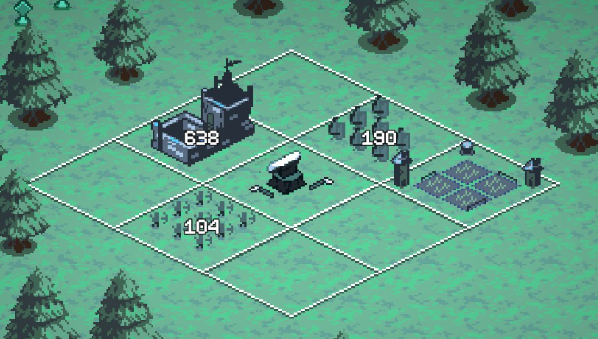
 Ogres are a trap, they look good but start off too weak to be useful. Start by placing Scapegoats. Scapegoats take so long to kill that our Castle can handle the first couple years on its own. Try to let all the Goats die whenever possible to get the most gold. We can only reroll our first card loot once, so take the first good card we see. Cards we’re looking for are:
- Shrine
- X-ray
- Gigantify
- Golem
- Razing
- Scapegoats (only Year 1)
We want to upgrade our Scapegoats to get even more gold for rerolls. Once we have the gold for multiple rerolls, start going for Golem. Our goal is to get Golem then use Gigantify and later Osmosis to power it up to insane levels extremely quickly. If we get Supplies from Razing we can use Soldiers or Paladins instead.
 Place Lvl 3 Archers on the Blessing space, then next turn place Boars in the space next to them with 3 adjacent forests. Later place 2 Blacksmiths between the Archers and Castle.
This is a fairly easy quest and with a good decree/some good merchant cards should be an easy win. Good first decrees include Development, Overwork, Feast, Twinshot, Oddity, Refraction, Eyeglass, Sharp Blades, and Wishing Well.
 Place Soldiers on the blessing space, then upgrade a Farm around them. Avoid placing other units except to use with Sacrifice and Offering. When fighting Spells, grab Static if you don’t already have it on your Soldiers, then Offering. Give your Soldiers Steel Coat, place a Library next to them once you have the Tower event, and just keep buffing the soldiers to win.
 While Razing one of our 3 tiles would be funny, don’t do that (yet). Place Archers in the center tile, with the 2 Twinshot decrees we start with they’re the best choice. Place your Soldier, then Wildcard your Castle twice. We want to try and keep the Archers level 1 until the first decree, in case we can grab Freshmen.
Try to place a Blacksmith between the Castle and Archers. When fighting Spells grab Static if you haven’t already and Offering. Sacrifice your Soldier, or play something else to sacrifice for Offering, to get random Tome cards to boost your archers. The only good Nature cards are Procreate and Clone.
Try to declare war on Nomads. Their Migration card can be used to get the blessing effect for our Archers, and Swords are fantastic for boosting our low starting damage. Time is also a good choice of enemy for Regression and Rewind.
Go all in on buffing your Archers via Tomes and decrees. Eyeglass, Iron Fist, Refraction, Overwork, Armory, Oddity, are all good decrees to pick. Near the end of the run you can use Razing if you’ve held onto it, by that point you won’t need all 3 plots.
Start by placing Orbiters and a Library adjacent to your Paladins. For the first couple years before the rainbow fight never reroll more than once, we want to save our money. When fighting Spells we want Static if we don’t already have it, then Offering. When fighting Time we want Regression or Rewind. When we fight the Rainbow army we want GIgantify. Shrine, Razing, Osmosis, and Temple are acceptable, and you can grab Golem if you have an Offering in hand.
Play Static on your Paladins as soon as you get it. If you get Offering, hold onto it until the rainbow fight. Play Regression on your Paladins whenever possible, they gain a ton of stats on level up, and hold onto Rewind until the Rainbow fight.
There are 3 ways to win this quest. The first is to get Gigantify and use Rewind to keep playing it on your Paladins over and over. The second is to use Regression on your Paladins and keep leveling them up, which will quickly make them extremely strong. Finally, with enough stacks of Static and Steel Coat you can do enough damage to win.
 Starting by using both Wildcards on your Castle, then focus on upgrading your Blacksmiths and Wallmakers. After the Rainbow fight we ideally want X-ray or Shrine to level up a bunch of cards at once. Now you can Earthworks to get additional Wallmakers to level up. Keep in mind a Lv3 Wallmaker has as much health as 2 Lv2 Wallmakers. By the end of the run you want 4 Lv3 Wallmakers for a total of 9600 Health.
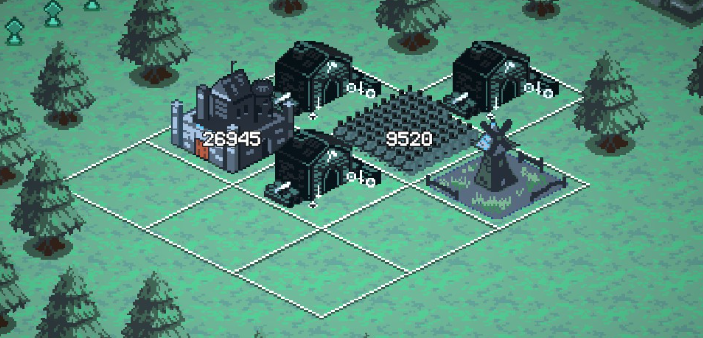
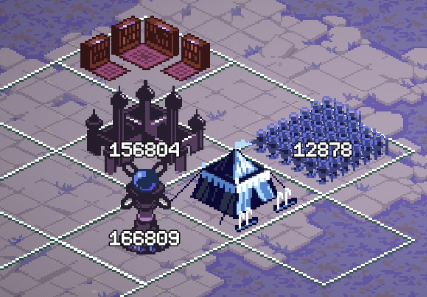
 Start with the setup shown on the right. Use Wildcard and Steel Coat on the Paladins and upgrade your Castle to level 2. The Archers are there to eventually sacrifice with Overhaul or Offering.
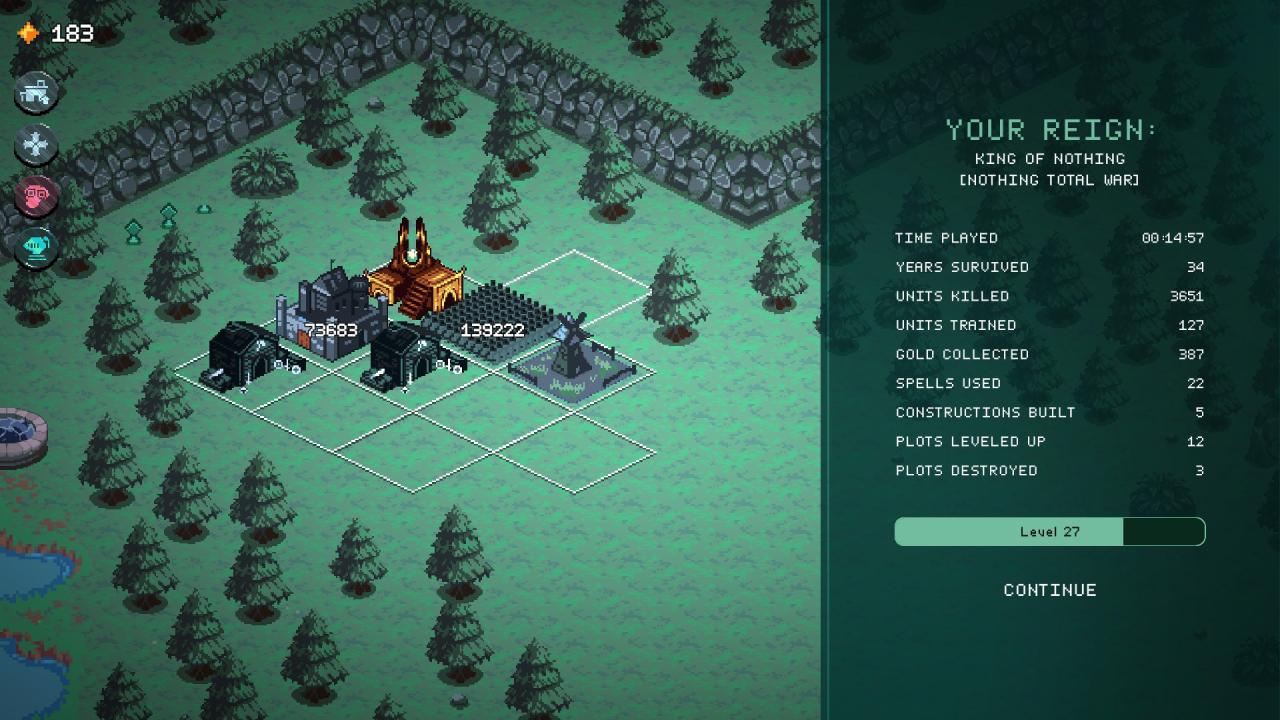
Total War quests are very random, so you’ll want to reroll a lot to try and get good cards. Avoid rerolling any card loot more than once, we don’t want to spend 20 on a reroll. Never reroll the enemy king unless it’s Stone. Stone has no cards we want and should be avoided. We’ll be mostly relying on Paladins to carry us, so always look for cards that can be used to buff them. Good cards to grab include Offering, Beacon, Overinvest, Carnage, Clone, Procreate, Camp, Overhaul, Regression, and Rewind. Try to get a Camp, Beacon, or Blacksmith set up in the top corner. The best decrees to grab are Feast, Sharp Blades, Oddity, Wishing Well, and Overwork.
No matter what, you’re going to need to improvise on this one.

King of Spells
Spells has a phenomenal deck, with Shaman and Spire being the only bad cards. Offering is the best card in the game, and Static is an amazing damage dealer early game.
Re-enchant and Athenaeum are good if you’re using Wizards but otherwise nothing special. Static Fields is great if your Citadel is your main damage dealer. Glass Staffs is only good early on. Spiremania and Abracadabra are just never worth taking.
 Play Precision, Adrenaline, and Combustion on your Wizards, while playign Carnage and Steel Coat on the Warlocks. Throw out the remaining Enchantments. They’re not as good, and if we apply them they can get copied by the libraries might copy them instead of something useful.
Use Procreate on the Warlocks and Regression on the Wizards. Use Overhaul, Offering, and Rewind basically whenever possible.
 Throw Combustion on the Ogres. We start with Wishing Well and a ton of gold, so reroll your first loot until you get Offering. Immediately discard it to get 3 back, and use them on your Spire, Library, and Wizards. Your Ogres now get +20% stats every turn, and you should have some Tomes you can use to power them up, letting them easily sweep the entire quest.
 If you run out of things to sacrifice you’ll be in trouble. Try to always use Offering on low level plots and save the high level ones for Earthworks. If you’ve got 4+ plots that you can sacrifice then you can afford to use Overhaul. Sacrifice isn’t as good and should rarely be used.
To win, focus on buffing the Citadel. Swords, Overinvest, Regression, and Migration can all be used on it. Try to always have money to buy at least 1 card at shops. Hands down the best decree to get is Supplies which gives us another 5 permanents to sacrifice, but Static Fields and Oddity are also good picks. If you get Supplies, don’t sacrifice the Warlocks. They gain HP form each tome you use, so by the end they’ll have thousands of HP and can stall the champion.
 Remember Incantation? Yeah basically do that. Set up a single Wizard with Combustion and multiple libraries, and a Warlock to serve as distraction. Use Offering to get tomes like Swords and Procreate to get even stronger.
Remember Incantation and Spells Revolt? Do the same thing again. Set up a Wizard with Combustion and a couple libraries, use Warlocks and Raptors to stall and distract the enemy, and use Offering when everything is max level. Slightly harder than Spells Revolt in my experience but still easy if you get a decent decree.
Ok here me out, what if we did Wizards+Combustion+Library again? The Libraries are all set up for us this time. Place Wizards in the center and throw on Combustion,. Try to get Wizards or Warlocks as your first card loot, then buy something from the merchant you can use as a sacrifice for Offering.
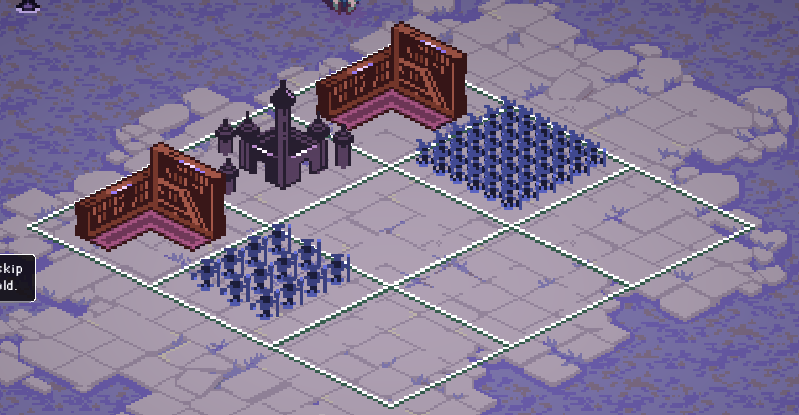
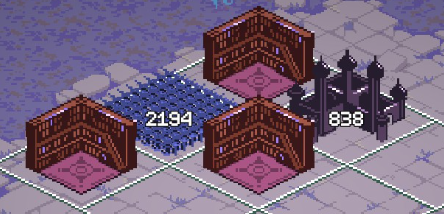
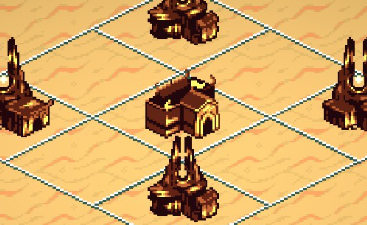
 First, place a Warlock on one of the lower two tiles. Second, the devs pulled a trick on us. All the Spires we start with have increased damage compared to a normal spire, but the bottom one has been buffed the most. Use Offering on the other 3 Spires.
Use any Swords you get on your Spire, and any Shields on the Warlock. Use at most 1 Migration to move the Warlock, then use all your remaining tomes to buff your Warlocks and Spire. There’s a decent chance you’ll be able to loop Rewind+Offering a few times and play some extra cards.
As soon as possible, play a Camp between your Spire, Citadel, and Warlock. Try to get it to Lvl 3 quickly. From now on you want to use Overinvest, Swords, Shields, Migration, Procreate, Clone, and Offering as much as possible to buff your Citadel and Spire while also raising your Warlocks HP. Feel free to spam Beacons Camps Raptors whatever on the empty plots to trigger your main Camp.
In terms of Decrees, Poison Thorns and Spiremania, while normally not worth grabbing, are great here. Feast, Overwork, Eyeglass, Sharp Blades, Oddity, Supplies, and Wishing Well are all great as usual.
When you reach the final year, reroll if you’re matched against King of Greed. Greed’s Champion will 1-shot your units one at a time, nothing our Spire can do to prevent that. Nomad’s Champion is notorious for shredding troops, but if you’ve buffed your Warlocks and Spire enough you’ll be able to survive the damage.
 Back to combustion Wizards. Sacrifice all the Wizards except the one located in the top left on the blessing tile. Grab Steel Coat and Combustion, apply them both, stack Libraries, and use Offering whenever you get a chance.
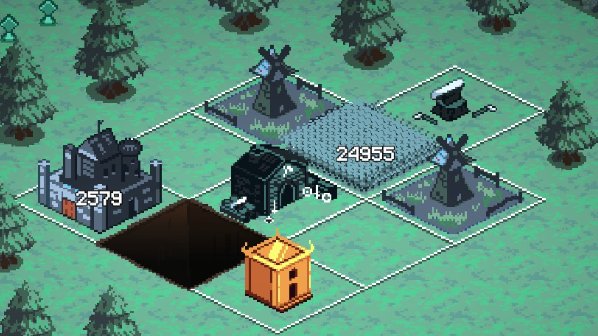
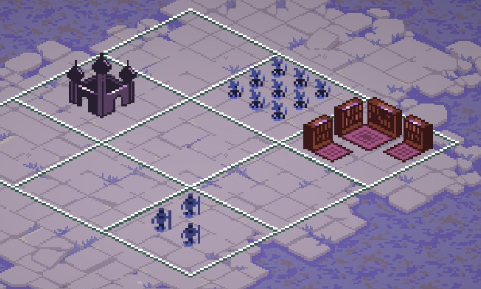 More Combustion Wizard spam. Set up your units as pictured on the right here to get benefits from the blessing. Use Offering on your Spire and then use the tomes you get. Our goal is the same as always, turn your Warlocks into bulky distractions and Wizards into glass cannons.
The best cards to get are easily Offering, Overhaul, Procreate, Steel Coat, and Rewind. Procreate should be used on your Warlocks, and Steel Coat on your Wizards. Use the other cards to get multiple libraries set up and level everything up.
As with any Total War quest, some improv will be required. Focus on finding ways to level up early on, then setting up your Libraries, then grabbing tomes to buff your units.
King of Greed (1/9)
Greed’s cards are all about money, making it and using it. Your base is powerful but struggles against large groups, Dispenser is a good card but takes time to get going, Beacon is a fantastic support building, and Overinvest is a great stat boost for any unit or tower. Midas Touch and Vault are mostly useless in quest mode.
Thiefs have a small niche in being an above average unit for stalling the enemy, since they teleport behind the enemy front line forcing them to turn around and run backwards, but they aren’t great. Mercenaries are unique in that they don’t gain more units on level up, but their unit count is adjusted based on the amount of gold you have. While they gain a decent amount of stats on level up, its nothing special. What this means is 2 Lvl 1 Mercs is almost always better than 1 Lvl 2 Merc.
Your Greed decrees are bad. You don’t need or want them.
Autofire should be turned on 95% of the time. It makes the Palace target golden enemies to get you the most gold per battle, which we want, because we’re playing Greed.
 Start by tossing your Beacon in the center. This quest might feel random, but since every shop gives us 6 cards to pick from its not that bad. The main cards we’re looking for are Mercenaries, Palace, Dispenser, Cemetery, Demon Altar, Wildcard, and Clone. We want to upgrade our Palace and get a Dispenser and/or Alter out as soon as possible. Spam Lvl 1 Mercenaries to stall, and stick a Cemetery next to them.
Only ever reroll for Architect (Building) Merchants. The reroll cost at shops never resets, so rerolling quickly gets very expensive. If you start losing to King of Nothing, reroll your enemy to avoid him. When declaring War avoid Spells, Stone, and Time.
20. Fugitive ★★★
Runs always have 2 fights against the Rainbow army which let you pick special, powerful cards as loot. In Fugitive, these 2 fights take place in Years 17 and 27. We start the quest in Year 18, and our first fight is always against Time. We can grab a portal as loot from the first fight, buy something to level it up with at the shop, then immediately place it and activate it. Doing this will send us back to Year 17 and earn us a Rainbow card.
The best cards we can possibly get as loot are Gigantify and Shrine. Gigantify we use with Rewind to massively buff a unit and breeze through the quest, while Shrine can be used to activate more portals, letting us go back in time and replay Year 17 several times.
A recent update added the ability to reroll the type of Merchant you get, making this quest more consistent. You can easily afford to reroll 3-4 times to get the shop you want. Any type of shop can work, so rerolling is unnecessary, but different shops require different strategies.
Place your Imps, discard the Amplifier, then when you win the first fight reroll until you get a Portal. Now we want the Building or Tome Shop. Look for Portal in the building shop, and Wildcard, Clone, and Rewind in the tome shop. These cards will let us make a level 3 portal immediately. Buy another 2 cards just to fill your hand and guarantee you can play everything else. Try to have at least 200 gold left over.
Place the portal, level it up and activate it, then fight the Rainbow army. Reroll your loot for Gigantify and use it on your Imps. Alternatively, grab Shrine to let you quickly level up a portal or two and retry the fight. Whenever we fight Time now, we want to reroll for Rewind. Use Rewind, get Gigantify back, use it on Imps, repeat until win.
Never fight Blood. They don’t have cards we want and their high unit count makes them dangerous. Make peace with Blood when you can. When fighting Nomads, grab Raptors and place them next to your Imps. Raptors are an amazing mount, and their charge attack is incredibly strong.
Place your Imps in a corner, discard the Amplifier, then when you win the first fight reroll until you get a Portal. In the shop, we want 2-3 Raptors and 2-3 Orbiters. If you’re struggling to get Orbiters, Ballistas also work. Ideally we get 5 total Raptors/Orbiters, then buy 2 more cards so we can play everything in our hand.
Place the Portal diagonal to your Palace, next to the Imps. Place the Raptors/Orbiters (whichever you only have 2 of) diagonal to the Palace as well, and the other one should be placed next to it. Use Swords on the level 1 Raptors, then use X-ray targeting the Palace, then play your remaining Orbiters/Raptors cards.
For the rest of the run we want to grab Regression whenever we fight Time and use it on the Raptors, then grab Raptors when fighting Nomads. Never fight Blood, make peace with them when you can. Right before the 2nd rainbow fight in Year 27 try to grab a Portal instead of Regression. Grab Shrine or Gigantify as loot, then activate the Portal and redo the fight for more loot. Use Rewind+Gigantify or Regression+Shrine to power up the Raptors as much as possible in the final few turns. Don’t be afraid to reroll the enemy king to keep fighting Time. You should have enough stats by Year 33 to easily win.
Kind of Greed continued
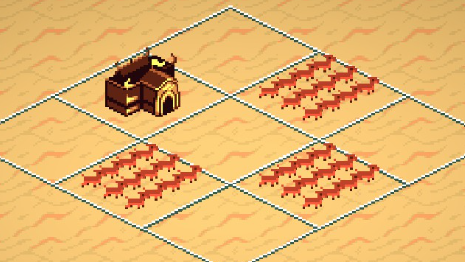
Place a Dispenser. For the first couple years, don’t use your Palace until your Goats are almost all dead. More dead goats equals more money. Upgrade the goats if you get the chance. Hold onto the Mercenaries from your starting hand but avoid playing them until you’re in danger of losing lives. Use Level 1 Mercs to slow the enemy down while your Dispenser and Palace kill everything for an easy win.
 Start by placing a Cemetery between your Thief and Mercenaries. You goal should be to get more Mercenaries and use them to stall while your Palace and Dispenser kill everything. Upgrading the Thief and Palace can also be helpful. Late game sacrificing the Thief and replacing it with a Cemetery or more Mercs will make the champion fight safer.

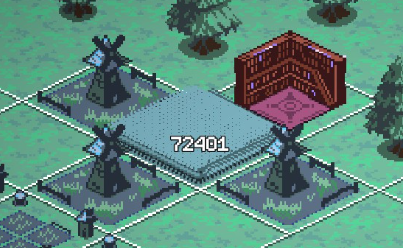
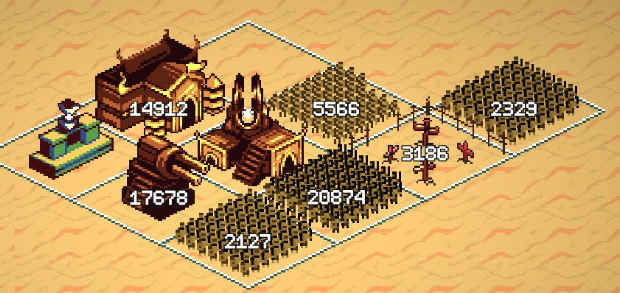
Start by using Mortgage on 2 Lvl 3 Forests next to your Palace, and 2 Lvl 2 Forests on the corners of your land. Our goal, as always with Greed, is to get a Dispenser and Mercenaries up as fast as possible. Rather than rerolling our first fight to take on Greed, we’re going to lose. Start the first fight, let your Palace kill most enemy units, then hit Escape to open the menu and forfeit the battle. This lets you pick a card from Greed’s deck instead of the enemy deck. Reroll for a Dispenser.
We immediately have a shop, and want to buy 2 cards. Doesn’t matter what they are, they just need to take up space so we can use our last 2 Mortgages on the remaining Lvl 3 Forests after we place the Dispenser. Lose your 2nd fight as well (unless you’re facing Greed), and grab Mercenaries. From here on you want to be rerolling the enemy king to always fight Nature and Greed.
Nature and Greed have relatively few units in their army when compared to Spells and Progress, meaning our Palace is much more effective at dealing with them and they struggle to cut through large numbers of Mercenaries. Just keep placing Level 1 Mercs, and eventually make peace with Spells or Progress. By the end of the run our Dispenser should be dealing one shot damage, and we should have enough units to stall out any King.
Once again we want a Dispenser and Mercs. Once you’ve got those down, start upgrading the Palace and maybe place a Beacon to buff your Palace and Dispenser. Spam more Mercs, and it should be an easy win.
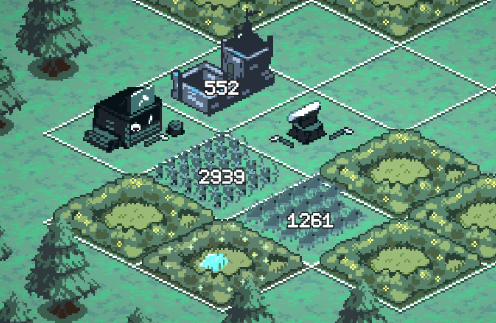
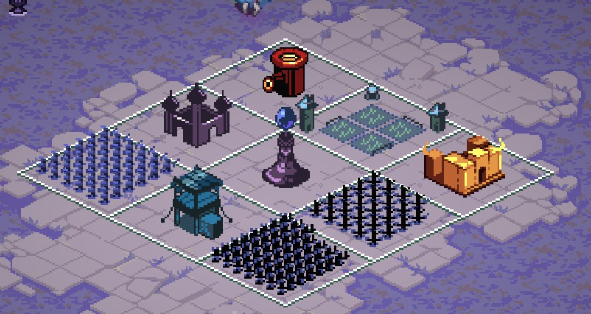
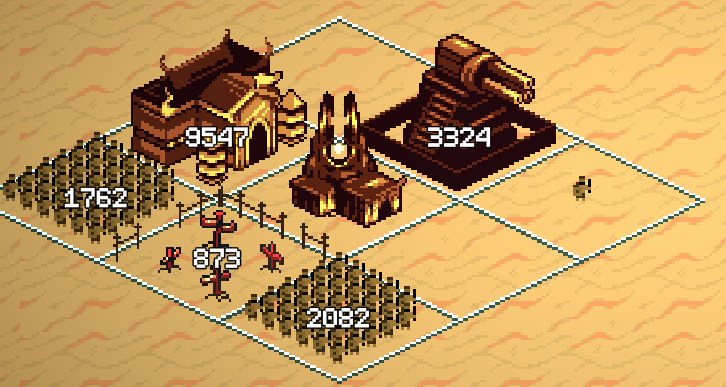
 Start by using Offering on a Level 1 Shrine, then Sacrifice on the center Level 2 Shrine (this levels up 4 other plots at once). Save your Mortgage for later when everything is fully upgraded and use it on a level 3 Shrine.
The strat is simple, pick a Mercenary plot and buff it as much as possible. Migration, Overinvest, Swords, Shields, random enchants, random tomes from Offering, all are good for buffing them up. Avoid rerolling too much, we need to keep a lot of money to keep our unit count high. Eventually play some Raptors next to the Mercs you’ve been buffing.
For the final fight, try to face off against Spells. Your Mercs should be strong enough to deal with the AoE, and the fight should be pretty easy. Blood’s Bombers and Nomad’s Champion are much more dangerous to you than anything Spells can throw at you.
 Toss down Mercs, then try to grab Dispenser from your first loot, and Mercs/Palace otherwise. Pick a strong first decree like Supplies or Feast. Weaker decrees like Outsourcing or Loan can work but require a bit of luck.
For your next fight you’ll ideally get Earthworks from King of Stone. Use it on a Level 3 Beacon, place 2 Beacons around your Palace, then Mortgage the other Level 3 Beacon. If it’s Spells, try to get Offering instead. Sacrifice one of your weak Beacons for some random tomes, then try to use them as best you can.
The general goal is to get a Dispenser up, buff the Palace, and use Mercs to stall the enemy. When it comes time to declare war, reroll for Nomads or Nature. Their low unit count makes the Palace especially effective against them. Once you have only 1 Life left, never fight Stone, reroll to avoid them.