
If you have just opened Scapewatch: Idle MMO for the first time, the skill list can be genuinely overwhelming. Between the 15 skilling skills, 10 combat skills, and 5 odd “skills” that don’t quite fit either category, it’s hard to know where to put your early time. This guide walks through what each skill actually does, how they feed into one another, and which ones I’d prioritize depending on how you want to play. Whether you’re chasing combat power, gold, buffs, or just want to understand the systems before committing, this should help you make your own call.
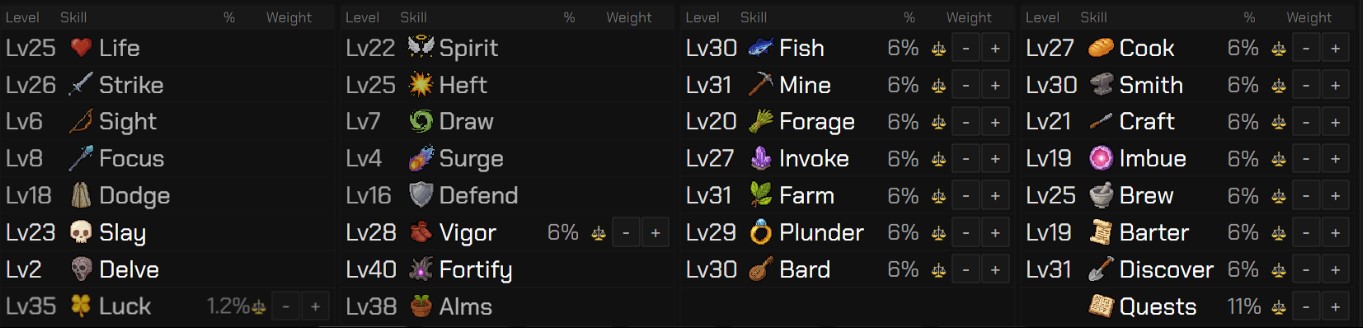
I put this together after seeing the same “what should I level first?” question pop up again and again. The honest answer is that almost everything is viable, and the game gives you a lot of room to enjoy it your own way. But since people keep asking, I’ve laid out a rough priority order below, then broken down each skill so you know exactly what you’re investing in.
The Short Version: What to Prioritize
If you only read one section, read this one. There’s a core set of skills that I’d call mandatory no matter what build you’re running, a tier that’s simply too good to skip, and a tier that comes down to personal preference.
First, you must pick your combat path. Your choice of Mine/Smith (Melee), Craft/Forage (Range), or Invoke/Imbue (Magic) determines how you upgrade your combat equipment. This pairing also feeds into Fortress, so it’s not something you can ignore.
Beyond that, Fish/Cook is essential for healing, both in combat and for Fortress runs.
In the “very good” tier, Vigor speeds up everything you do, and I’ll usually go grab it if there’s a task nearby. Farm/Brew gives you buffs that are genuinely strong, covering combat stats, movement, and task rewards.
The “up to your playstyle” tier includes Plunder for gold, random resources, and Thief’s Gloves; Barter for resources and barter tab rerolls; and Bard and Discover for Discover Potions and chest openings, which can contain resources, gold, or tools.
To be fair, everything could fall under “up to your playstyle.” The game rewards whatever direction you take. But enough people asked for a concrete answer, so here it is.
Fishing and Cooking: Your Healing Engine
Everyone is going to need Fishing and Cooking, no exceptions. This is the most reliable way to get healing for combat, and it’s the one skill pair I’d tell any new player to start early.
Fishing catches raw fish, which pairs directly with Cooking to turn that raw fish into cooked food. The healing you get scales up as you move through the tiers, and it outclasses the Life Soup you can brew by a wide margin. If you’re planning to spend any time fighting, this is your lifeline.
Mine/Smith, Forage/Craft, Invoke/Imbue: Choosing Your Combat Style
These six skills map directly onto the three combat styles. You only need the pair that matches the style you want to pursue.
If you fancy Melee, go Mine/Smith. Mining gathers ores, which you smith into metal bars. Then, in the Smithing tab (Hotkey: 6), you use those bars to make equipment, earning more Smithing XP along the way.
If you like Range, go Forage/Craft. Foraging gathers leathers, which you craft into processed materials. Then, in the Crafting tab (Hotkey: 7), you use those processed materials to make equipment and ammo, gaining more Crafting XP.
If Magic is your thing, go Invoke/Imbue. Invoking gathers crystals, which you imbue into Charged Essence. Then, in the Imbue tab (Hotkey: 8), you use that Charged Essence to make equipment and ammo, earning more Imbue XP.
Farm and Brew: Potions and Buffs
Farm and Brew are how you build up a potion stash. Potions provide bonus combat stats, extra rewards, and movement speed, so they’re worth the investment even if you’re not going hard on combat. Brew also gives you another source of healing food via Life Soup, though it heals less than properly cooked fish.
You gather herbs using Farm. The herb color tells you which stat the resulting potion buffs:
- Skirmish/Battle/War (Red) — melee bonus stats.
- Hawk/Eagle/Condor (Green) — range bonus stats.
- Mystic/Arcane/Cosmic (Blue) — magic bonus stats.
- Shell/Barrier/Fortress (Orange) — defense stats.
- Calm/Serene/Tranquil (Light Blue) — spirit.
- Swift/Fleet/Haste (Yellow) — movement speed.
You then take those herbs into Brew tasks to make (Unf) ______ potions for each respective type. The one exception is Spirit herbs, where the Brew task hands you the finished product directly.
Finally, in the Brew tab (Hotkey: 9), you combine your (Unf) potions with resources from other skills to make complete potions, or Life Soup:
- (Unf) Red Potion + Ore and Bar = Melee Potion
- (Unf) Green Potion + Leather and Straps = Range Potion
- (Unf) Blue Potion + Crystal and Charged Essence = Magic Potion
- (Unf) Orange Potion + Raw Fish = Defense Potion
- (Unf) Pink Potion + Jar of Sweat (from Vigor Tasks) = Movement Potion
- Barding Notes (from Bard Tasks) + Jar of Dirt (from Discovery Tasks) = Discover Potion
- Any (Unf) Potion + Raw Fish = Life Soup
Plunder: Gold and Thief’s Gloves
Plunder is one of your main sources of gold in the early game. You’re essentially robbing villains who are hoarding gold and miscellaneous resources.
There is a small chance you’ll lose some HP, and if you’re really unlucky, you could die. I’d recommend carrying a bit of food before you head out, just in case the dice don’t go your way.
When plundering, you get gold and random resources based on the tier of the task. T0 tasks give T0 resources, T1 gives T1 resources, and so on up the chain. You also have a chance to pick up Thief’s Gloves, which are strong gloves with excellent stats. The drop rates get lower the higher the tier you go, and you can check the exact numbers in the Collections tab (Hotkey: E).
Barter and the Barter Tab
Barter tasks use your gold to purchase resources, and the resource you get depends entirely on the task. A T0 Fish Stall nets you raw or cooked fish. A T1 Forage Stall gets you leather and materials for Crafting, and so on up through the tiers.
One thing worth knowing before you commit: when you run a barter task, all your gold is taken out of the bank. That means donating to Alms or using the barter tab is unavailable until the task finishes.
You can also pick up these newer barter drops from completing Barter tasks. They influence the weighting of your Farm and Brew:
- Farmer’s Almanac — +1 to each weight point in Farm tasks.
- Brewer’s Almanac — +1 to each weight point in Brew tasks.
Both make it easier to weight your Farm and Brew tasks up or down as you need.
Using the Barter Tab
The Bartering tab (Hotkey: ” / “) starts working at Barter level 10. You’ll need to reroll once to get it working after you unlock it.
You’ll unlock more bartering tab slots at levels 20/40/50/70/80. The tab gives you another way to make gold by selling and buying excess resources and equipment. It runs on your barter reroll credits, which you get by completing Barter tasks specifically. Each reroll costs 10 credits and changes all the slots, so use them wisely.
As a general rule of thumb, higher tier stuff sells for more gold, and equipment is worth the most. What you can roll into depends on your Barter level and your other skill levels. For example:
- Barter T1, Fish T2 — you can only get T1 fish, because Barter is T1.
- Barter T2, Fish T1 — you can only get T1 fish, because Fish is T1.
- Barter T2, Fish T2 — you can get T2 fish.
You can check the full breakdown by hovering over the scroll icon in the top left of the barter tab. When you see a sell or buy task, watch the color of the number. For both buying and selling, green means good and red means bad. A red number means you’d be selling below the average price for that resource, so it’s usually worth skipping unless you’re desperate.
Bard and Discover: Potions and Treasure Scrolls
Bard and Discover are a little different from the rest. Bard has a chance to give you gold, Barding Notes, and Treasure Scrolls. Discover has a chance to give you Jars of Dirt and to complete a step on one of your Treasure Scrolls.
Barding Notes and Jars of Dirt are used in Brewing at levels 20/50/80 to make Discovery Potions. These are great because they double the reward of completing a task:
- 1 reroll credit becomes 2 reroll credits.
- 1 skill point becomes 2 skill points.
- Double chance for automaters to drop.
- T5/T8 potions also add extra chest loot when opening chests.
Bard tasks have a chance to drop Treasure Scrolls of tiers below yours, plus one above. A T5 Bard task, for example, can drop a T0 through T6 Treasure Scroll. The same mechanic applies to Discovery: a T5 Discovery task has a chance to complete steps for a T0 through T6 Treasure Scroll. Otherwise, you’ll need to path through the map or head to a task at the location shown on the scroll.
Vigor: Speed in Every Sense
Vigor keeps you moving fast. It grants movement speed on the map, faster skilling actions, and faster attack speed. On top of that, it gives you Jars of Sweat, which are used to make Movement Speed potions in Brew.
You can find the full breakdown of Vigor’s benefits in the Unlocks tab (Hotkey: Q) by hovering over the entry. I’d recommend checking that early so you can see exactly how much speed you’re gaining per level.
Combat Skills Breakdown
These are the skills tied to combat, covering Slay, Delve raids, and PvP.
| Skill | What It Does |
|---|---|
| Life | Your HP. |
| Spirit | Combat resource that drains 2 per attack you make and 1 per damaging hit you take. While above 0, it boosts all combat stats by 20%. Kills restore +10% of max Spirit. |
| Melee | Strike / Heft. |
| Range | Sight / Draw. |
| Magic | Focus / Surge. |
| Dodge | Enemies’ attacks miss you. |
| Defend | Reduces damage you take when hit. |
Life and Spirit level up naturally as you fight, so you don’t need to do anything special for those.
Strike / Sight / Surge govern accuracy. When you train your accuracy skill, you also train your Dodge. Once your accuracy goes above 100%, the excess converts into a bonus to your minimum hit.
Heft / Draw / Surge govern power. When you train your power skill, you also train your Defend.
Each combat style has specific weapon subtypes:
- Melee — Stab (Dagger) / Slash (Axe) / Crush (Mace)
- Range — Range (Bow) / Stab (Crossbow)
- Magic — Magic (Staff) / Slash (Wand)
Alms: Passive Bonuses Through Donation
Alms is where you take your gold and donate it in exchange for great passive bonuses and item rewards. I’d suggest saving your gold until you hit Alms levels, while also keeping some aside for any bartering you plan to do. It’s a balancing act, but the passive bonuses are worth the patience.
Slay: Killing Monsters for Progression
You level up Slay by killing monsters. As your Slay level rises, you unlock more monsters that give more Slay XP, and eventually a new tier of monsters through Slay Masters.
Every monster has a set of unique drops that grant powerful bonuses and stats, so it’s worth checking what each one can drop. You can view monster drops in the Mob Selection (Hotkey: 4) or in Collections (Hotkey: E).
Luck: XP Sources and Lucky Tasks
There are a number of ways to gain Luck XP:
- Doing lucky tasks.
- Gathering an item for the first time from tasks.
- Crafting an item for the first time.
- Getting rare drops from mobs.
- Basically anything tracked in Collections (Hotkey: E).
Lucky tasks are marked by a yellow four-leaf clover icon. Tasks have a chance to come with the lucky modifier, and when they do, you get:
- 2x EXP.
- 2x task actions completed per tick.
- 2x task completion rewards (reroll credit, skill credit, automater/telescope drop).
- No fails.
Discovery Potions also stack with Lucky Tasks, which makes the combo very lucrative. A general rule of thumb: a lucky task one tier below your max tier gives more XP than a regular task at your max tier. For example, a T5 Lucky task beats a T6 Normal task, but a T6 Normal task still beats a T2 Lucky task.
Delve and Fortify: Party Raids
Delve is the combat party raid. You team up with 4 other players to challenge raids together.
Fortress is the skilling party raid. You team up with 4 other players to protect a fortress from waves of enemies.
Conclusion
There’s no single correct answer to which skills you should prioritize, but hopefully this breakdown gives you enough to make a confident call. Pick your combat path, keep Fishing and Cooking running in the background, and lean into the skills that match how you want to play.