In this guide, I’ll explain the main mechanics of TasteMaker and strategies to have an efficient restaurant. In the end, I’ll go through every achievement and explain ways to unlock them.
General Tips
- Waiting Time and Hygiene are pretty self-explanatory: if your restaurant is dirty, either hire more cleaners or buy more brooms/vacuums (also, don’t worry about rats); if your waiting time is high, either hire more workers or look for what’s delaying the orders and buy more stoves/ovens/etc.
- Bladder is also obvious, so make more toilets and sinks. A funny fact is that you can put multiple toilets and sinks in the same room, so you can make a 2xN room and make a big toilet. That way, you don’t have to worry about multiple rooms. (3 toilets are usually enough)
- Price: if it’s too high, lower it! You’ll usually want to keep them in the standard value to make profit and still have clients.
- Food quality: in general, it’s good to have all the appliances in the maximum quality. It doesn’t make much difference for the time in the long run and it really boosts your ratings.
Now I’ll adress the issues with decor, menu and then talk about how to manage space in your restaurant.
Decor
In this game, decor points are computed as the sum of contributions (good decor vs. items like brooms, etc. which are negative) from items that are next to the customer. So you can have $10k worth of decor in your restaurant, but if there are only few tables next to it, you’ll have a bad decor rating.
Therefore, my biggest biggest biggest tip to decor is to use $200 Candle. Every decor item is pretty much worth of 25 points per $100, but the candle has the advantage to not require space, and it’s guaranteed to be next to customer. Furthermore, if you place candles in every table, each table will be surrounded by ~4 candles. They usually take care of decor alone.
Also, for some reason customers can sometime see “ugly” items through walls, so try to place them not too close (or just compensate them on decor). As a last remark, some decor items such as the jukebox are more “flexible” to walk though, so you can place them like you place the chairs in the tables tile and people can go through them.
Menu
To have a good menu rating, you need to have multiple dishes. If you’re playing sandbox, just keep getting new items and ingredients. If you’re going for the scenarios/achievements, put new dishes on the menu that are the closest to your objective (i.e. use the same ingredients/kitchen items you’ll use for the objective), so you don’t have useless ingredients or appliances. For an example, see the notes about scenario 2.
Tiles
The biggest issue in the game is space management. A thing that goes without saying is that the more expensive versions of items (big mixer, big shelf, big fryer) are always worthier than the cheaper ones, since they occupy less space. One way I found to manage space better is to make efficient “tiles” – replicable patterns that can be put side-to-side so that you can make utility of the most space possible. This makes it easier to see what’s missing in your restaurant and to avoid making dead ends/places that get people stuck.
Most elements of the kitchen, such as dishwashers, stoves, ovens, mixers, etc. can actually be used in the diagonal, so you don’t have to make them face you to use them. The tip is to improvise this tiles according to your needs (specially for those trying to get the achievements). In the following, I’ll give 3 examples of useful tiles:
Tables Tile
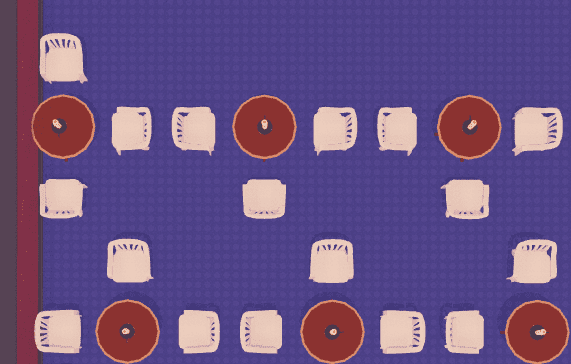 This is by far the tile I used the most.
I’m not sure if there’s a more efficient way so you can fit 4 chairs, but in this tile, this happens:
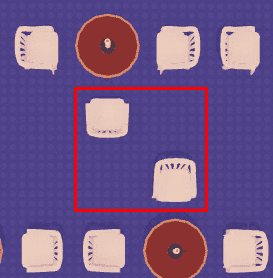 If chairs are put side by side, a customer cannot go through them. In this arrangement, they can. So you can make tables with three places facing one direction, and then make the same mirror-placed pattern in such a way that the chairs are next to each other but diagonally.
Kitchen Tile
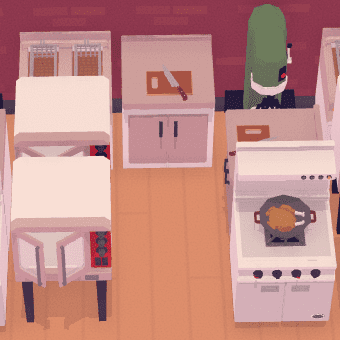
In this tile, we have two cabinets for plates, pans, etc., and they are placed in such a way that the workers can use the cutting board. Every other kitchen item can be used since they have at least a clear diagonal. This is useful in general, and the present kitchen items can be exchanged with other as needed, so this tile is not too rigid.
Storage Tile
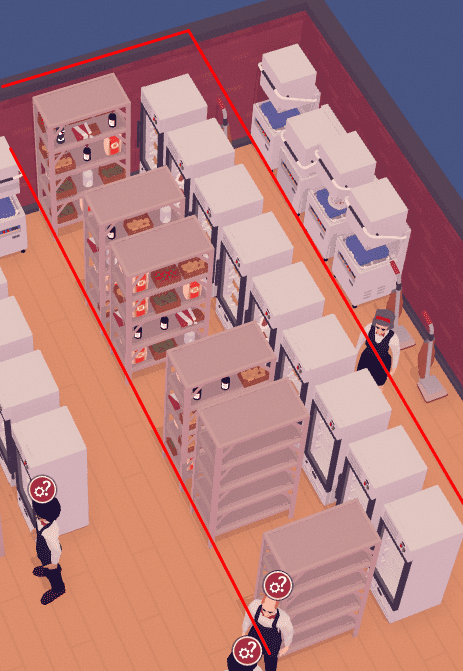
In this tile, you have lots of freezers for meat, and the freezers that are “blocked” by shelves are accessible through the diagonals.
Other Tips
- When hiring people, define their priorities right away. Cheap workers that are fast but clumsy/bad at cooking are perfect for cleaning, so try to delegate their tasks according to their abilities (…just like real life, haha)
- Pause the game when making big changes like redesigning the kitchen, etc. Even if you could get money in the time you paused, you’ll probably get people stuck, messed up decor or orders that can’t be done because something is blocked, so your rating goes down and it’s very tedious to get them up again.
- Second floors are life-savers for some scenarios (see Scenario 2). To build them, place a staircase (from the construction menu), and in the bottom-right menu, click at the up-arrow. You can then build walls on your second floor.
- You can place staircases facing the street. Customers will go up the staircases just as any other entrance.
- Objectively speaking, things like windows, wallpapers etc. do not matter to customers.
- Don’t be afraid to refresh workers. Keep playing and refreshing then until you find a good one.
- Try to make a central line of clear path to your workers so that they can move between the kitchen and the tables faster (with the tile, this is specially good)
Achievements Guide
Sandbox Achievements
 Chicken Killer
 Cult Leader
 Kidnapper
 ♥♥♥♥ Maker
 Museum
All of these achievements can be unlocked in a single sandbox restaurant. The best way to do this is in a creative sandbox restaurant, so we don’t have to worry about cash or profit.
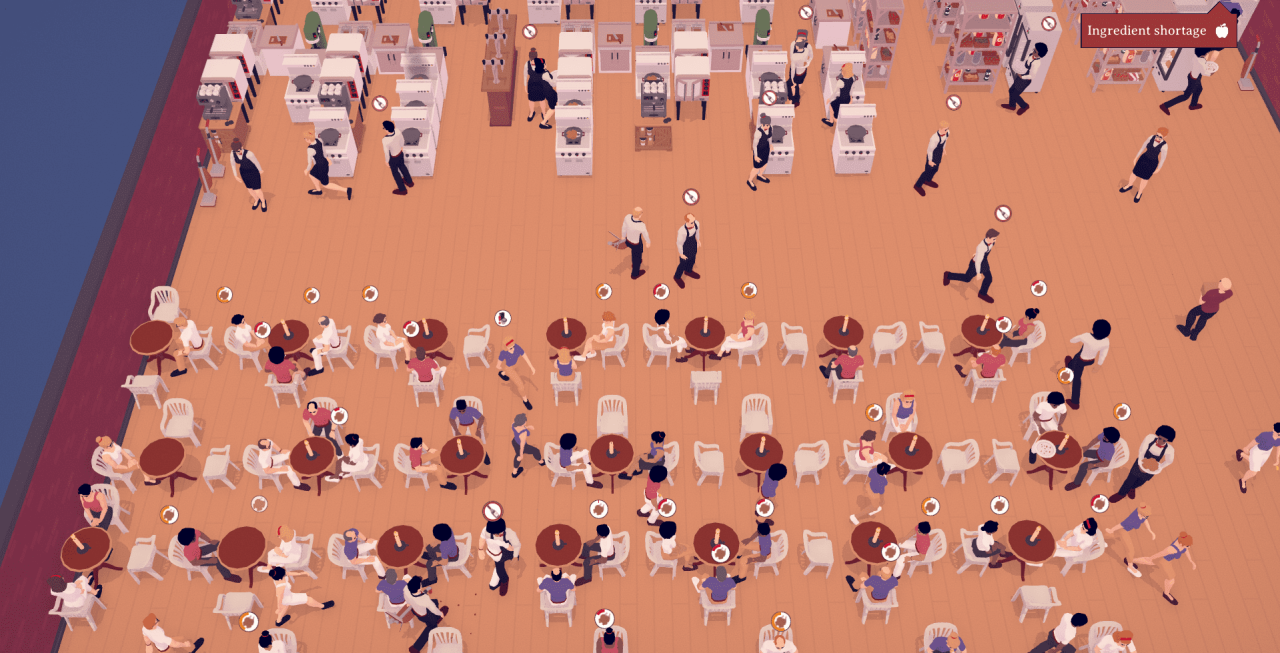
- Chicken Killer: build a big restaurant (e.g. as big as the map) with lots of workers, tables, decor, food quality, etc. Basically build the best restaurant you can (the tips can help on this). Once your restaurant is huge, take everything from the menu and keep only the Chicken for the price of $1. Way for the current and the next months to end and the achievement should pop. If it didn’t, get more tables.
- Cult Leader: using the previous restaurant, just hire lots of people.
- Kidnapper: after your restaurant is really full, click on the trash icon and delete the door and wait for the customers’ agony. If you want to keep your beautiful restaurant, save it now.
- ♥♥♥♥ Maker: the fastest way I found for this one is to keep the restaurant working normally and look for people who want to use the bathroom. When you find someone, lock them (you can make a 1×1 room or use chairs, etc. to make them stuck). Wait for them to poop, rinse and repeat until all of the 10 pooped on the floor.
- Museum: this one is boring. Histerically put paintings on the walls until you can’t. If the walls of the restaurant are not enough, you can make various walls inside the restaurant and keep putting paintings.
For reference, this was my restaurant:
And that’s it for the Sandbox Achivements.
Scenario Achievements
Most of these are the same thing: start the restaurant, make it efficient and with good stats, expand, etc. So there’s not much to explain; most of the tips are contained in the previous section. None of these are based on how much money you currently have, so investing in decor and big appliances is a very good idea. I’ll leave screenshots of my restaurants as reference.
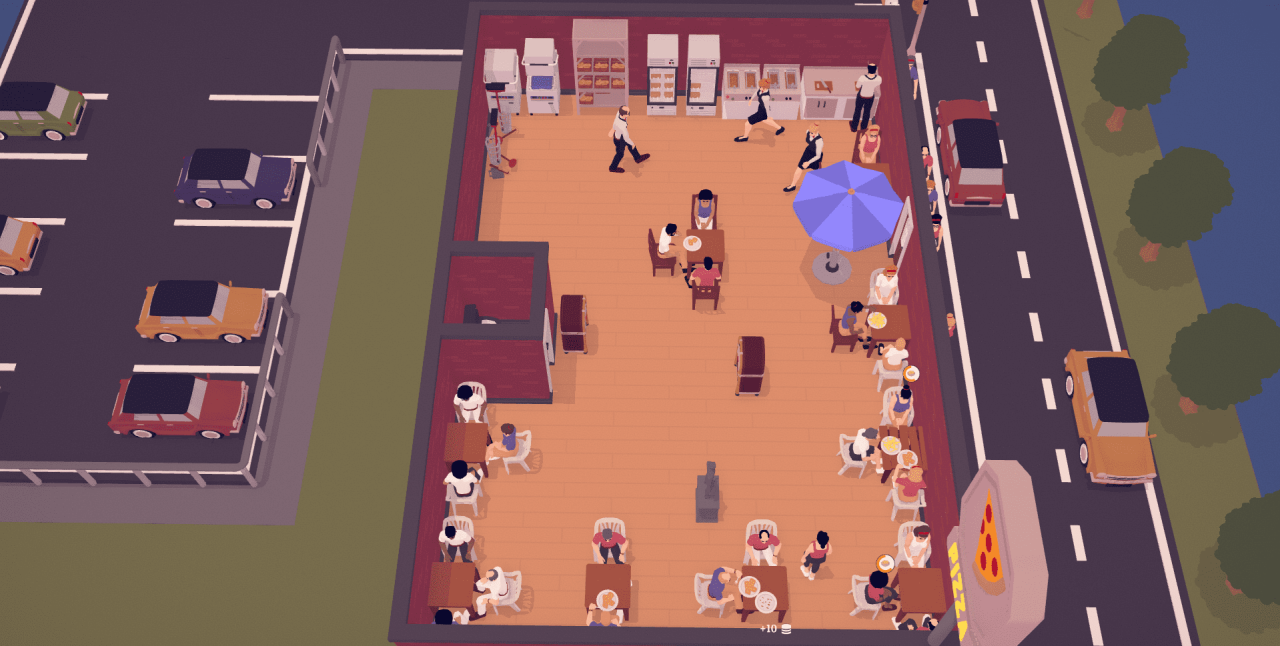
 Scenario 1
This one is not hard at all (as you can see, my restaurant doesn’t even have a standard), it’s just a matter of waiting for the cash and upgrading it. Get fryers, get people, get tables, get decor, rinse and repeat.
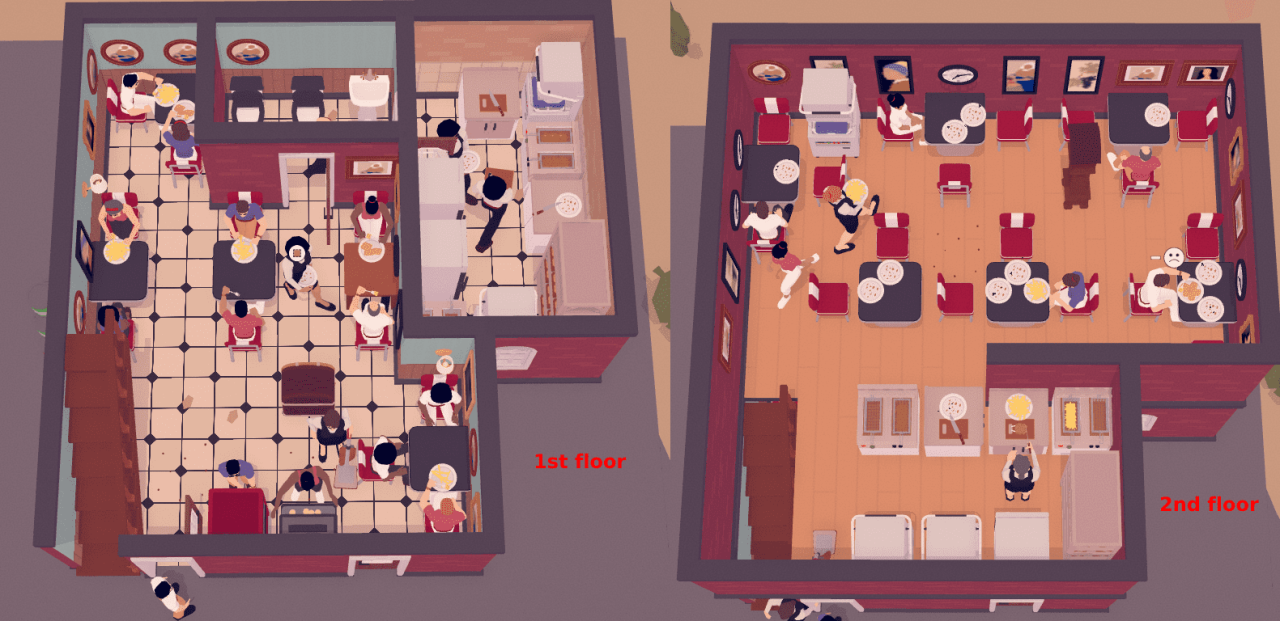
 Scenario 2
First of all, reorganize the chairs, tables, decor etc. to make your restaurant useful at all. Do NOT[/u] hire people while doing this, otherwise you get even deeper in debt (it’s a fixable mistake, but it’ll take much longer). You can get the last two achievement using just fries and nuggies.
Expand the bottom floor as much as you can, and then start building the second floor. Profit is the goal, so wait until you have enough cash to get lots of decor, and keep hiring and firing people until you get cheap workers that are very specialized (e.g. very good cook but bad server, etc.) so you keep the quality of the restaurant for less cash. Very very cheap workers are also good; even if they are trash, they can clean, etc.
I didn’t try to get other dishes other than fries and nuggies but it seems a good idea (so you can raise the prices and still get the full capacity of this small restaurant).
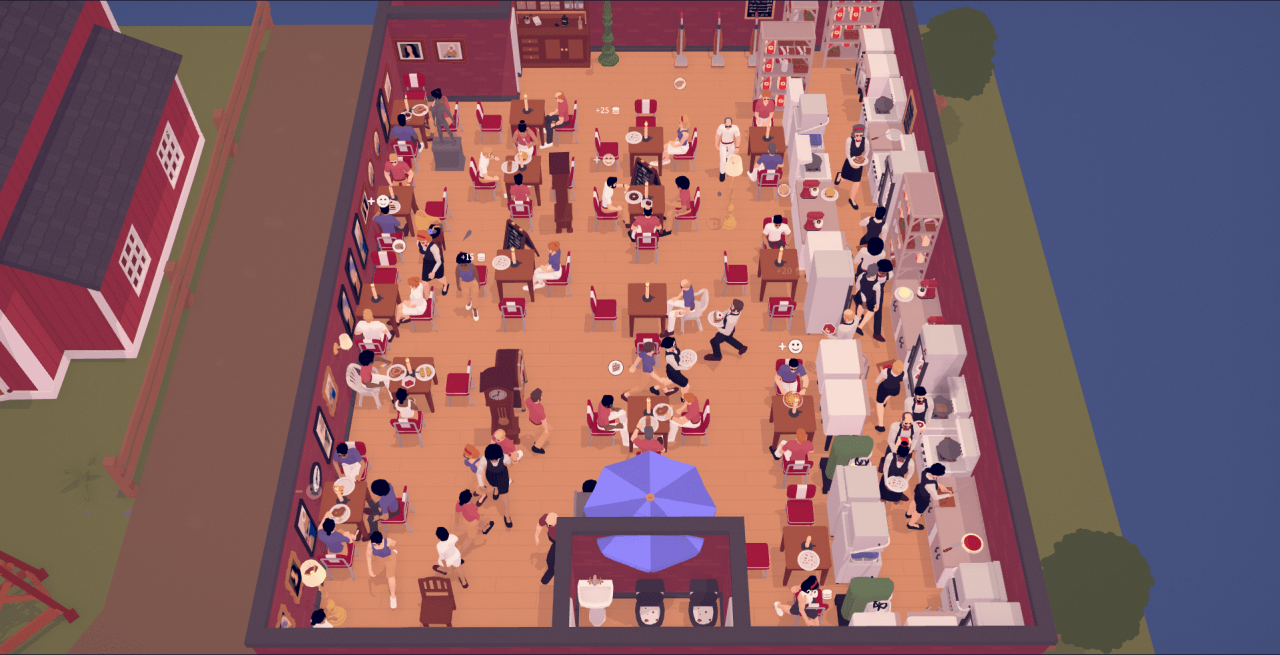
 Scenario 3
Start out slow. The money you have in the beggining is not much, so buy just some 2 stoves, 1 fridge, etc. Keep expanding. When you have a good income, start making burguers and keep expanding in the most productive way possible (try to follow the tiles). This one is not based on profit but on income, so hire as much people as you need.
After the second goal, escalate your kitchen to produce bread, cakes, avocado etc. Your menu rating should be very high. I’m not sure if a higher price would help, so just keep making it bigger, more decorate and adding more people. Be patient! You have to sell a lot, so it’s a matter to slowly get your restaurant to the maximum area and using it efficiently.
And that was the last achievement!