An unnecessarily verbose guide on where to find Kali’s locker and how to decipher James Mason’s code to unlock the gate in the Restroom of the Vestibule of the Ward with images and maps.
When in the game is this puzzle?
This guide contains text, images, and maps to give you more than what you need to solve this puzzle.
Scroll slowly if you just want hints along the way, or skip to the images if you’re already at wit’s end.
To be certain, this puzzle presents itself after you have:
- Attempted to activate the Archives in the Control Room next to the Arbour with the apple tree.
- Have been granted Archives security access through a new module on your CAT.
- Have activated the servers.
- Came in contact with Entity A.
- Successfully rebooted the Archives.
If none of that sounds familiar to you, you may not have arrived at this puzzle yet.
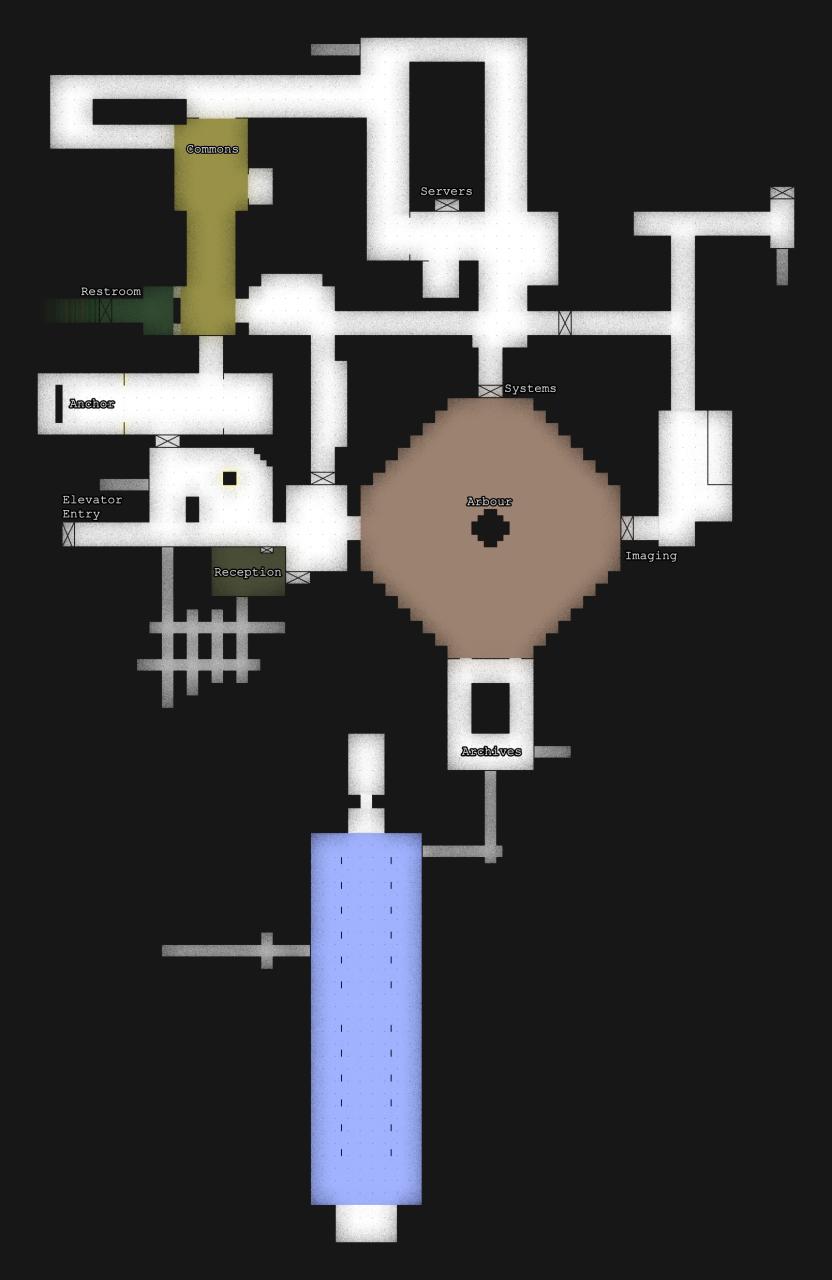
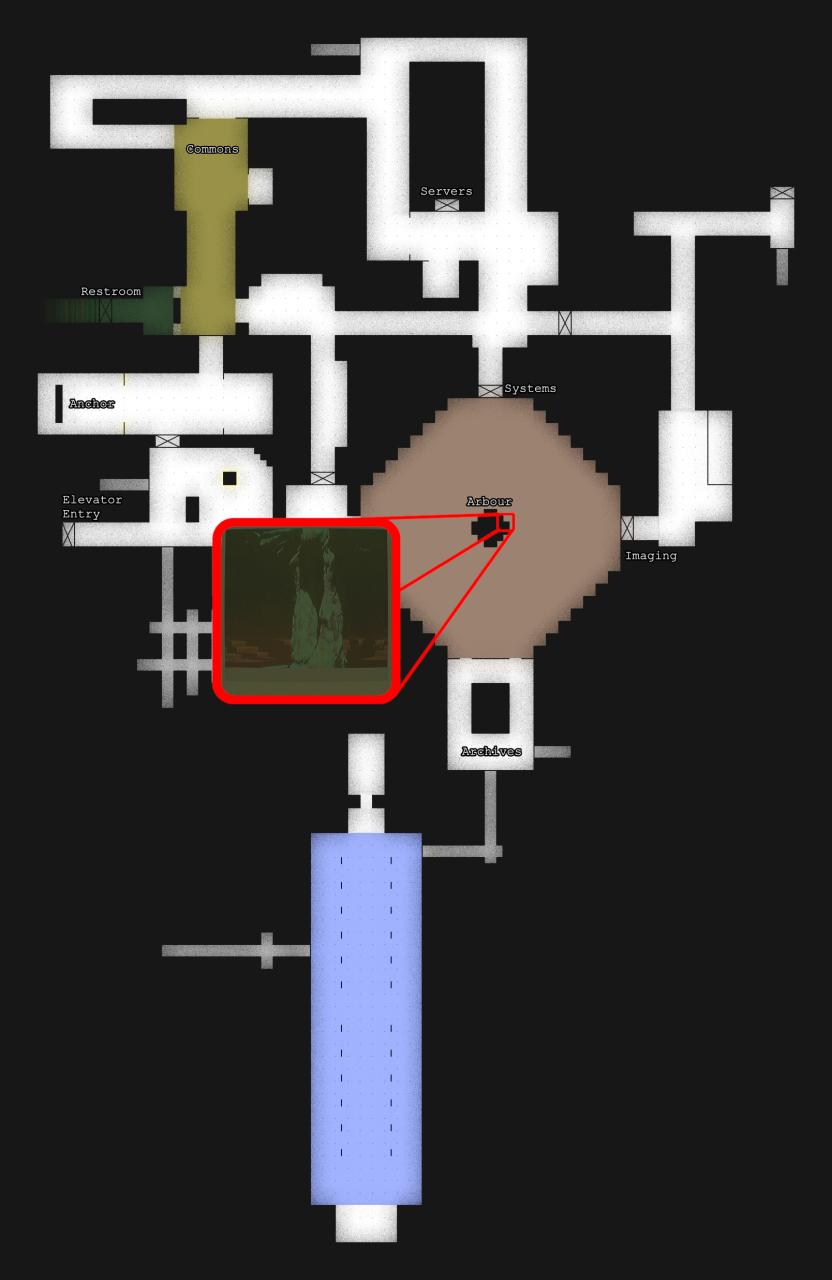
What is the layout of the Ward?
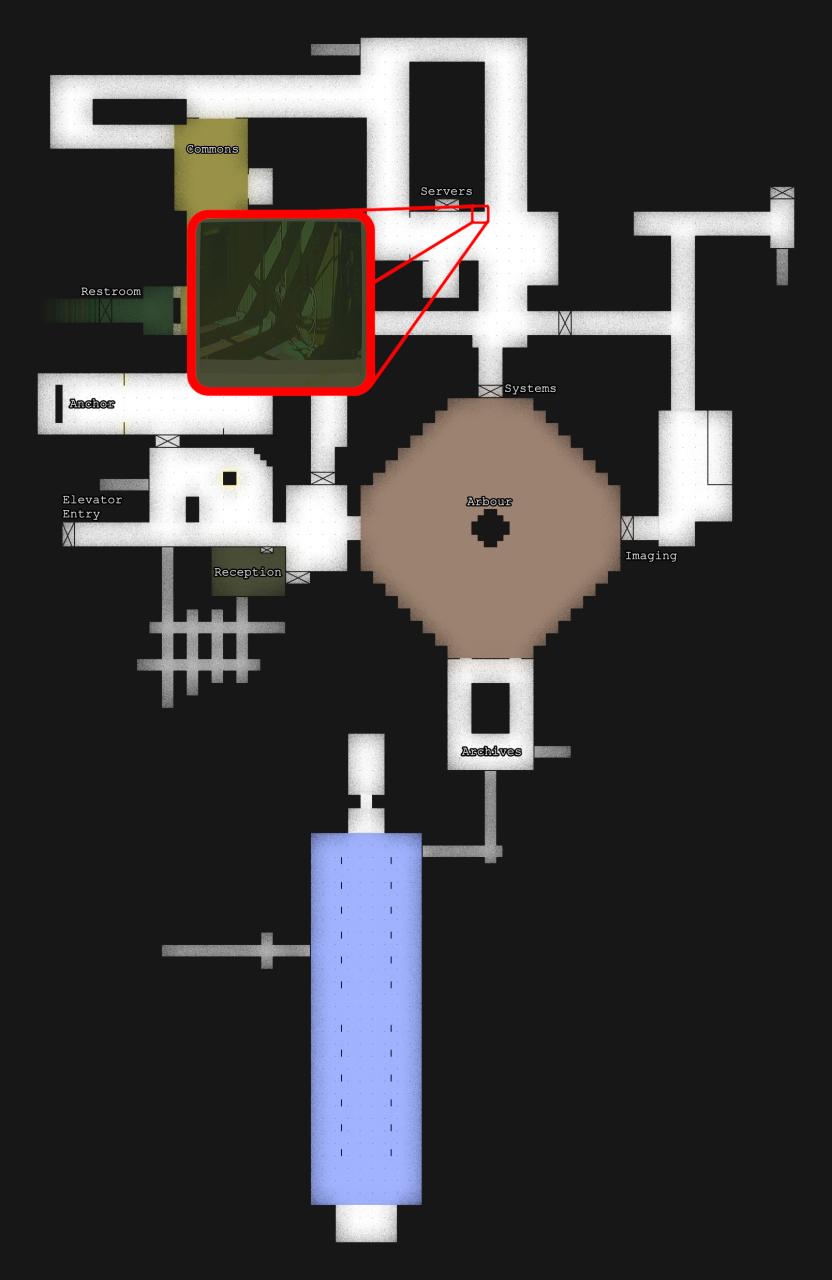
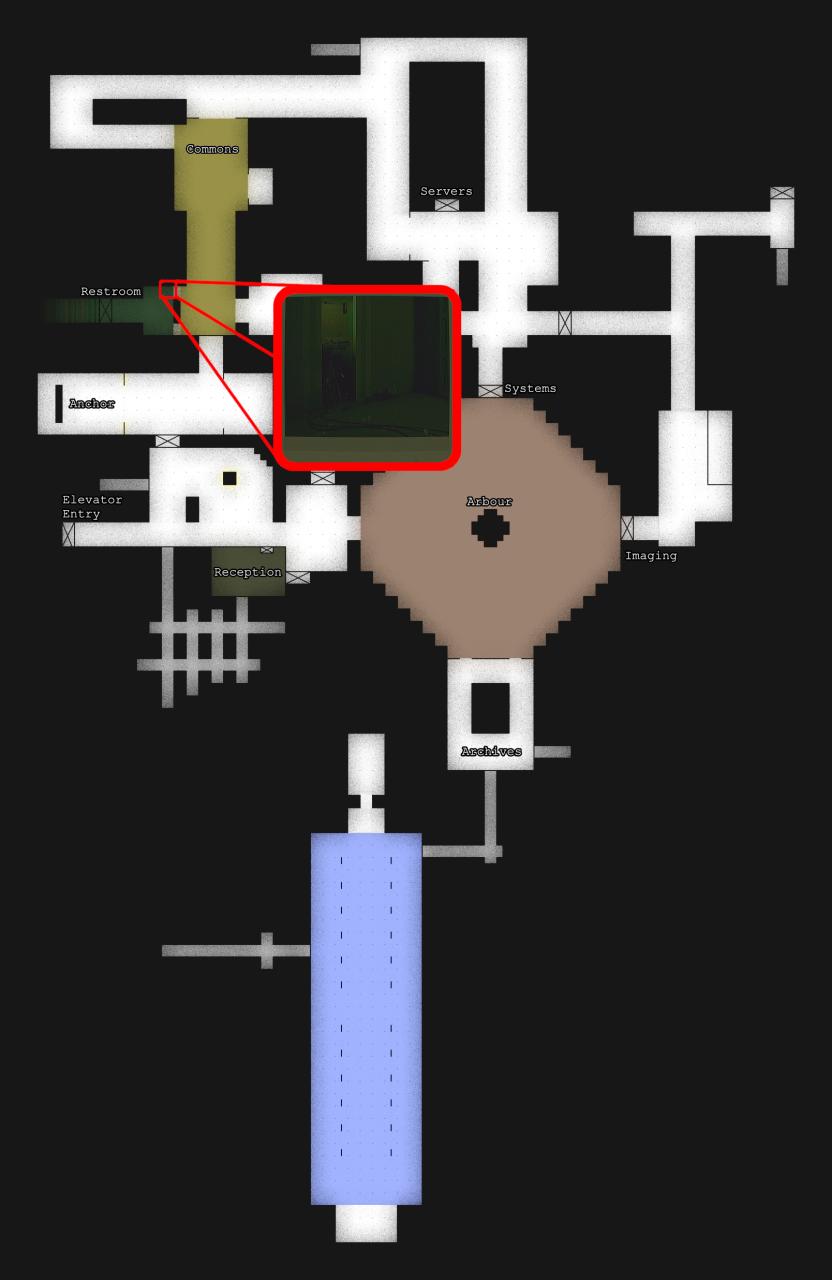
Below is a simple map of the space with some labels to help orient yourself.
This Map will be shown below each step with the section’s objective shown. Scroll slowly to avoid spoilers!
How do I get around the Ward?
There are also quakes which cause all of the circuit breakers to simultaneously release, forcing all doors to close, but ultimately these quakes are always conveniently timed to allow us to easily redirect power to a new route without having to go shut off power to unnecessary doors manually ourselves.
However, there is a good chance you are no longer alone in the Ward at this point in the chapter.
Sometimes the creature known as Entity A is completely passive, no footsteps can be heard and it never shows itself to you. I am unsure if this is because of randomness in the game, bugs in the game, the player character’s lack of knowledge of the creature if you do not read enough notes about Entity A, or because of pure happenstance that the player never caught a glimpse of Entity A on the Interface Module or Ultraview Module so it is not upset at you yet.
If Entity A is there, there are some things to know:
- Entity A is large, and cannot reach you while you are in a tight corridor or vent.
- Entity A makes loud footsteps when it patrols, use those to assess its proximity to you.
- Entity A wanders around quite slowly, you do not need to quickly run away when still undetected.
- Entity A is not very perceptive, allowing you to easily move away when not directly in front of it.
- Entity A can materialize at will; you cannot always visually see it.
- Contrary to the slightly misleading notes you may read in the Ward, when Entity A is “invisible,” even the CAT cannot be used to see it.
- If Entity A is making strange noises that sound close to you instead taking loud footsteps, and you cannot see it, Entity A is about to pounce on you and you need to go to safety immediately.
- When not patrolling, Entity A likes to stand in corners, dark spots, and near walls; check your corners when walking through the corridors.
- If detected, run to the nearest concrete corridor or vent, or to the Control Room.
- You can use the flash of the CAT’s Interface Module to temporarily stun Entity A.
How do I start the puzzle?
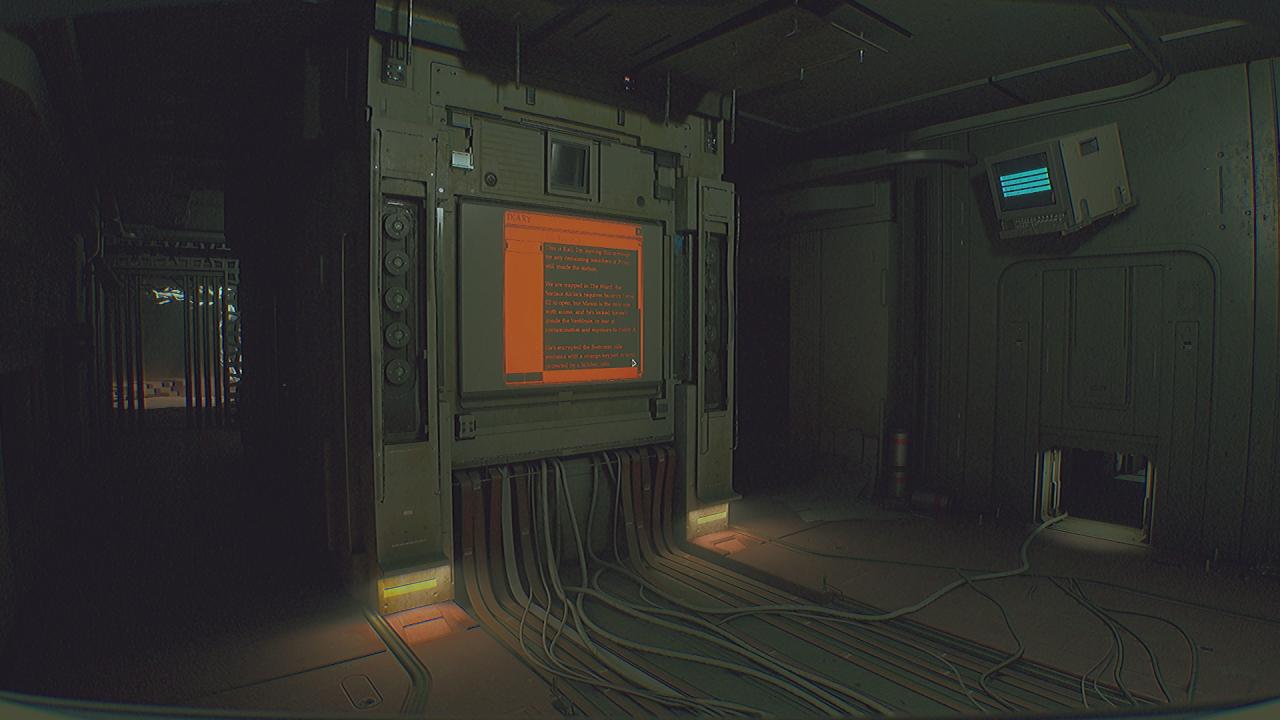
In this diary entry, you learn that Kali and others are trapped in the Ward with Entity A because they lack Security Level 02 credentials and cannot open the doors without it — much like yourself. There is a man named James Mason that does have Security Level 02 access, but he has locked himself behind a gate he rigged in the restroom because he feared encountering Entity A. Mason had drawn a diagram and took several photos of locations in the Ward as a way to encrypt the passcode to the gate. Luckily, Kali was able to take those documents from Mason and she stored them in her locker, noting the pin to the locker.
The game randomizes pins and id numbers every playthrough, so unfortunately this guide cannot tell you what the pin to the locker is with any certainty. You will need to note the pin from the diary entry yourself.
The Vestibule entry gives us our first goals:
- Find Kali’s Locker.
- Use the pin from the diary entry to open the locker.
These goals are reaffirmed in the CAT Personal Data Assistant Tasks list that can be seen while connected to a Wireless Access Point. The CAT PDA Database will also have Kali’s Locker PIN listed for your convenience at any WAP if you forget it, or you can read the diary entry again at the Archives Terminal.
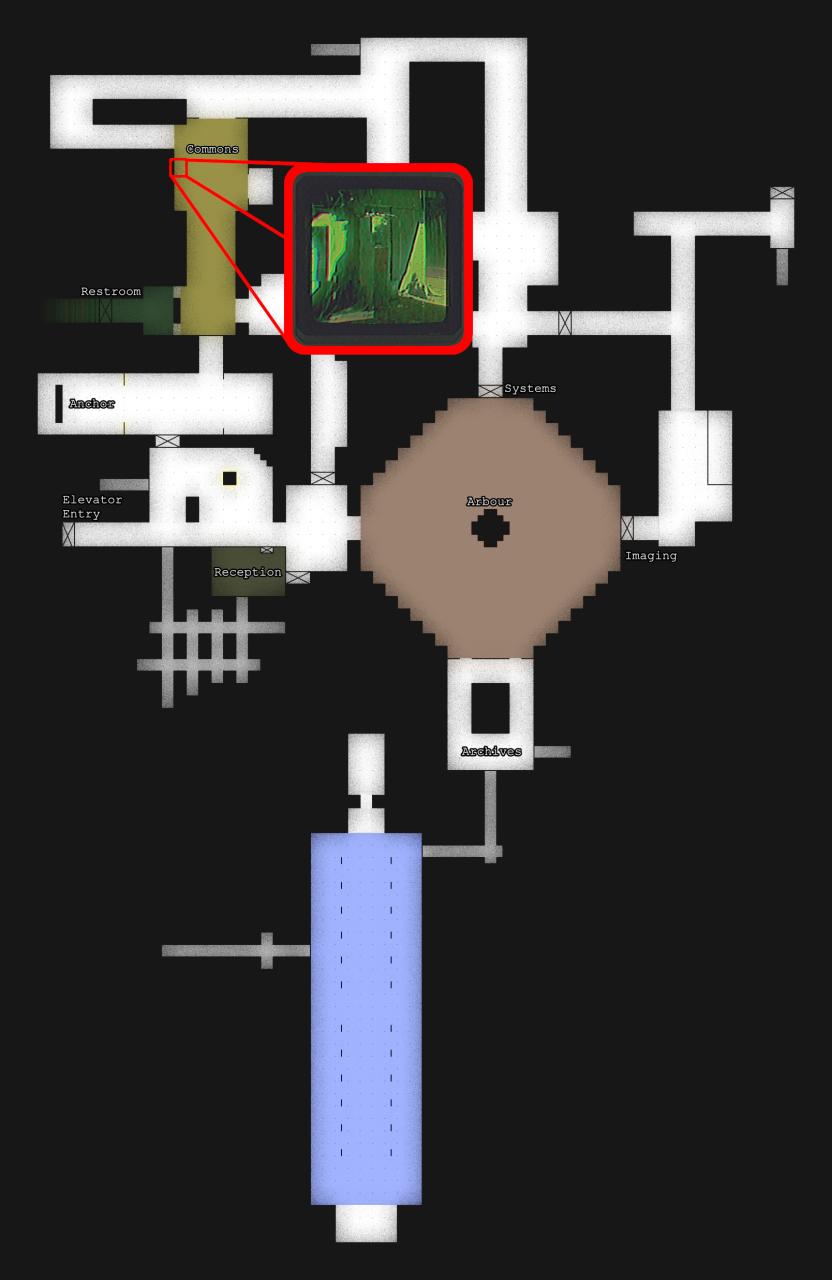
Where is Kali’s locker?
- There’s a only handful of distinct areas in the Ward; perhaps one of them has a few standalone lockers?
- Lockers would probably be in a common area as opposed to Systems, Imaging, or the Pass.
- There’s some lockers in the large, well-lit room of the Commons near the Restroom.
- Kali’s Locker is between the infected body laying on the floor of the room in the Commons that is blanketed with yellow light and Kali’s Terminal.
Keep scrolling to see the exact location on the map.
What is in Kali’s locker?
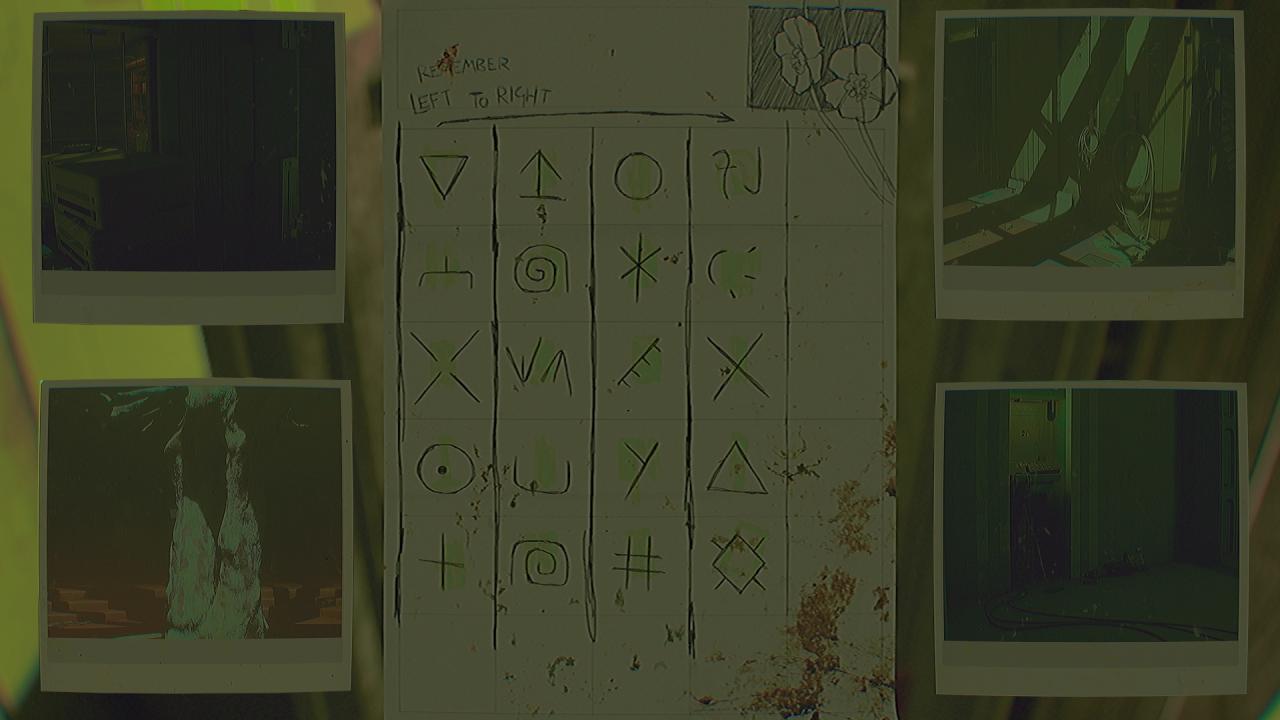
Generally speaking, each photograph:
- Is of a location that is currently accessible to the player.
- Is taken in a different room of the Ward from each other.
- Notably does not show a symbol.
Seems finding each location from the photographs in the Ward will be the next step of this puzzle.
Photograph #1
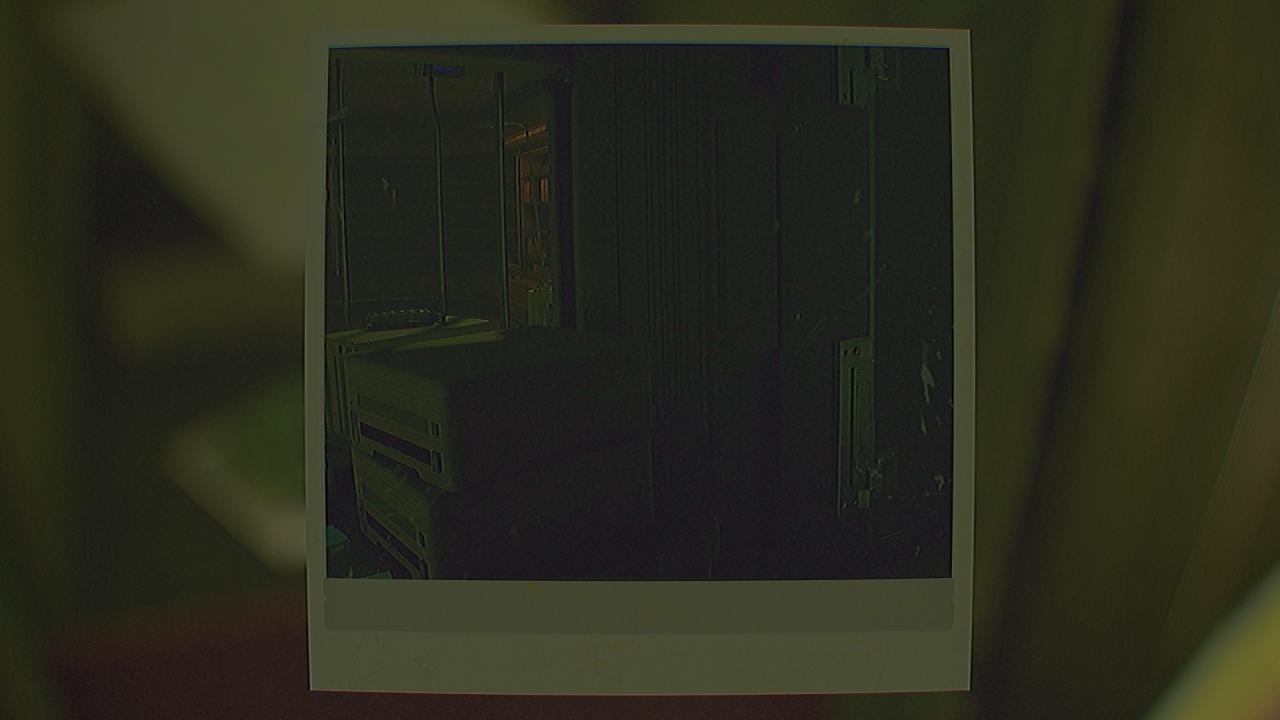
The photograph contains the side of a door, a window with metal bars, and a bookcase.
This photo has a door in it, so it must be near one of the 10 doors in the Ward.
There are only 2 locations in the Ward that have interior windows, and one of them has pink lighting that does not match with the photo.
There is only 1 location in the Ward that has the unique curved bookcases.
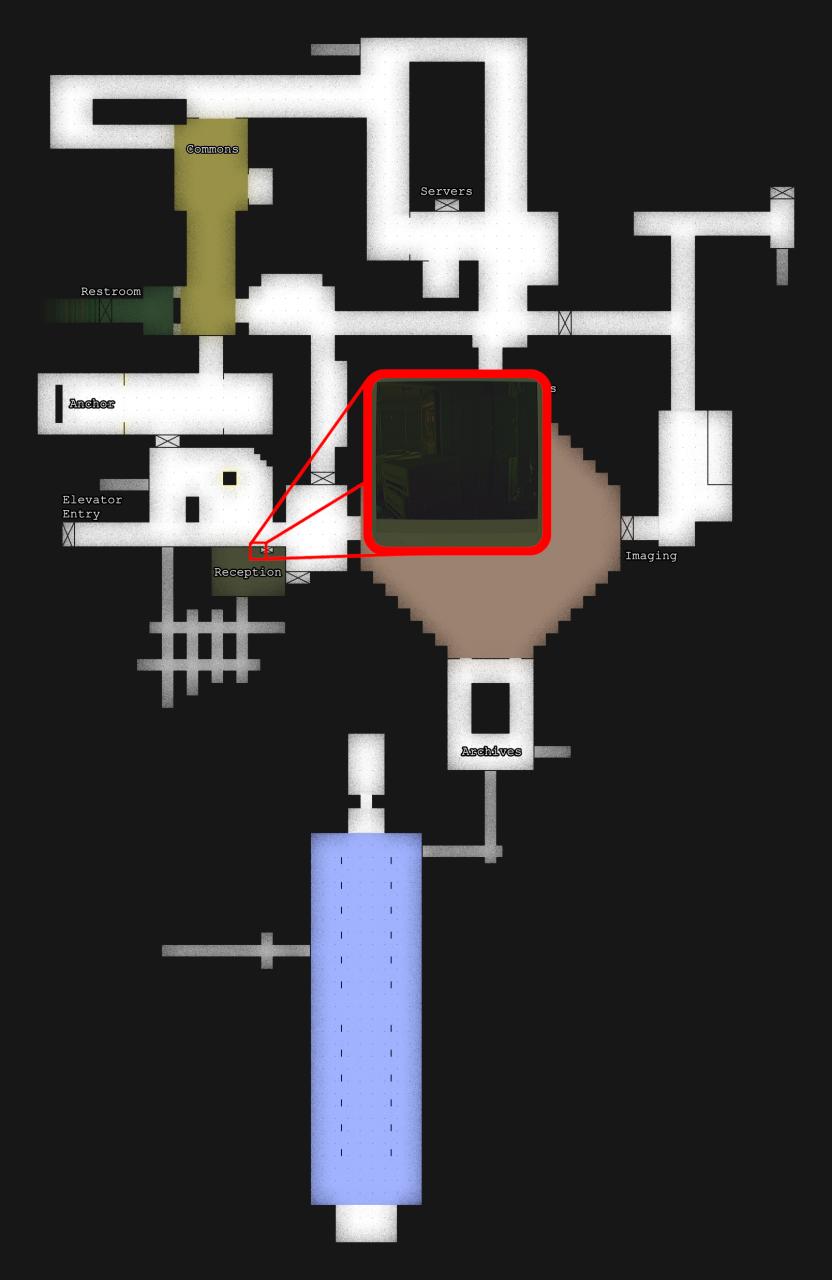
Below is a wider view of the location shown in the photograph.
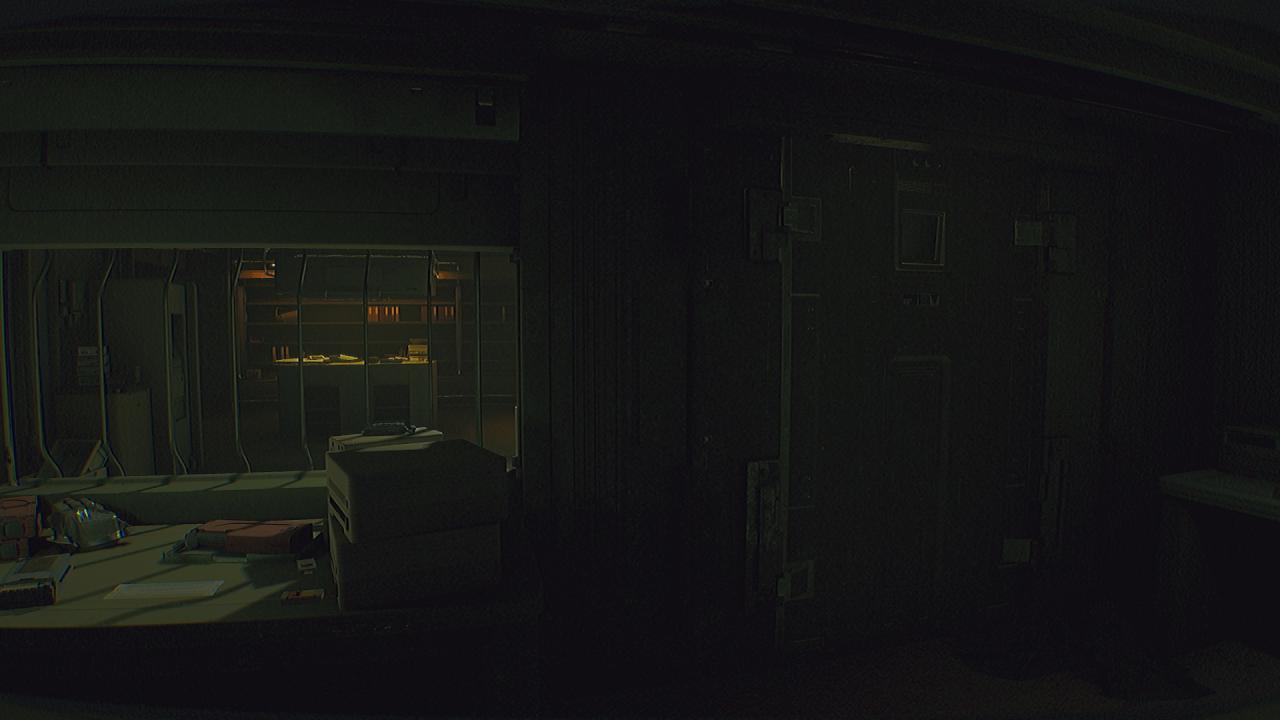
This location is from inside Reception, which is connected to Commons and the Arbour, and near the Elevator Entrance.
Having trouble seeing the icon?
Is there a tool you have at your disposal that can used to see things that are invisible to the naked eye?
Are you using the the Ultraview Module instead of the flash photography of the Interface Module?
Use the zoom key or button (shown in the settings) with the Ultraview Module activated to bring it closer to your vision so you can better see the symbol. Some symbols are very similar looking on the low-resolution display of the CAT.
The icon is randomized per playthrough, so this guide cannot show you the icon with any certainty that it would be the same icon you have in your game. However, for reference, this is what it should look like when using the Ultraview Module to see this symbol.
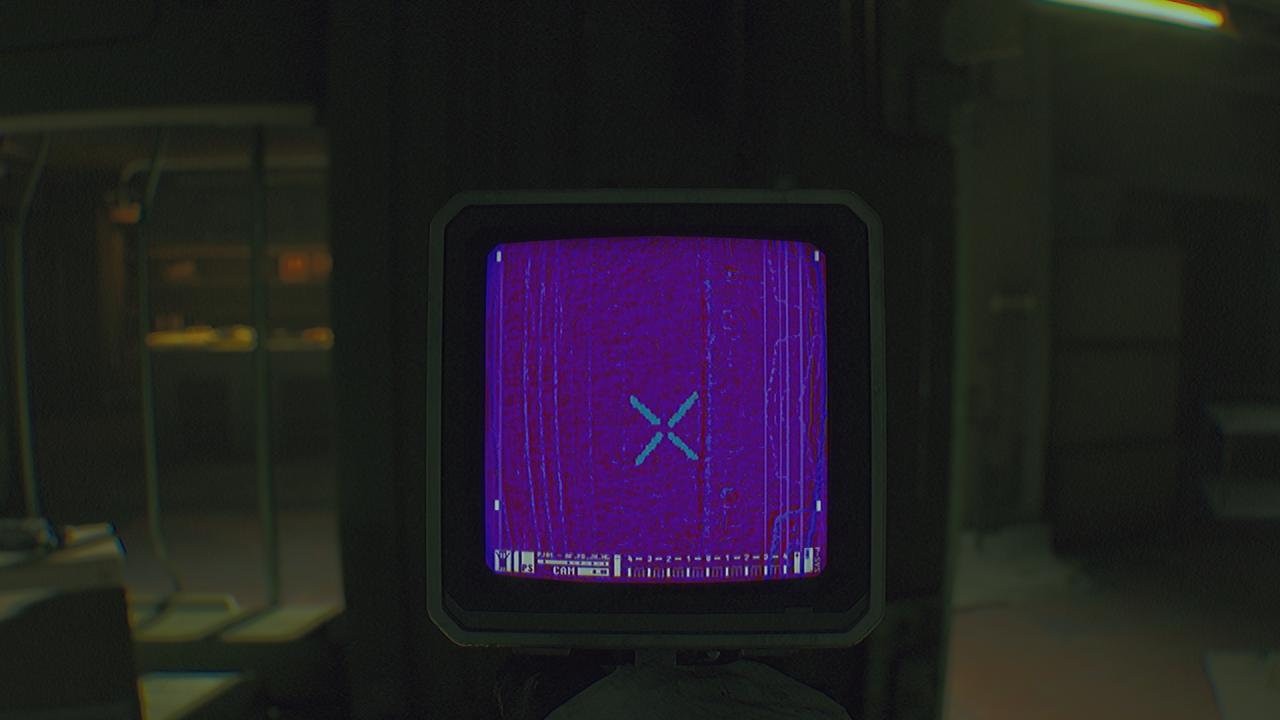
Write down, screenshot, memorize, or otherwise save the icon for later use in deciphering the code using the diagram in the locker.
Photograph #2
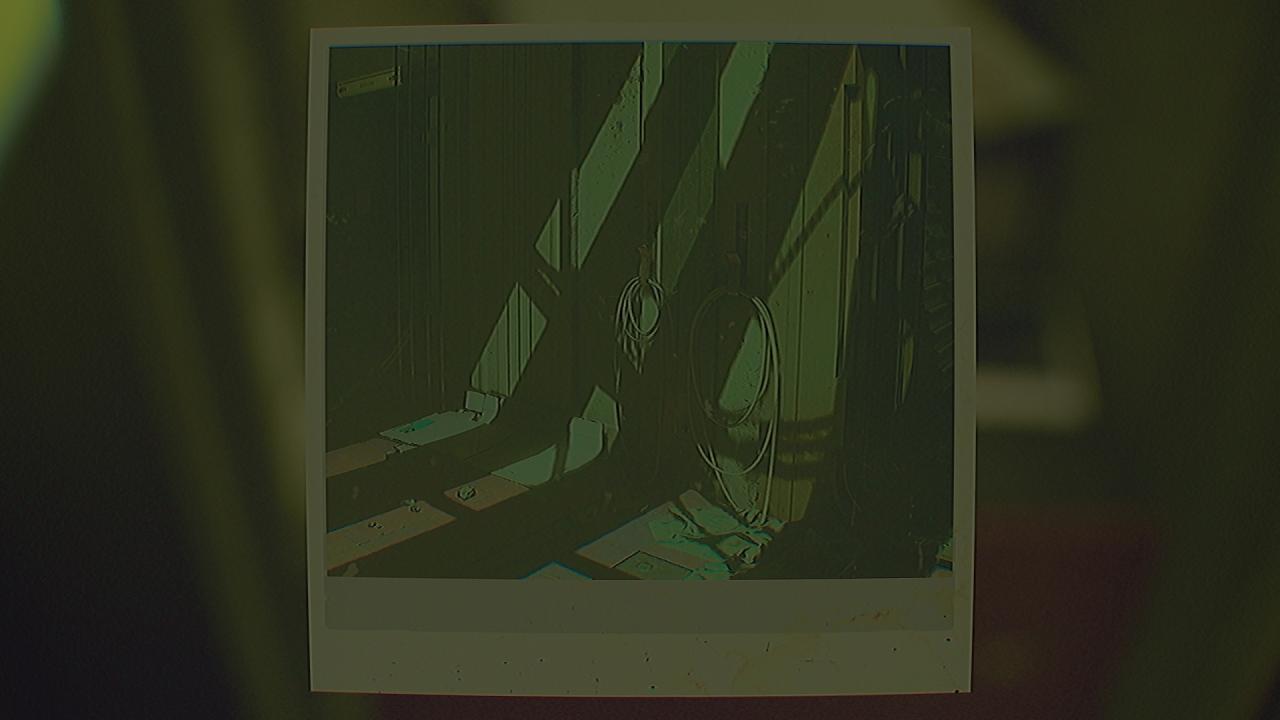
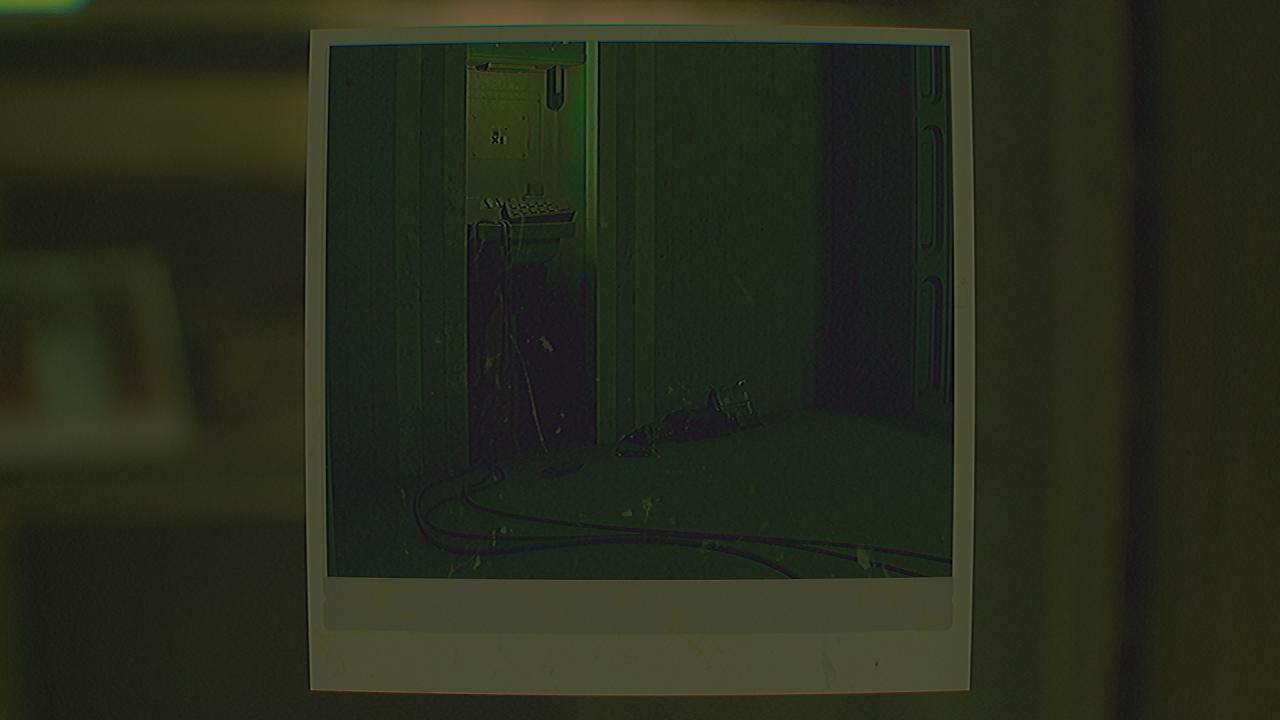
The photograph contains a door with long metal bars nearby, and two cords wrapped around hooks on the wall.
This photo has a door in it, so it must be near one of the 10 doors in the Ward. The name on the door seems short, and those metal bars seem unique.
Those cords are probably power cords, maybe they would be in the Systems department.
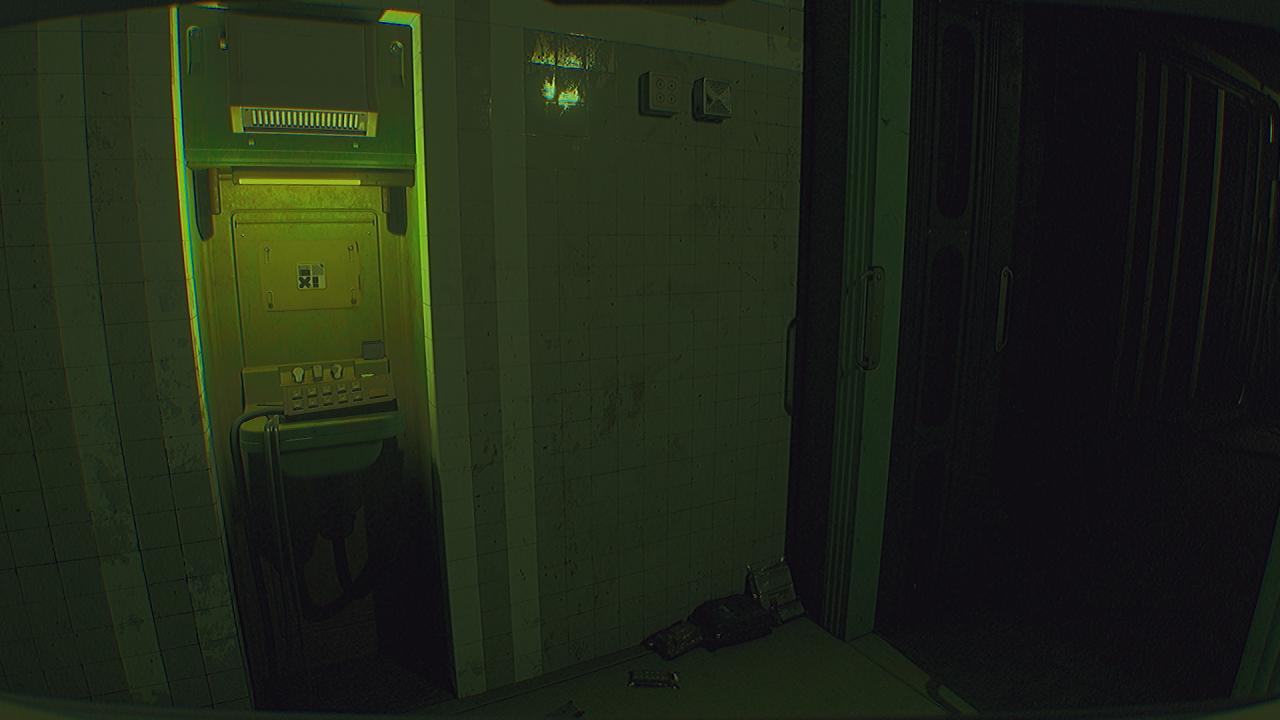
Below is a wider view of the location shown in the photograph.
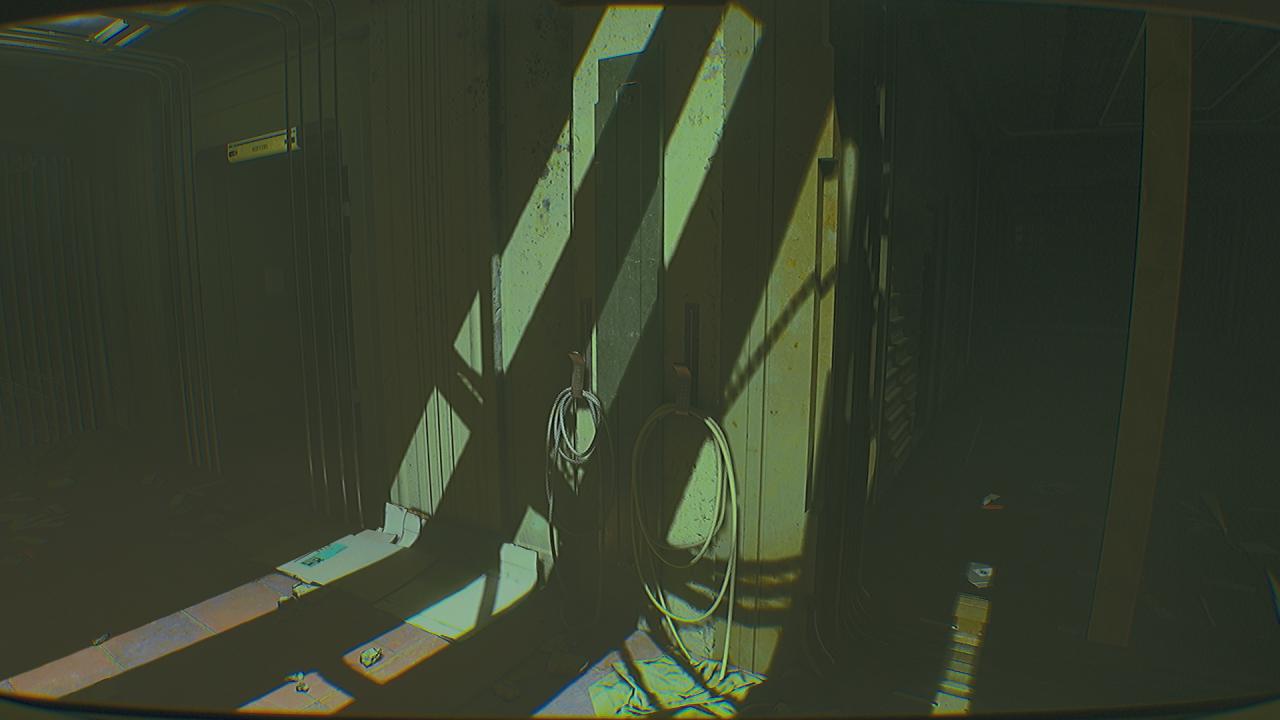
This location is inside Systems, which is connected to Imaging and the Arbour, right next to the Servers door. Going through the Systems door from Arbour will lead you here.
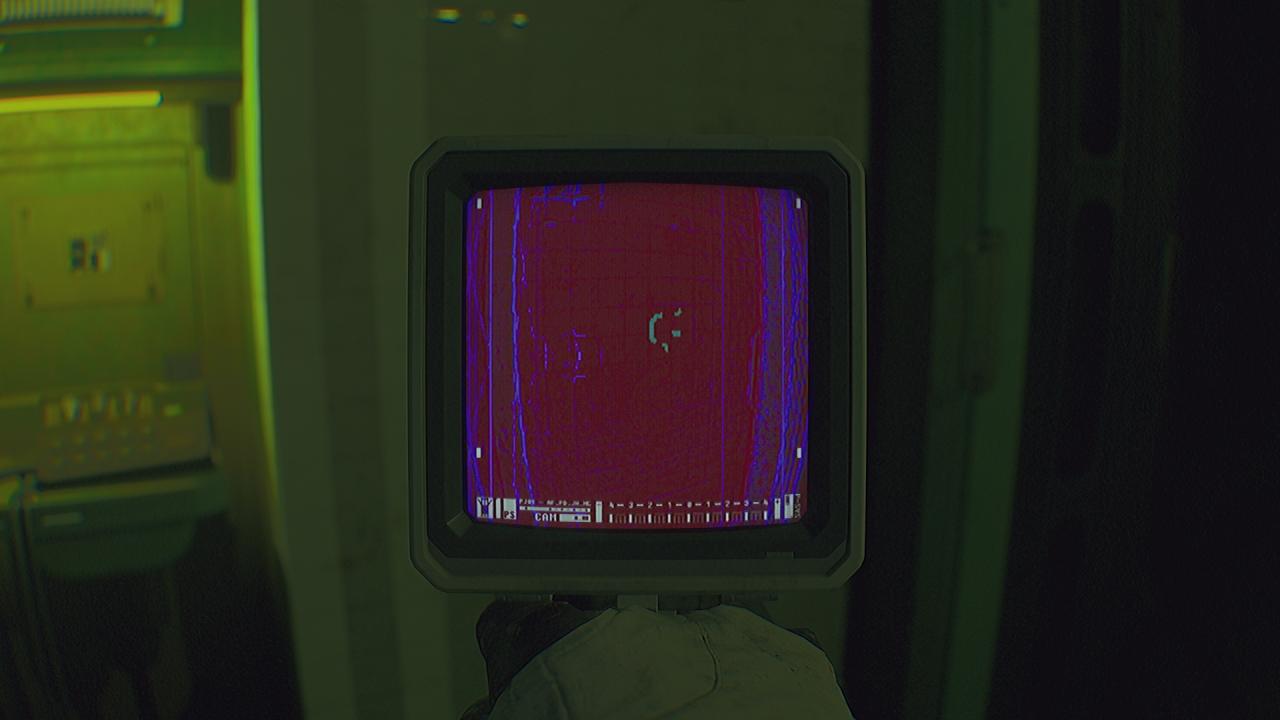
Having trouble seeing the icon?
Is there a tool you have at your disposal that can used to see things that are invisible to the naked eye?
Are you using the the Ultraview Module instead of the flash photography of the Interface Module?
Use the zoom key or button (shown in the settings) with the Ultraview Module activated to bring it closer to your vision so you can better see the symbol. Some symbols are very similar looking on the low-resolution display of the CAT.
The icon is randomized per playthrough, so this guide cannot show you the icon with any certainty that it would be the same icon you have in your game. However, for reference, this is what it should look like when using the Ultraview Module to see this symbol.
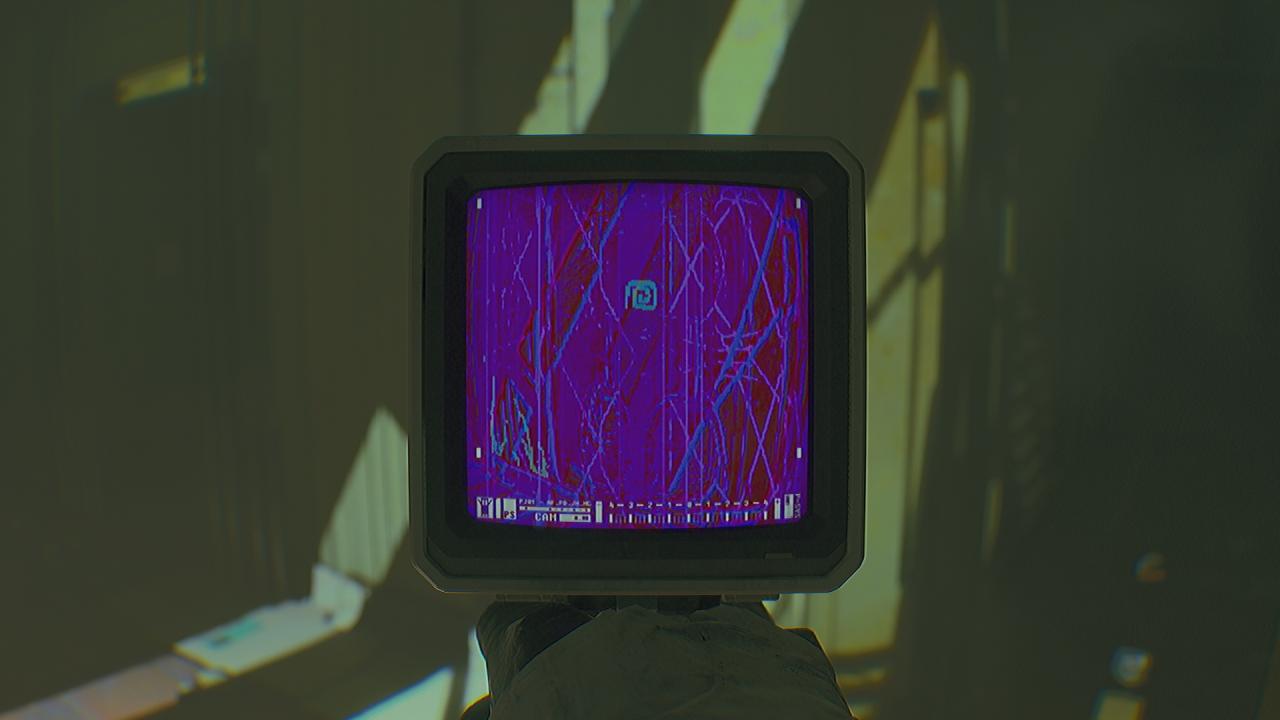
Write down, screenshot, memorize, or otherwise save the icon for later use in deciphering the code using the diagram in the locker.
Photograph #3
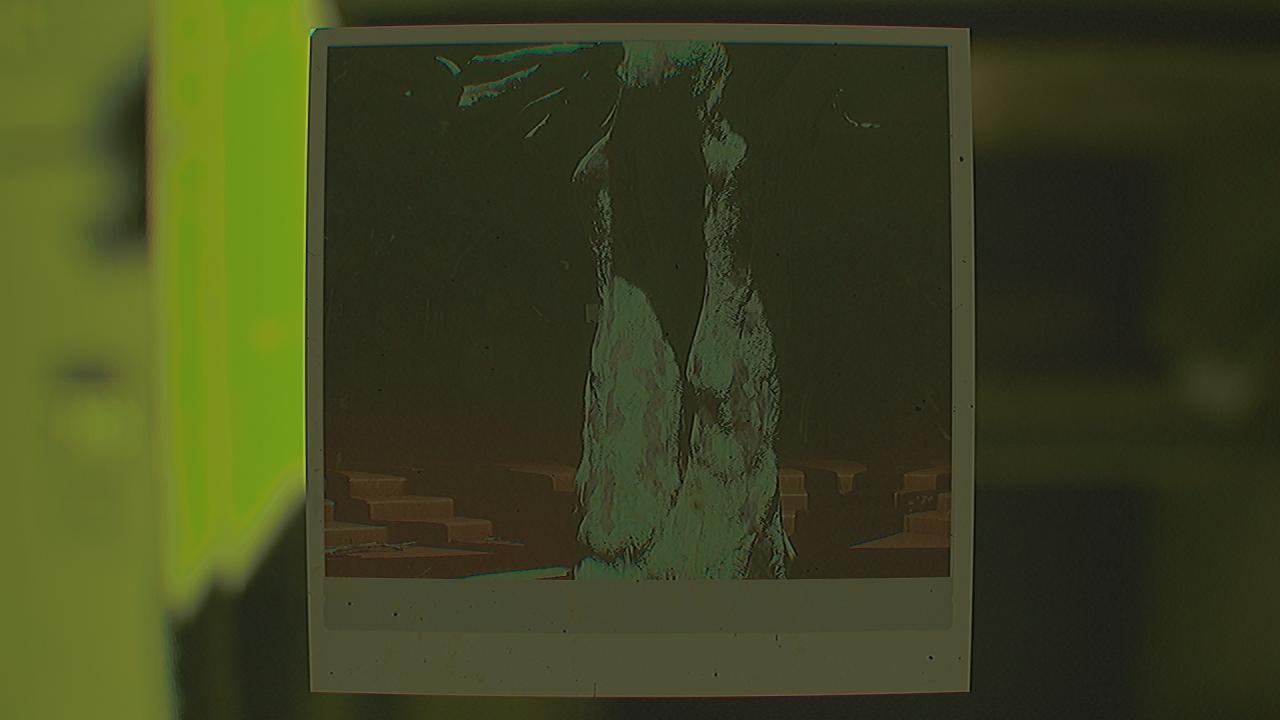
Probably the most recognizable photograph. It is of the apple tree in the Arbour.
Below is a wider view of the location shown in the photograph.
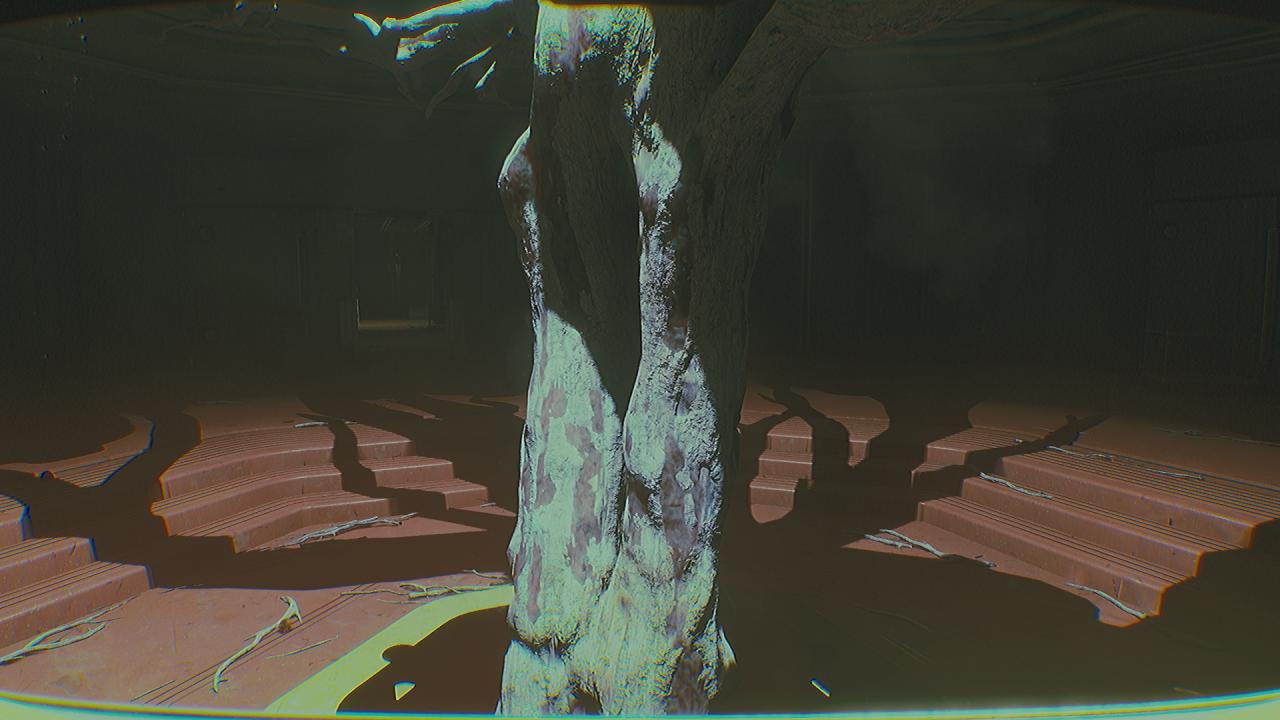
This location is on the side of the apple tree that faces the Imaging 01 door.
Having trouble seeing the icon?
Is there a tool you have at your disposal that can used to see things that are invisible to the naked eye?
Are you using the the Ultraview Module instead of the flash photography of the Interface Module?
Use the zoom key or button (shown in the settings) with the Ultraview Module activated to bring it closer to your vision so you can better see the symbol. Some symbols are very similar looking on the low-resolution display of the CAT.
The icon is randomized per playthrough, so this guide cannot show you the icon with any certainty that it would be the same icon you have in your game. However, for reference, this is what it should look like when using the Ultraview Module to see this symbol.
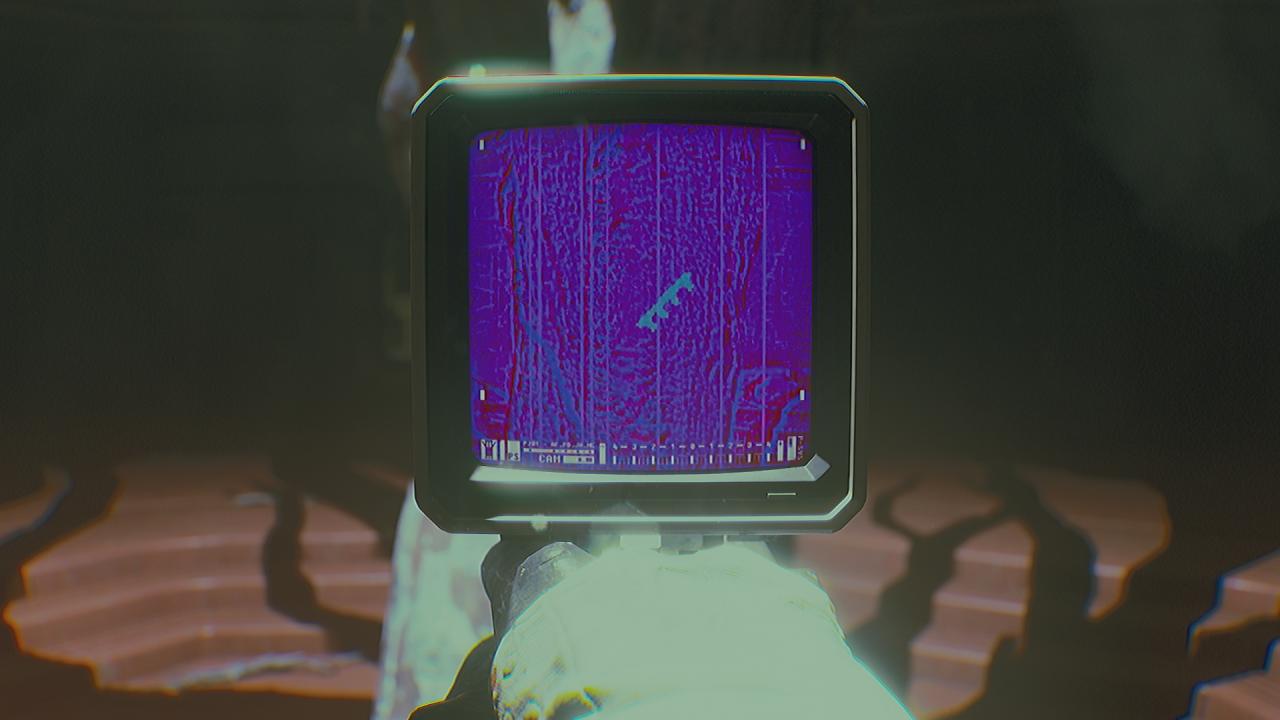
Write down, screenshot, memorize, or otherwise save the icon for later use in deciphering the code using the diagram in the locker.
Photograph #4
Probably the 2nd most recognizable photograph since you can see the keypad for this puzzle which you know is in the Restroom near Kali’s locker.
Below is a wider view of the location shown in the photograph.
This location is just to the right of the keypad in the Restrooms.
Having trouble seeing the icon?
Is there a tool you have at your disposal that can used to see things that are invisible to the naked eye?
Are you using the the Ultraview Module instead of the flash photography of the Interface Module?
Use the zoom key or button (shown in the settings) with the Ultraview Module activated to bring it closer to your vision so you can better see the symbol. Some symbols are very similar looking on the low-resolution display of the CAT.
The icon is randomized per playthrough, so this guide cannot show you the icon with any certainty that it would be the same icon you have in your game. However, for reference, this is what it should look like when using the Ultraview Module to see this symbol.
Write down, screenshot, memorize, or otherwise save the icon for later use in deciphering the code using the diagram in the locker.
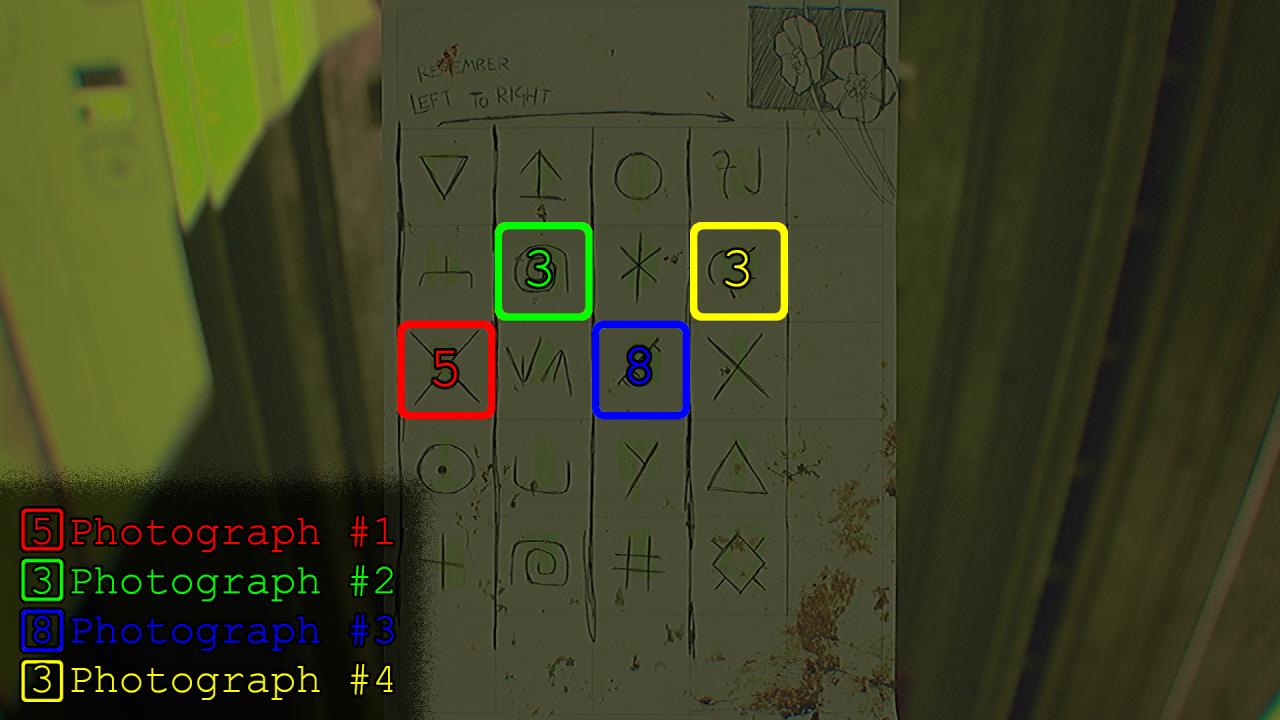
How do I use the Code Diagram?
Each location’s symbol should exist in its own respective column on the Code Diagram; if two symbols you found exist in the same vertical column as each other, then you need to go double-check those symbols because one of them is wrong.
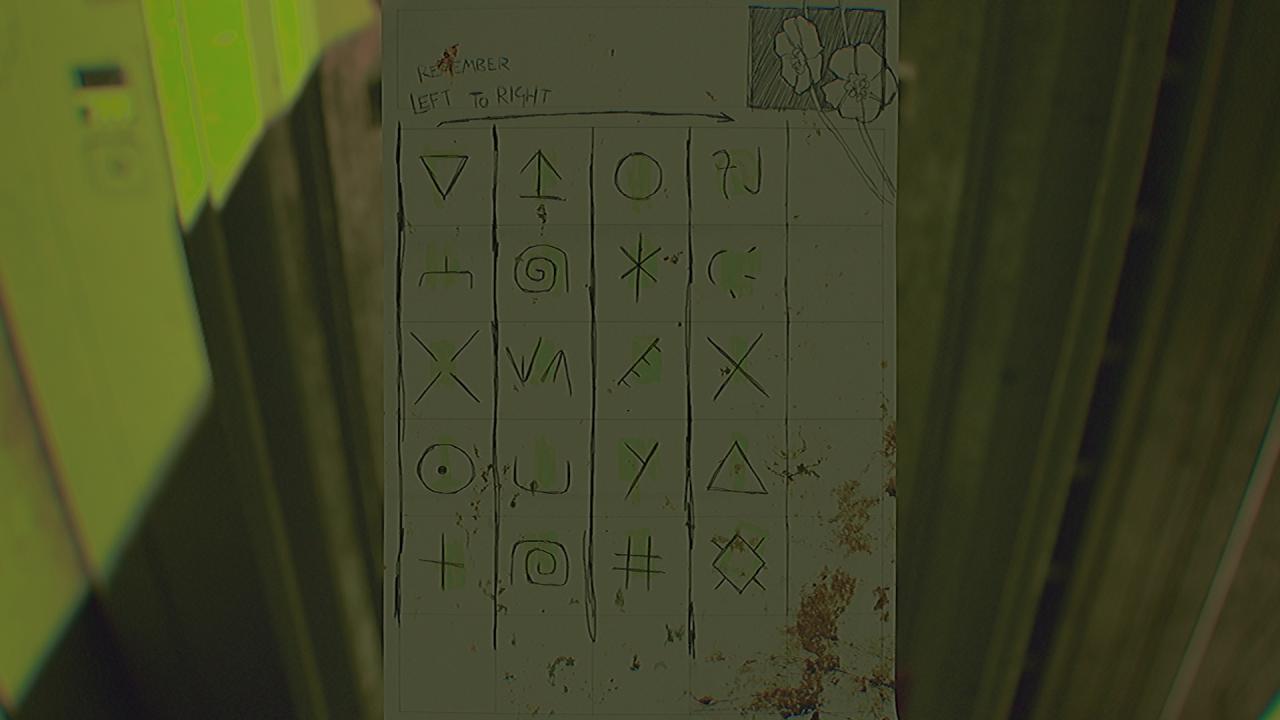
If you are following along with the examples given in this guide, this is what symbols were found in the guide’s playthrough.
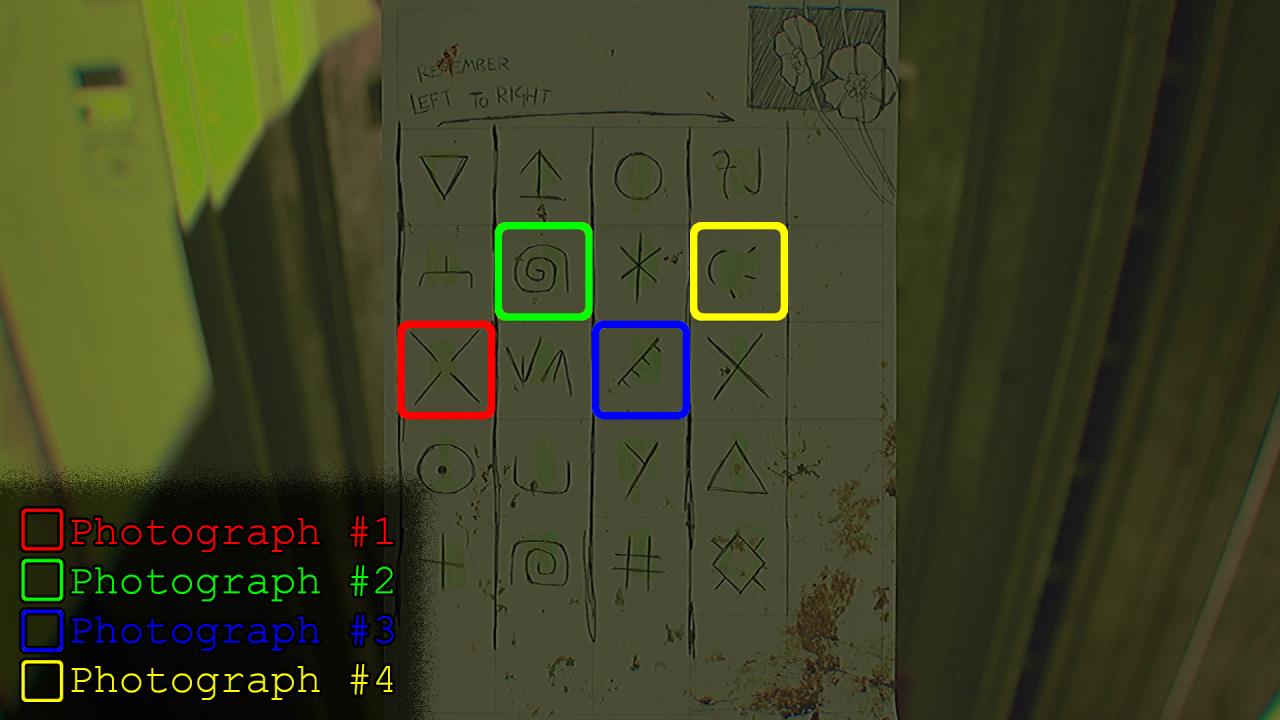
Your playthrough’s symbols will most likely be different!
There is an important note on the Code Diagram that says “Left to Right,” but how do we decipher these symbols into a four digit pin of numbers?
To do this, we need to use a feature that up to this point has not be necessary at all.
We must flip over the Code Diagram.
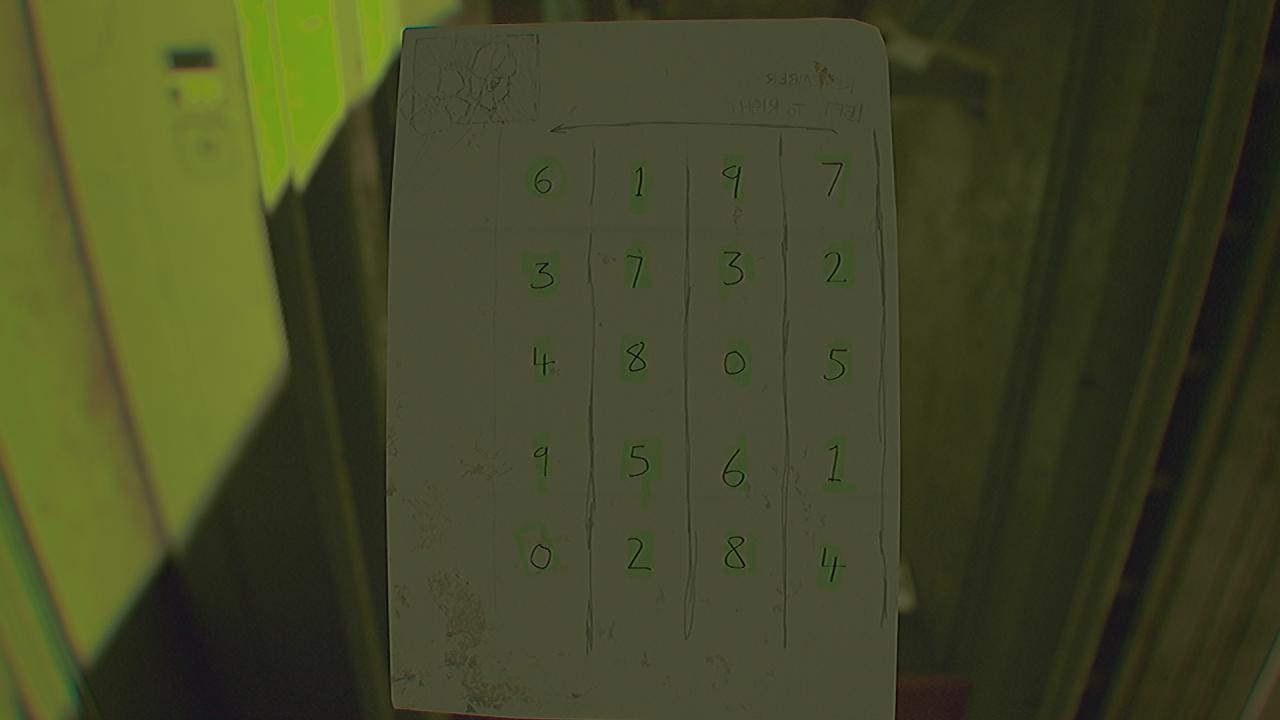
The most important part of this puzzle is that Mason held the paper up to a light and wrote the digits directly behind the symbols they correspond to. So, now that the paper has flipped, the leftmost column of symbols on the front correspond to the rightmost column of digits on the back of the Code Diagram.
This gif may explain it better.
With this, we know the numbers that correspond to each symbol in the photos.
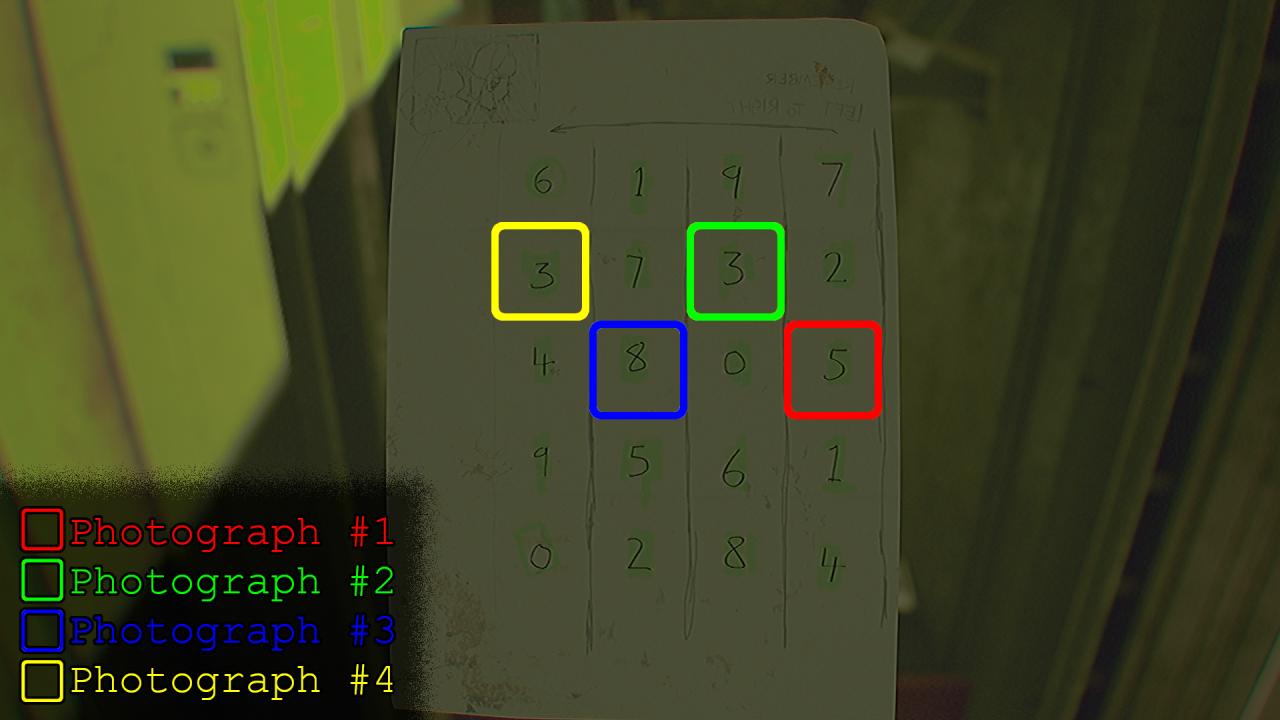
Now, we flip the Code Diagram back to the front, so we can have the exact sequence of the PIN.
The code was 5383 for my playthrough in this guide, but yours will most likely be different!
Where do I enter the PIN?
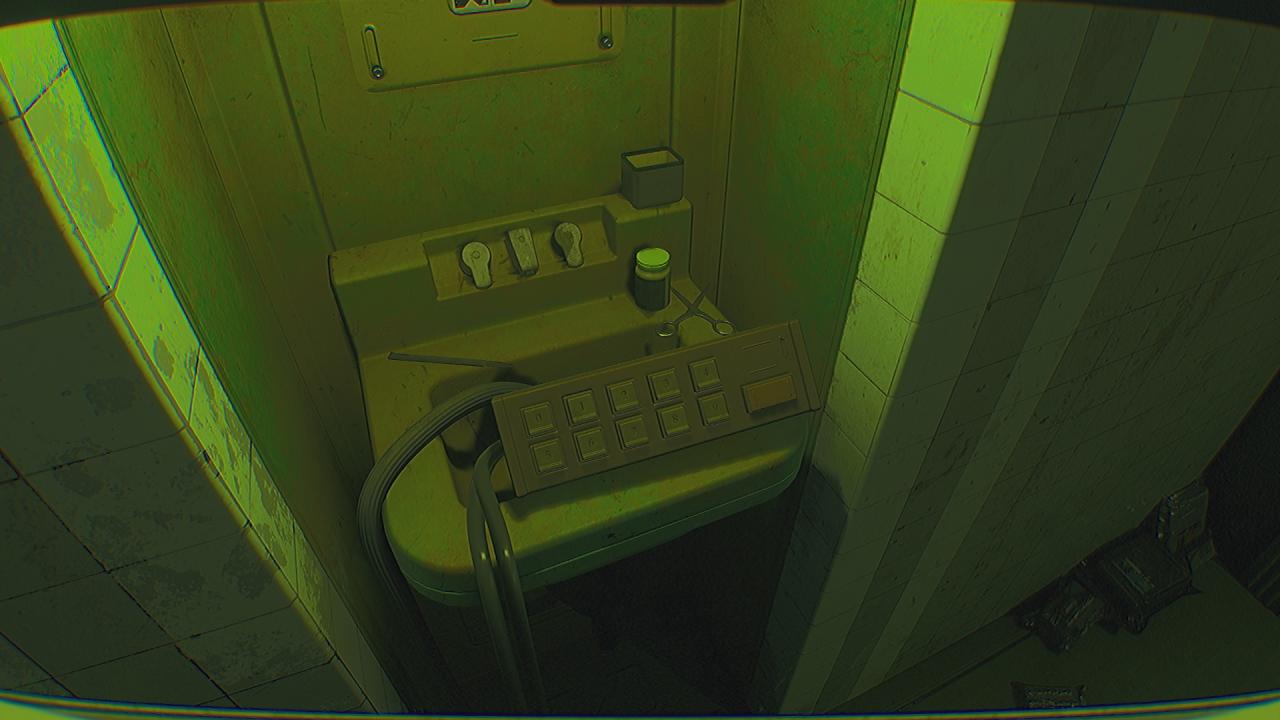
After entering the pin and hitting submit, the gate that the keypad is connected to will open.
Good luck.