This guide will/should help you get the “Green Hell” achievement in the quickest way possible.
Be mind-full that we are going to finish Green Hell story mode with the bad ending. If your looking for the good ending, pick a different mode and run with it as this is permanent death if you die! (Not really, but will go with that for now) This is about speed!!
*Side note:
This might be a low-down dirty way to getting the achievement, but after already running the story mission twice, I really don’t care to be invested into it a third time. Story mode wasn’t that good anyways. Its always some girl name Mia that gets us in deep ♥♥♥♥!! Remember Mia from RE7? She cut’s your hand off and got us into all kinds of weird ♥♥♥♥.. (Shame on Creep Jar for adding the achievements well after everyone has invested a great deal of time in this game, kinda why I don’t feel bad for taking this route!!! but I still love em tho)
So don’t judge me, and you shouldn’t if you are reading this and trying to get tips on how to do it the fastest way possible.
Lets do this!!
Preparation
I recommend you read through this guide first before attempting to play on Green Hell Mode if your not an expert at this game…
Never know, might find a tip that could save you from a restart
FYI:
I have died many times testing this. You might too, so please don’t think this is just a one attempt run, with any luck it is for you.
Some pointers to keep in the back off your mind while playing:
1. Try not to ever let your Macroelements(fats/carb/protein/water) level fall below quarter.
2. NEVER PASS OUT, if you are getting tired get to a bed.(Don’t tempt fate)
*** The above 2 are Priority Number One at all times through out the game!!***
3. Stick with the stone blade through out the whole game. Stone blade and bow is the only level we care about. Nothing else matters.
4. The object is to run pot to pot with minimal stops.
5. Stay out of the river, unless to wash. If you must cross rivers do so quickly!
6. At no point will I mention to collect stuff to heal wounds,(You can choose to if you want, but not necessary) with the exception of the aspirin bottles, collect all those.They are cure all)
7. Always assume you are being hunted. Tribesmen and Wild animals, keep in eye out for them at all times. They will come quick and harsh. Survival rate is less then 25% if not less, even if you do live, everything will deplete quite quickly! Were are only going to have bone armor.
Tip: Avoid tribesmen at all cost (if you do not get a head shot off on a tribesman, it take 3 or 4 shot to down them)and head shot Puma/Jaguar/Croc as soon as you see them coming at you. Always keep your ear out for alligators once you get in croc area, they will kill you if they get a hold of you.
8. Avoid running and jumping as much as possible as this will burn stamina quicker. Do bump runs, (push shift for a few sec. then let off) try to always keep your stamina above half bar.
9. Never run into a direction you haven’t been yet, as you can run into all kinds of trouble quickly.
10. Always be on the look out for snakes, spiders and scorpions. Always count on spiders and scorpions while in caves.
11. Steel Bidon: keep full at all times and try to only drink when near food that will kill parasites.
12. Pull leeches as soon as you see the magnifying glass. Leeches will drain your sanity quickly.
13. I highly recommend you do some practice runs on the path you are going to run to get familiar with the route you are going to take. The map will be the same, but what shows up might not be the same.(RNG is RNG.)
14. Always stay close to rock walls. This will aid you an only having to look in 2 directions, off to the side and forward. Not to say you might have to look back, but shouldn’t have to. Stay out of open areas as much as you can.
15. DO NOT jump from anything, scratches and abrasion will set you back.
16. Travel with only the essentials. Everything else is weight.
17. Once out of the first camp eat everything in you path to help keep stats up, try not to carry extras.
Map 1 Spawn-In
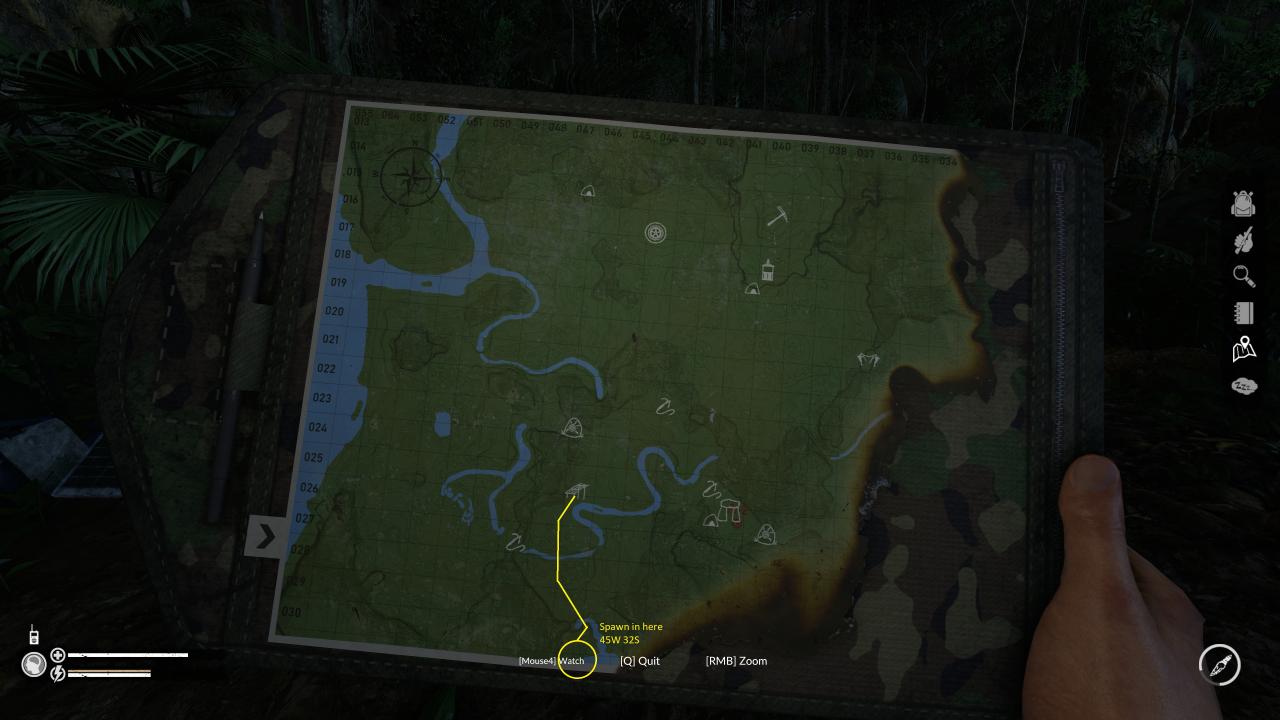
The First camp
As soon as you get to the top of the rock skip the tutorial. ((Press escape and click “Skip Tutorial”))
Tip: During the rest of the game, never talk to Mia unless you absolutely have to, wasted time and you don’t need to talk to her to progress the story, keep the walkie-talkie holster, besides shes just bad news and a Debbie downer. Do the same with all the papers, read only what you have to get by. You do need to read the first one in the backpack to make Ayahuasca drink.
Step 2:
When you gain control of yourself again, ((By the lake((45W,32S)) stay in this area to collect the following.
* Collect rocks and make 2 stone blades((Should be some right next to you))
* Collect rope
* Cut bushes to start them drying in your backpack((keep 3-6 dry leafs in your back pack at all time))
* Cut down skinny tree and make a bow and a spear. ((Fill your back back with twigs and sticks.))
* Keep an eye out for dead birds on your travels, pick up and harvest. Make arrows with the
feathers.((You Should have about 10-15 arrows all together. This is in case you shoot
something and it runs off, do not chase after it.)) Make head shot kills, practice on
spiders and snakes if need to, but don’t go out of your way to do this. Archery level not required to be high, just good enough to stop shaking so much.
Step 3:
Head to first camp. You are not far away from it. ((46W,26S))
We are going to spend as little time here as possible to get ready. This is the longest stay through out the rest of the game. The rest will all be one night stays or to renew energy or pass time.
***Below can be done an any order.***
* Build fire
* Find a coconuts, make a bidon.
* Pick up Map and read papers.
* kill animals for their bones and make bone armor.
* Cook meat.
* Prep pot for fire, but do not lite it yet.
* Collect Banisteriopsis((brown Vein X2)) and Psychotria Viridis((red berries X2)) while on travels.
Tip: When ever heading to the next pot keep an eye out for the above 2 ingredients. You should have these in your back pack at all times as to save time searching for them once you get to a pot.
* When you feel you are ready, lite the fire under the pot and play the cut scene. ((Do not replenish stats before lighting fire, as once you finish the cut scene you will be topped off!! Bonus!!))
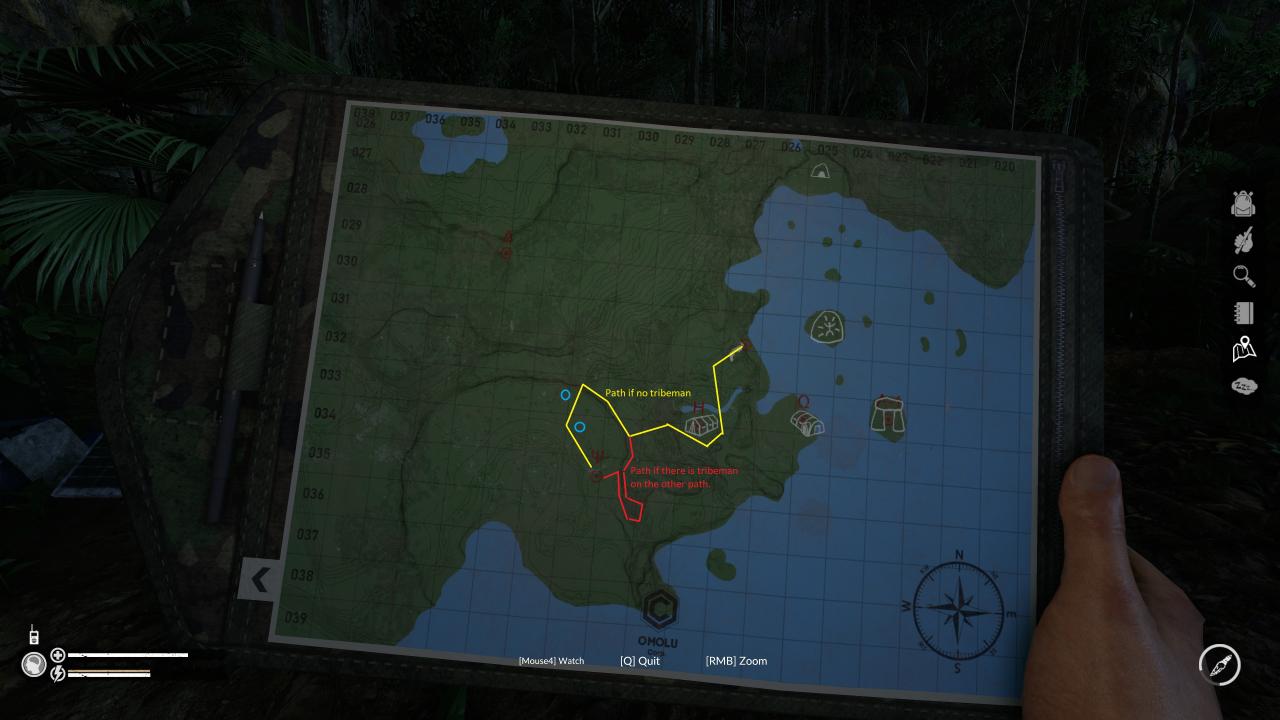
Map 1
Map Legend:
Yellow Line: Suggested Path
Blue Circle: Known Areas For Tribesmen

The Hook
1. Fill your bidons with water.
2. Make sure back pack is full on twigs, sticks. ((restock as needed, never run low))
3. Fire starter in check((make a couple and put the last one in your bag))
4. 3-6 dry leaves ((Always keep full, it will rain almost the whole game.))
5. Couple pieces of meat that restore energy.
6. Arrows Check((At least 5))
7. Archery level((At least 5))
8. 100% bone Knife ((Found @ First Camp))
9. 2 fairly good stone blades, 1 stone blade spear, 1 good bow((make a couple, use the last one made))
10. Top off what ever you can food and water wise((before bed))
It is time to go get the hook from the gold mine.
1. Wake up between 7:30 and 8:00 am(everyday, keep this schedule. Move only during the day)
2. Refuel
3. Start heading to the stone wall that was blocking the passage way.
4. Once your able to make a right turn(pass door) and head to the log.(stay on the path)
5. Cross the log and watch out for the snake that might be on the other side.
6. Stay on the stone ledge all the way to the rock mountain.
7. Once you get to the rock wall follow it until you see off to your left a huge clearing mud/down logs. Stay close to the rock wall.
8. once you cross over that clearing you should see the road that will lead you to the Jeep.
Danger warning: When you are traveling down the jeep path, keep your ear out for tribesmen singing. If this is the case, head up in the jungle on your right and make your way to the jeep. ((Be Careful of snakes and spiders)) As long as you stay out of site you will be fine.
9. Grab the supplies and gas can at the Jeep((44W,17S)) and move onto the gold mine. ((40W,18S)) Just keep on the path all the way to the elevator. keep in mind there could be spiders((walking across the river bed)) and snake((up by the logs)) in the river bed.
*You are in a generally safe area here. The idea here is to go down grab the hook, gather food supplies, aspirin bottle and get back up top as quickly as possible and get to the next pot before dark. Head down following the path, go down in the pit by plank come up the other side raid the buildings and get back to the top. ((There are known spiders around the building, so be careful. I have never seen a snake down here, but that not to say there isn’t, so still move with caution.))
*Once back up top be-line to the next pot following the same path until you reach the stone door then turn left at the rock wall.
Side Note: On your way out, there might be tribesmen just stay low and move past them.
Once you pass on the other side of the stone door, be on high alert for the Jaguar that lurks around here. ((I have never seen him before day 5, but just in case.))
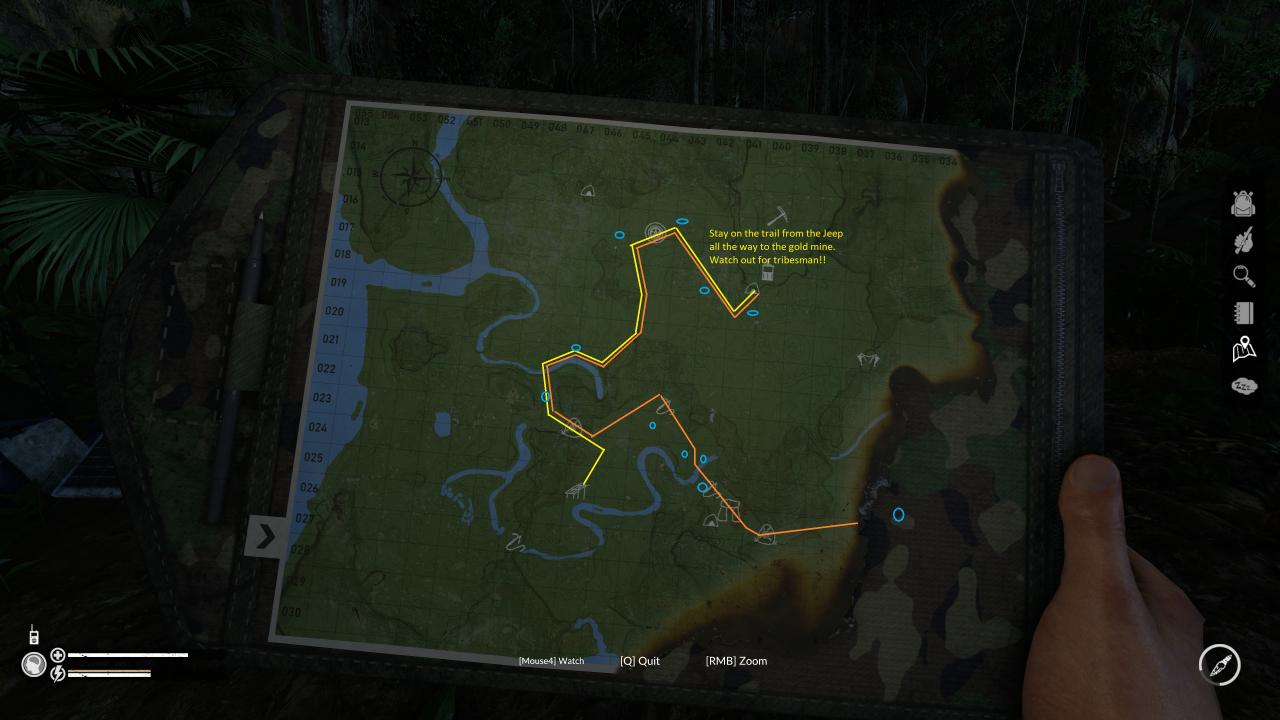
Map 1 Part 2
Orange Line: To Next Pot
Blue Circle: Known Areas For Tribesmen
Once the cut scene plays through and you are back at the pot, if you need to sleep till the next morning.
Wake up and top off your stats and move up the path to the next map.
EXTREME DANGER WARNING!!!
Approach the last log with caution. There could be a tribesmen there and there is definitely a croc down there. You should be able to see the croc once you come up to the log. I have come up on that log and saw the croc not to far away from the end of the log. What ever you do just be aware he IS there, even if you don’t see him. We are going to go straight across anaconda island, brief stop for supplies and keep moving to make it to the airport before dark.
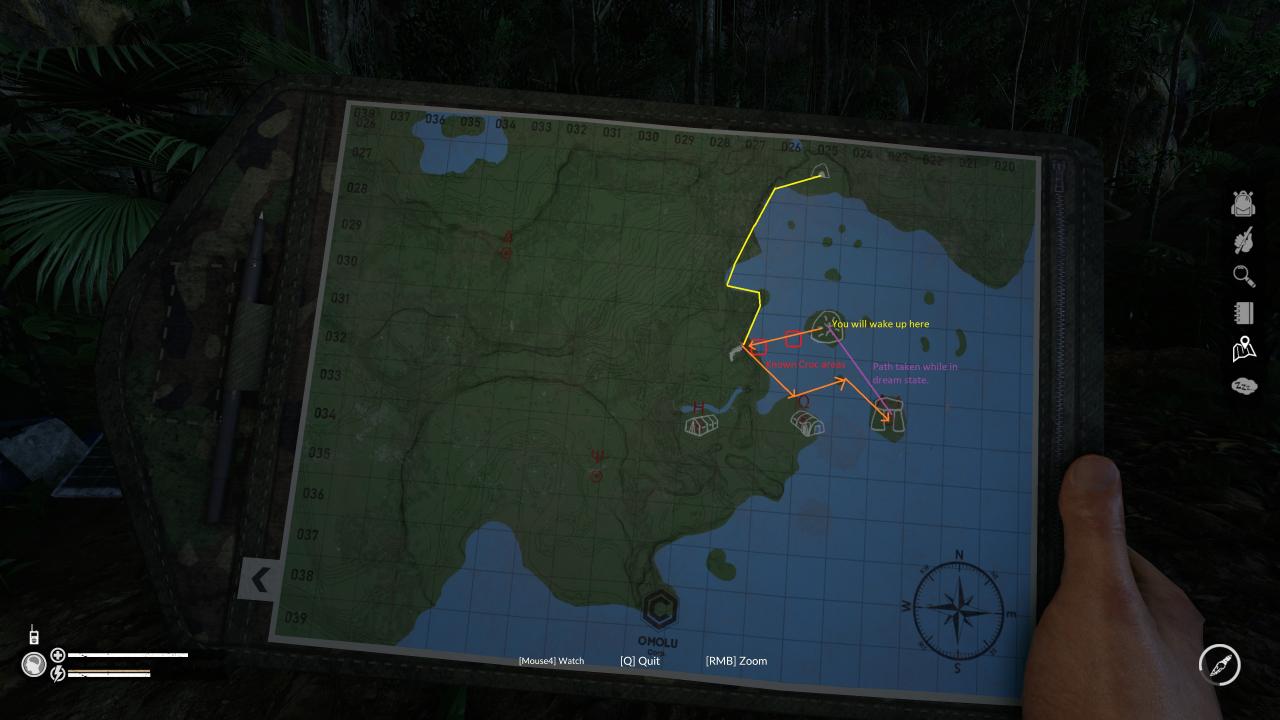
Map 2
Anaconda Island((35W,26S))
* Raid the camp.
* Sleep till morning if you need to.
* Wake up and top off stats.
* Exit the side with the full bamboo bridge.
* Make your way to the rock wall and find the trail that leads up into the mountain.
**Be-careful, there is all sorts of nasty’s that can be lurking between the bamboo bridge and the rock wall.
Map Legend:
Red Blocks: Know Area for Crocs.
Yellow Line: Suggested Path.
Blue Circles: Know Area fro tribesmen
The Airport
* Make sure you are full on water before heading to the airport as there is no way to get water up there.
* When at the airport keep your eye out for the Puma roaming around. There is also a chance of 2-3 spiders on the trail leading back down to the zip line. There is a snake and tribesmen known to be behind the shed.
* Go fix the broken wire and talk on the radio.
* Once you have finish talking on the radio grab the key and head to the shed with the lock on it. * *
* Take anything you can in the shed and raid the buildings with with the radio.
* Tonight we sleep on a comfy bed.
* Wake up top off your stats and head to the zip line. ((Be careful of spiders!!!))
* When you get to the zip line, it pretty straight forward and safe until you come out the other side.
Map 3 Part 1 (Swamp)
Staying close to the wall and make your way to the spot where you have to use the grapple gun to get up.

Map 3 Part 2 (Swamp Pot)
Map 3 Part 3 (Final Push)
Now you are at the last pot hopefully you got all the ingredients and don’t have to go look for some. Light that ♥♥♥♥♥ up and congratulations on getting you “Green Hell” achievement!!!!