
Transport Fever 3 dropped a feature I relied on constantly in the previous game: the game no longer tells you how long a train consist needs to reach its top speed, or how much track that takes. If you are laying out stations and junctions and wondering why your shiny new express train never actually hits its advertised speed, this guide is for you. I walk through the math myself, both the quick approximation and the exact equations, so you can punch in a few vehicle stats and get real numbers before you commit to a layout.
I put this together because eyeballing acceleration distances in Transport Fever 3 kept burning me — you think a stretch of track is long enough, the train crawls for half of it, and suddenly your timetable is nonsense. Doing the calculation by hand takes five minutes and saves a lot of guesswork. One thing to keep in mind from the start: everything below is metric, and it assumes flat ground, so treat the results as a solid baseline rather than gospel on a hilly map.
How the Equations Work
The core idea is simple: you swap the letters in the formulas for the actual values of the vehicle you are looking at. P is the engine power, F is the tractive effort, and m is the mass of the vehicle. Those are the three inputs you pull straight from the vehicle’s stats panel.
The one conversion that trips people up is velocity. The formulas want V in meters per second, so you divide the speed you see in the game by 3.6. A train with a top speed of 100 kph goes in as 100/3.6, which is roughly 27.8 m/s. Don’t skip this step — plugging in the raw kph figure will give you wildly wrong results.
The nice part is that V doesn’t have to be the top speed. You can enter any speed you care about. If I want to know how long the Metroliner takes to reach 160 kph, I just enter 160/3.6 ≈ 44.4 instead of its maximum. That flexibility is genuinely useful when you only need a train to hit a specific cruising speed rather than redline. In the formulas, t is the time the consist needs in seconds, and d is the distance it covers in meters.
The Simplified Version
If you want a fast answer and don’t mind a bit of optimism, use the simplified equations. This version assumes tractive effort is infinite, which strips the formulas down to something you can run in your head or on a basic calculator.
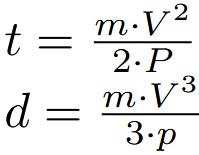
Because it pretends traction is unlimited, this method leans low — it will tell you the train accelerates faster and in less distance than it really does. How far off it lands depends heavily on the vehicle. When tractive effort is low relative to top speed and power, the error grows. I’ve seen the distance-to-top-speed figures for the IC 125 and the ETR 450 come out 13% lower with this formula, and the EMD AEM 7 is off by a hefty 22% regardless of wagon weight. Those are the cases where the shortcut stops being good enough.
On the other end of the scale, some vehicles barely notice the simplification. The Schienenbus is only about 1.2% off, and the EMD F-Series sits around 2%. So the quick version is fine for a rough sense of scale, but if you’re working with a high-power locomotive that has traction as a limiting factor, reach for the full equations below instead. Picking the right method here matters more than people expect — a larger map unlock guide is all well and good until your express train still can’t reach speed on the new space.
The Full Version
When you need the exact numbers, these are the equations that actually account for tractive effort. They take longer to work through, but they’re the ones I trust when a layout really has to be tight.

Things Worth Knowing Before You Plan Track
A few points I’ve learned to keep in mind, because they change how you apply the results in practice.
- The equations work just as well for buses, trams, and trucks — it’s not a train-only tool.
- All of this assumes a flat surface. Grades will throw the numbers off.
- Loaded vehicles, cargo haulers especially, get significantly heavier and will need more time and distance to accelerate. Calculate with the loaded mass, not the empty one.
- If you want a vehicle to reach a specific speed, add the braking distance from that speed on top of the acceleration distance when you’re sizing the total track length. Forgetting the stopping stretch is an easy way to run out of room.
- The distance equation (the complicated version) and the TpF 2 built-in calculator for flat terrain give slightly different values, and both are a little off from measured acceleration distances. So treat every result as a close estimate rather than an exact figure.
That last point is really the whole philosophy here. These formulas give me good enough numbers to plan confidently, and that’s what the old automatic feature was doing for me anyway. Do the math, leave a little margin, and your consists will behave the way you expected them to.