
This one’s for everyone who has pushed their factory far enough to unlock the reset loop in Can ‘Em All — the point where you cash in your whole operation and walk away with permanent bonuses. I’ll walk you through every permanent upgrade the game offers, what each one actually does for your runs, and the order that made the most sense to me while working through this content.
I wrote this up because the upgrade menu dumps everything on you at once with almost no guidance, and spending your hard-earned gears on the wrong thing early really stings. You’re looking at roughly 530 gears to buy the full set, so knowing what to prioritize before you start buying saves a lot of regret later.
Selling Your Factory and What Comes Next
If you’ve gotten far enough to sell your factory for permanent bonuses, congratulations — you’ve cleared the hump that trips up a lot of players. From here the loop changes: everything you grind feeds back into these one-time purchases, and each reset makes the next run faster. The full catalog costs about 530 gears total, which sounds intimidating until you see how quickly resets start paying for themselves once you have a couple of the right upgrades.
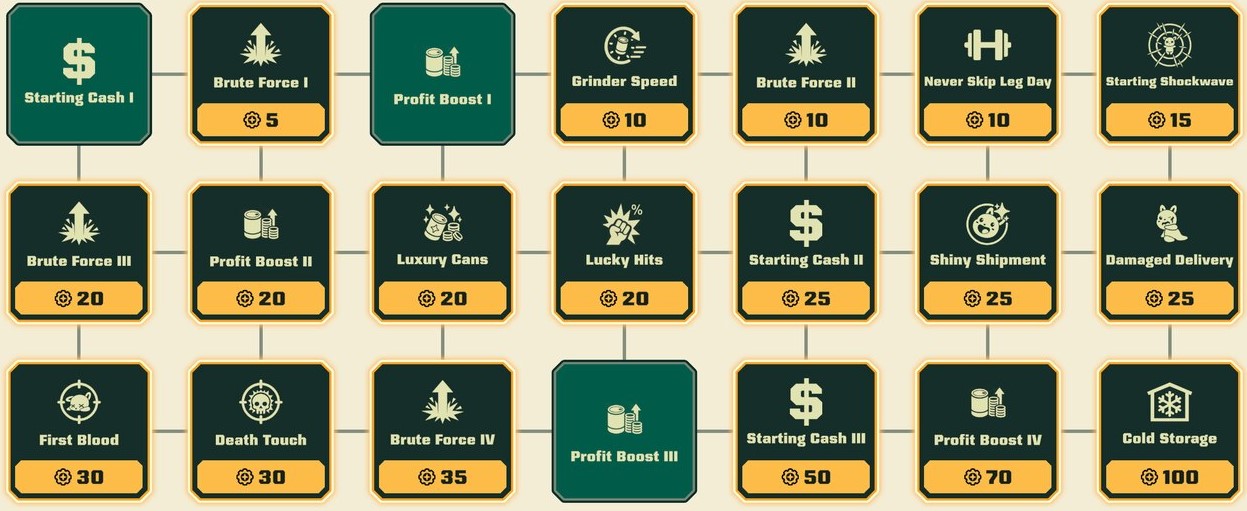
Damage Buffs
The damage side of the tree is where I’d spend my early gears after securing one economy upgrade, because faster kills means faster deliveries means more income overall.
| Upgrade | Cost (Gears) | What It Does | My Rating |
|---|---|---|---|
| Brute Force I | 5 | +100% damage output | Essential |
| Brute Force II | 10 | +100% damage output | Essential |
| Brute Force III | 20 | +100% damage output | Essential |
| Brute Force IV | 35 | +100% damage output | Optional |
| Starting Shockwave | 15 | Boost to shockwave trigger odds | Essential |
| Lucky Hits | 20 | Boost to critical hit chance | Skip early |
| Damaged Delivery | 25 | Part of each delivery arrives wounded | Optional |
| First Blood | 30 | Bleed effect | Skip early |
| Death Touch | 30 | Chance to instant kill | Skip early |
The four Brute Force tiers each grant the same 100% damage increase, so there’s no reason to buy them in order — grab whichever is cheapest first and work your way up. All four together run 70 gears and form the backbone of your damage scaling.
Starting Shockwave was a standout for me. Boosting the odds of the shockwave going off means it instantly kills the lowest few critter tiers for you, which saves both time and ammo. That kind of passive clear is worth the 15 gears without question. Damaged Delivery pairs nicely with it later, since part of each delivery shows up already wounded and dies easier — great for quick culling on higher tier critters, but I’d get the shockwave boosts first.
As for First Blood, the bleeding helps but never impressed me enough to chase it early. Death Touch has its instant-kill chance, but I’d rather build dependable damage first and treat this as a victory-lap pickup later. Lucky Hits is a straight crit chance boost — decent, just not where your first gears should go.
Profit Buffs
This is where the real compounding happens, and it’s the branch I’d study most carefully before spending anything.
| Upgrade | Cost (Gears) | What It Does | My Rating |
|---|---|---|---|
| Profit Boost I | 5 or 10 | +100% profit | Essential |
| Profit Boost II | 20 | +100% profit | Essential |
| Profit Boost III | Unlisted | +100% profit | Essential |
| Profit Boost IV | 70 | +100% profit | Optional |
| Grinder Speed | 10 | Faster grinding, frees up machines | Essential |
| Luxury Cans | 20 | Shiny cans worth more | Skip |
| Shiny Shipment | 25 | First daily load arrives shiny | Essential |
| Cold Storage | 100 | Leftover meat persists overnight | Essential |
The Profit Boost tiers each add 100% to your profit, and just like Brute Force you should buy cheapest to most expensive to stretch every gear. The whole line runs over 100 gears total — the base cost on the first tier is either 5 or 10 depending on your run, and the third tier’s price escapes me, so treat those numbers as approximate.
Grinder Speed is sneakily one of the best value purchases in the entire tree. Getting things ground faster frees up your machines, and since the game seems to cap how many objects can exist at once — including the pile sitting in the grinder — pushing them through means fresh meat flows in faster. Ten gears for a big net profit boost is a steal.
Shiny Shipment makes your first load of meat every single day arrive shiny, every mob included. That’s a huge daily income spike for 25 gears, and I’d have it well before touching Luxury Cans, which I found to be the least useful pickup in this set despite the shiny can value bump.
Cold Storage is my personal favorite. Anything that didn’t get ground up at the end of the day is still waiting for you in the morning, along with any surviving cutelings if you let any live. It smooths out the daily rhythm in a way that genuinely changed how my runs felt.
Restart Speed
The Starting Cash line gives you a lump of money to open your next run with, in three tiers: I, II (25 gears), and III (50 gears). I remember Starting Cash III handing over 20k to unlock things with, and that jumpstart does a lot to bypass the early slow grind. If you want to skip the boring opening of each run, this is the branch for you.
Movement
Never Skip Leg Day (10 gears) makes your stamina burn slower, giving you more running time. It’s nice, but since unlimited stamina is fairly easy to reach anyway, I put this very low on my priority list.
What I’d Buy and What I Actually Did
My honest recommendation: grab Cold Storage the moment you can afford it, then work your way up from cheapest to most expensive. Leave Never Skip Leg Day, Lucky Hits, First Blood, and Death Touch for last, then circle back once everything else is purchased.
Here’s exactly how my resets went. My first reset landed at just over 125 gears, and I picked up Cold Storage, Starting Cash I, Brute Force I, Profit Boost I, and Grinder Speed. On my second restart at 160 gears I added Brute Force II and III, Starting Shockwave, Profit Boost II, Starting Cash II, Shiny Shipment, Luxury Cans, and Damaged Delivery. Third restart came at over 275 gears and I grabbed everything else — I honestly didn’t realize I’d gained so much so fast.
One thing worth knowing before you dive in: if you’re carrying progress over from the demo, it’s worth reading up on how to transfer demo save to full game so none of that early grind gets left behind.
The End
That’s the full permanent upgrade picture. If you take nothing else from this, let it be Cold Storage first and cheapest-to-priciest after that — it kept every one of my resets moving in the right direction.